This facility enables you to view documents available on the system uploaded for a member. These documents may be uploaded for the service Request using the Load Document menu selection. (Refer to Load Document below).
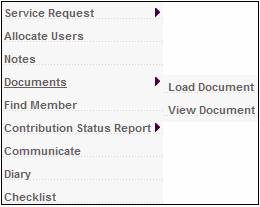
To view a document, highlight a service request on the JU7AB Work Management List screen and select Service Request from the sub-menu on the left. When the drop-down list is displayed, select View Document.
The Documents Uploaded screen will be displayed.
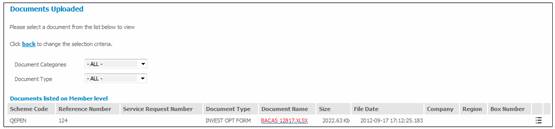
The following columns are displayed:
|
Document Categories |
The category of document uploaded for the member, e.g. Actuarial, Claim Document, General, Tax Document etc.
Select the category of document to be viewed from the drop-down list. |
||||||||||||||
|
Document Type |
The type of document uploaded for the member.
The system defaults to ALL and all documents for the service request will be displayed. If you want to display documents of a particular type only, select a type of document from the drop-down list.
If you want to display documents that are in a different document category, select a different category from the Document Categories field.
The Document Type field values displayed for selection are determined by the Document Category selected in the Document Categories field. |
||||||||||||||
|
Scheme Code |
The code of the scheme. |
||||||||||||||
|
Reference Number |
The reference number of the member. |
||||||||||||||
|
Service Request Number |
The unique number identifying a service request. |
||||||||||||||
|
Document Type |
The type of document uploaded for the member. |
||||||||||||||
|
Document Name |
A hyperlinked name of a document uploaded for the member.
*** alongside a document indicates that the document is for the selected service request number.
Note: Files with txt, PDF, HTM, HTML, Doc or Docx extensions can be viewed.
When an SMS or EMAIL has been sent, the system will save the records to the member record by updating Documents Uploaded. When the Document Name column is selected, information will be displayed as per the table below for each document type:
|
||||||||||||||
|
Options Button |
Refer to the Options Button section below. |
||||||||||||||
|
Size |
The size of the document uploaded. |
||||||||||||||
|
File Date |
The Timestamp for when the document was created. |
||||||||||||||
|
Company |
Select a Company from the drop-down list. |
||||||||||||||
|
Region |
Select a Region from the drop-down list. |
||||||||||||||
|
Box Number |
The Box Number where the document is stored.
This field is alphanumeric. |
||||||||||||||
|
Options Button |
To capture Storage Information for the document, click
The Storage Information screen will be displayed.
This screen allows for the capture of the Company, Region and Box Number. |
Options Button
Click ![]() to display a list of the following additional functionality:
to display a list of the following additional functionality:
- Move (to other SR)
- Delete
- Exit
![]()
Details of these functions are as follows:
|
Move (to other SR) |
Select this option in order to detach this document from the current Service Request and attach it to another Service Request.
The following field will be displayed.
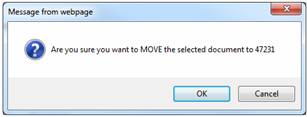
Capture the new Service Request Number in the Enter SR Number field and click MOVE.
The following message will be displayed:
Are you sure you want to MOVE the selected document to (new number)
Click CANCEL to cancel the move or click OK to confirm the move.
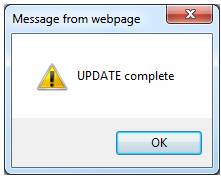
The following message confirming the move will be displayed:
UPDATE complete
Click OK to remove the message.
Note: The Timestamp for the creation of the new SR will be the same as the Timestamp of the old SR. |
|
Delete |
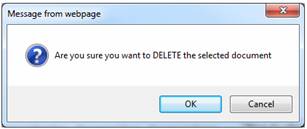
Select this option in order to delete this document.
The following message will be displayed:
Are you sure you want to DELETE the selected document.
Click CANCEL to cancel the deletion or click OK to confirm the deletion.
The following message confirming the deletion will be displayed:
UPDATE complete
Click OK to remove the message. |
|
Exit |
Select this option in order to close the Options Button functionality. |
To filter the list of documents by type, select a file type from the drop-down list in the Document Type field. All documents that have been defined as the selected file type will be displayed in the Document Name column.
To view a document, click a hyperlinked document name in the Document Name column.
If the service request was created via mailbox, the original e-mail that was received from the Client from which the service request was created will be displayed.

If the service request was created via mailbox and the e-mail attachment is in PDF format, a split screen will be displayed.
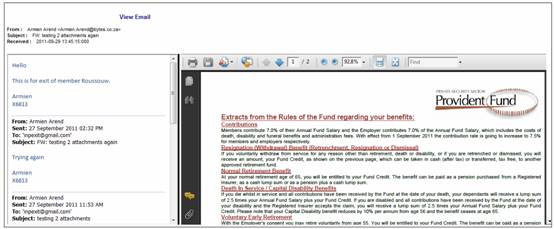
The left side of the screen displays the original e-mail that was received from the Client from which the service request was created.
The right side of the screen displays the e-mail PDF attachments to the original e-mail.