This functionality enables the system to be configured by creating and adding Data Elements to the Data Dictionary, defining Masks and mapping selected Data Elements.
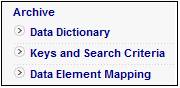
Select System Config from the top menu. The following sub-menu options will be displayed for selection on the left.
Data Elements are store in a Data Dictionary. The Data Dictionary contains all data elements (fields) used for a system.
To display the Data Dictionary for the System, select Data Dictionary from the sub-menu on the left.
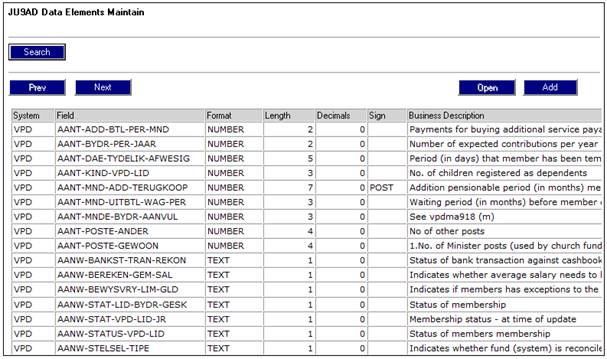
The JU9AD Data Elements Maintain screen will be displayed.

This screen displays all Data Elements defined for the selected System.
Open
To view the details of an existing data element, highlight a field and click OPEN.
If the Data Element selected has already been used, the following message will be displayed:
Please note that the selected Data Element has been used and cannot be modified.
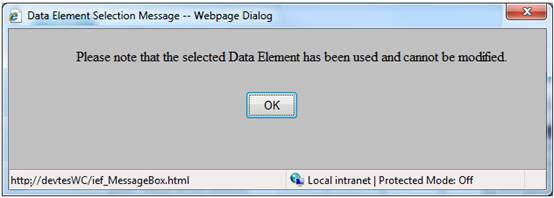
Click OK to remove the message. Click ADD to create a new Data Element.
If the Data Element can be modified, the JU9AD Data Element Maintain screen will be displayed.
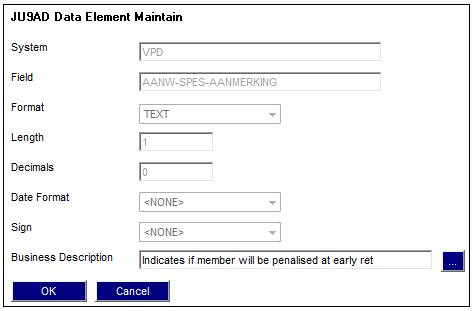
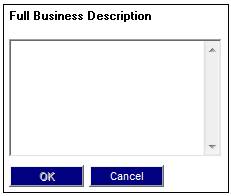
The Business Description field may be modified. To modify the Description, click the LINK button alongside the Business Description field to display the Full Business Description screen.
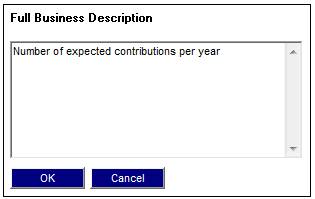
Modify the text and click OK.
Add
To add new Data Elements click ADD.
The JU9AD Data Elements Capture screen will be displayed.
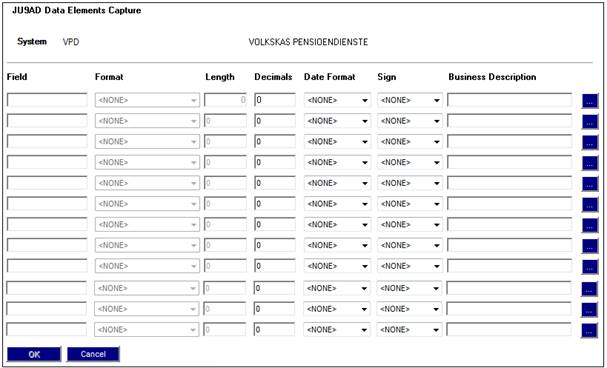
To add a new element, capture data as follows:
|
Field |
The name of a Field. |
|
Format |
Click the drop-down box to select a format for the field.
The following fields may be selected:
Amount (maximum 15 characters, including 2 decimal places) Date Factor Int (integer. Maximum 4 characters) Number (maximum 15 characters. No decimal places) Text Textlong Timestamp |
|
Length |
The specific maximum length of the field. (including decimal places if applicable). |
|
Decimals |
The number of decimal places in the field. |
|
Date Format |
If the Format of the field is defined as a Date, then select a format from the drop-down box. The following date formats may be selected:
DDMMYYYY YYYYMMDD |
|
Sign |
Click the drop-down box to select a Sign for the field.
Note: The drop-down box will only be enabled for selection if the value selected for the Format is one of the following: Amount Int Number
The default value for Sign is “None”.
This field defines whether a (-) negative sign must be displayed for the field value and the position of the sign.
The following fields may be selected: None (No sign is displayed) Post (a sign must be displayed after the value e.g. 131.56 -) Pre (a sign must be displayed before the value e.g. - 131.56) |
|
Business Description |
Click the LINK button to flow to the Full Business Description screen and capture a text description of the field.
|
Multiple data elements may be captured on this screen. Once all data elements have been captured, click OK.
The captured data element(s) will be displayed on the JU9AD Data Elements Maintain screen.
Search
To find a data element in the Data Dictionary, click SEARCH.
The Data Element Search screen will be displayed.
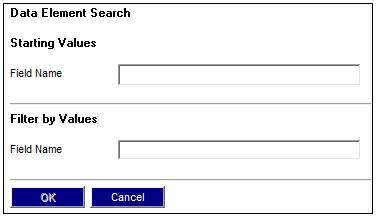
Starting Values
Capture all or part of the name of a field in the Starting Values field and click OK. The screen will display all data elements with the starting word / letters at the top of the screen followed by the other words that follow in alphabetical order.
Filter by Values
Capture all or part of the name of a field in the Filter by Values field and click OK. The screen will display only those Data Elements that match the search criteria.
This functionality enables you to maintain the definition of Keys and Search Criteria that will later be used to define the Layout for each file (refer to Data Element Mapping below).
Note:
A Key consists of one or more fields that can be used to sort and / or identify data in some manner. Providing the fields that make up the Key will provide a direct path to the data for which the Key has been defined.
You will not be able to later associate a Data Element to a Mask as a Key or Search unless the Data Elements have first been defined as Key or Search Data Elements under Key and Search Criteria (refer to Associate Key and Associate Search in the Data Element Mapping section below, in which Keys and Searches are associated to Masks).
To view the application of a Search, refer to
Processes
Archive
View Results
Select Keys and Search Criteria from the sub-menu on the left.
The JU9AB Keys / Search List screen will be displayed.
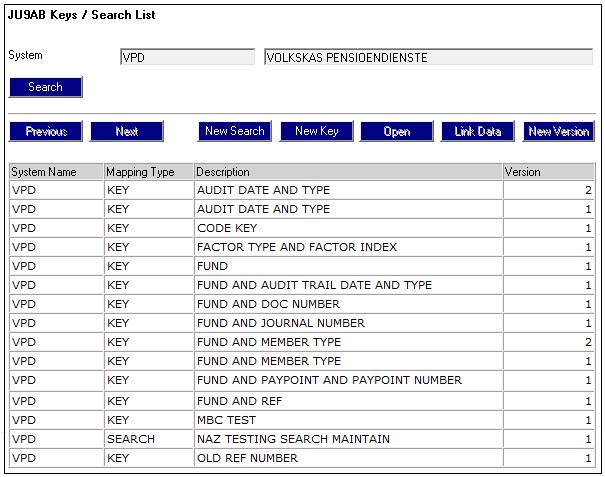
Open
To view the details of an existing Key, highlight a line with a Mapping Type of Key and click OPEN.
The JU9AB Keys / Search Maintain screen will be displayed.
To view the details of existing Search criteria, highlight a line with a Mapping Type of Search and click OPEN.
The JU9AB Keys / Search Maintain screen will be displayed.
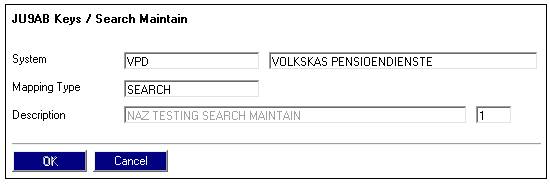
New Search
To define a new Search, click NEW SEARCH.
The JU9AB Keys / Search Maintain screen will be displayed.

Capture the name of the Search in the Description field and click OK.
Note:
The field that is displayed after the Description field is a System generated Version number that will automatically be populated. 1 will be allocated as the Version number unless an existing name is defined, in which case the Version number will be incremented by 1 to make the field unique.
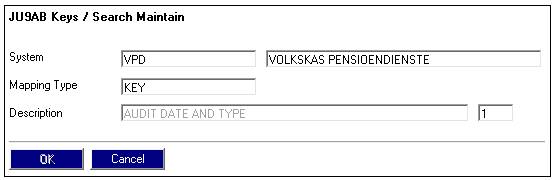
New Key
To create a new Key, click NEW KEY.
The JU9AB Keys / Search Maintain screen will be displayed.
Capture the name of the Key in the Description field and click OK.
Note:
The field that is displayed after the Description field is a System generated Version number that will automatically be populated. 1 will be allocated as the Version number unless an existing name is defined, in which case the Version number will be incremented by 1 to make the field unique.
Link Data
This functionality allows the Key and Search for the Load Layout (Mask) for the file to be defined by selecting the fields that must be included.
To select the Key and Search fields that must be included in the Layout for the file, highlight a line and click LINK DATA.
The JU9AB Keys / Search Mapping screen will be displayed.
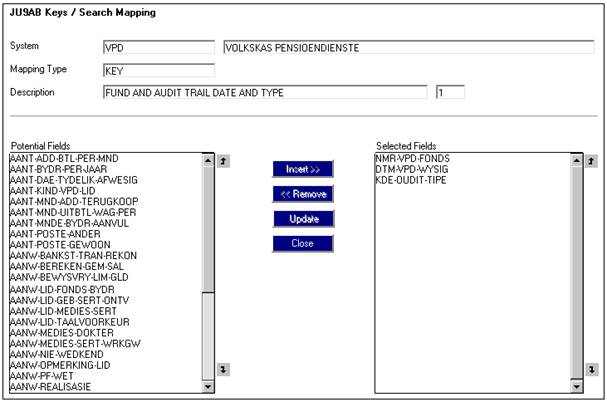
The Potential Fields pane on the left displays all the fields that are available for selection.
Inserting Data Elements
Highlight the required field and click INSERT.
Note:
Only one of the fields may be selected at a time.
The JU9AB Keys / Search Mapping screen will be displayed.
This screen allows you to view the Layout details for the selected field.
Click CANCEL to cancel the selection of the field or click OK to confirm the selection of the field.
The field will be moved to the Selected Fields pane on the right.
Repeat this process for each field until you have linked all the required fields.
Removing Data Elements
To remove a field from the Selected Fields pane on the right, highlight the field and click REMOVE.
Note:
Only one of the fields may be selected at a time.
The field will be moved to the Potential Fields pane on the right.
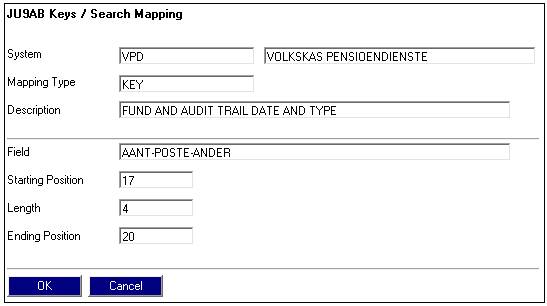
Updating data Elements
To update a field, highlight a field in the Selected Fields column and click UPDATE.
The JU9AB Keys / Search Mapping screen will be displayed.
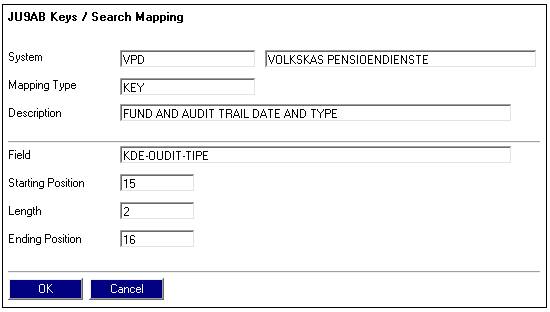
This screen allows for the Starting Position field to be updated. Capture a new Starting Position number and click OK.
If the change to the Starting Position field results in the field overlapping with a field already defined, the following error message will be displayed:
Current field overlaps with a previously defined field.
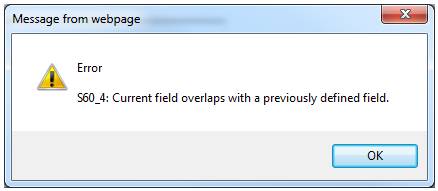
Click OK to remove the message. Investigate the Starting Position overlap and capture a new value.
If the field selected with INSERT or REMOVE is an older version and a newer version of the same field exists, then the following message will be displayed:
Modify denied. Newer version exists.
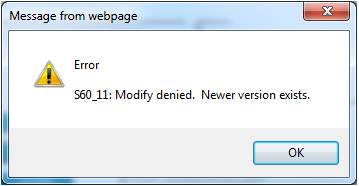
Click OK to remove the message. Select the newer version of the field.
If the field selected with INSERT or REMOVE is already linked to a Load then the following message will be displayed:
Modify denied. Search/Key linked to a Data Element Load.
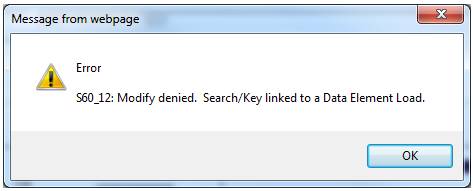
Click OK to remove the message. Create a new version of the Load (Mask) layout.
Click CLOSE to return to the JU9AC Data Element Load List screen.
New Version
This functionality allows the Version Number of a field to be incremented.
To increment the Version Number of a field, select a field on the JU9AB Keys / Search List screen and click NEW VERSION.
The Version Number for the selected field will be incremented by 1 on the JU9AB Keys / Search Mapping screen.
If the field selected is an older version and a newer version of the same field exists, then the following message will be displayed:
Modify denied. Newer version exists.
Click OK to remove the message. Select the newer version of the field.
Search
This functionality enables a search of all Mapping Types to be made.
Click SEARCH on the JU9AB Keys / Search List screen. The JU9AB Search screen will be displayed.
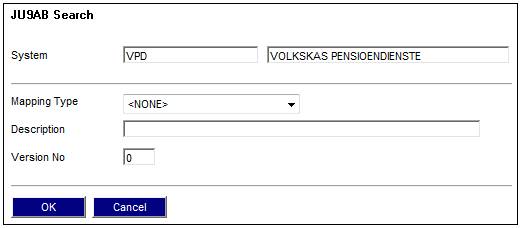
Select a value from the Mapping Type field and / or capture a description in the Description field and click OK.
The screen will display all data matching the search data that was input.
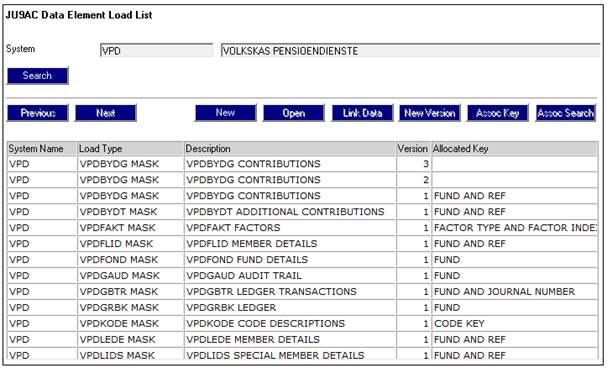
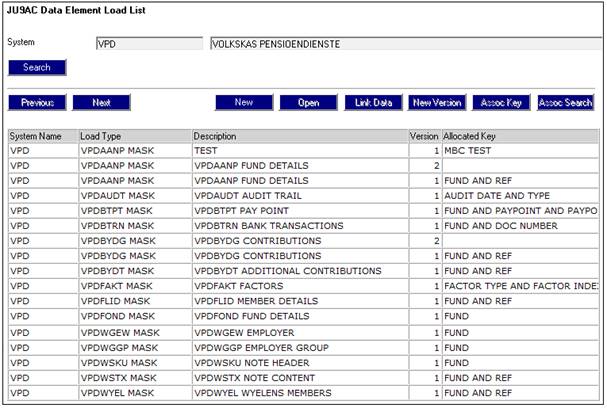
This functionality facilitates the creation of Masks for a system and the mapping of Data Elements to a Mask. In addition, Key and Search Data Elements are defined for the Mask.
Select Data Element Mapping from the sub-menu on the left.
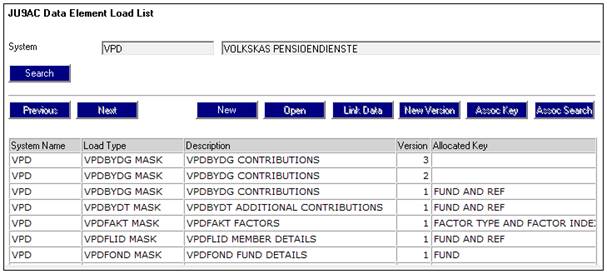
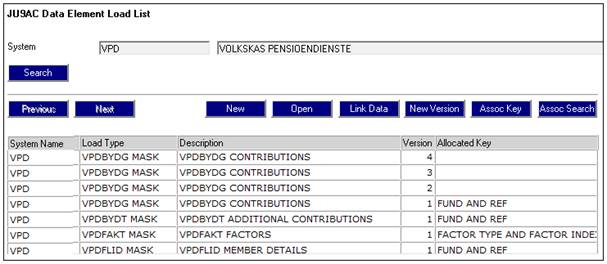
The JU9AC Data Element Load List screen will be displayed.
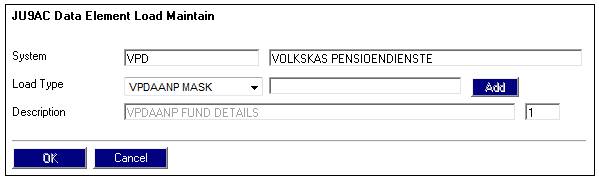
New
To create a new Mask (Load Type), click NEW.
The JU9AC Data Element Load Maintain screen will be displayed.
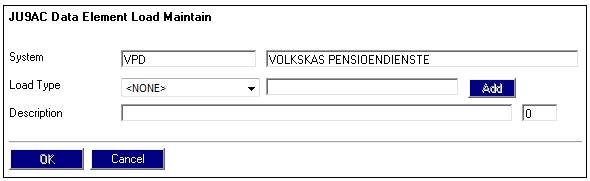
The following details are displayed on this screen:
|
System |
The System already selected. |
|
Load Type |
Select a Mask from the drop-down list. |
|
Description |
A text description of the Mask. |
Once the data has been captured, click OK.
The Mask will be displayed on the JU9AC Data Element Load List screen.
To add a new Load Type, capture the name in the second Load Type field and click ADD.
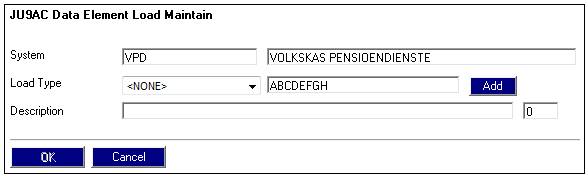
The new load Type will now be displayed for selection in the Load Type drop-down list.
Open
To view the details of an existing data element, highlight a field and click OPEN.
The JU9AC Data Element Load Maintain screen will be displayed.
Link Data
This functionality allows for selected Data Elements to be mapped to a Mask.
On the JU9AC Data Element Load List screen, highlight a Data Element and click LINK DATA.
The JU9AC Data Element Load Maintain screen will be displayed.
The Potential Fields pane on the left displays all of the Data Elements that are available for selection.
The Selected Fields pane on the right displays all of the Data Elements that have been selected.
Inserting Data Elements
Highlight the required Data Element in the Potential Fields pane on the left and click INSERT.
Note:
Only one of the Data Elements may be selected at a time.
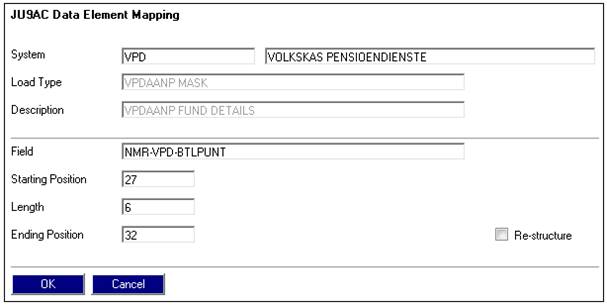
The JU9AC Data Element Mapping screen will be displayed.
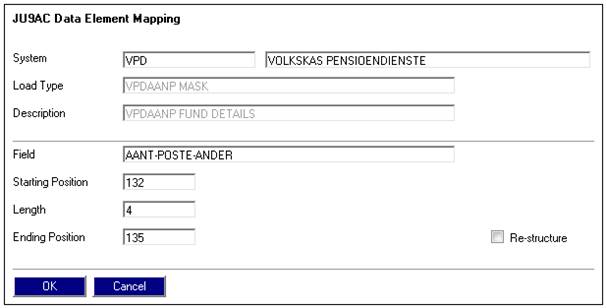
The following data may be updated on the screen:
|
Starting Position |
The starting position of the data element. |
|
Length |
The length of the data element. |
|
Ending Position |
The end position of the data element. |
|
Re-structure |
The Start and Ending positions of this field will cause the fields that follow it to be out of sequence.
Selecting the Re-structure tick-box will cause the System to determine the Start Position for each of the fields with a Start Position after the field being updated and based on the field length and update the Start Position for these fields. |
Click OK.
If the field selected is an older version and a newer version of the same field exists, then the following message will be displayed:
Modify denied. Newer version exists.
Click OK to remove the message. Select the newer version of the field.
Removing Data Elements
The Selected Fields pane on the right displays all the Data Elements mapped for the Data Elements that are available for selection
Highlight the required Data Element in the Selected Fields pane on the right and click REMOVE.
Note:
Only one of the Data Elements may be selected at a time.
The following message will be displayed:
Do you wish to reorganise the starting position of the columns that follow?

The Start and Ending positions of the field may cause the fields that follow it to be out of sequence. This message asks whether the system must reorganise the Starting positions of the fields affected.
Click NO to leave the starting positions of the columns that follow as the same.
Click YES to confirm that the starting positions of the columns that follow must be reorganised by the system.
Updating Data Elements
To update a Data Element in the Selected Fields column, highlight the element and select UPDATE.
Note:
Only one of the Data Elements may be selected at a time.
The JU9AC Data Element Mapping screen will be displayed to be updated.
This screen allows for the following fields to be updated:
|
Starting Position |
The starting position of the data element. |
|
Length |
The length of the data element. |
|
Ending Position |
The end position of the data element. |
|
Re-structure |
Click on the tick-box to reorganise the starting position of the columns that follow this Data Element. |
Click OK.
Click CLOSE to return to the JU9AC Data Element Load List screen.
New Version
To create a new version of a Data Element, highlight a Data Element on the JU9AC Data Element Load List screen and click NEW VERSION. A second version of the same Data Element will be created and displayed on the JU9AC Data Element Load List screen with the number allocated in the Version column incremented by one.

Associate Key
This functionality allows for a Key to be defined for the data linked to the Mask (in LINK DATA above).
Note:
The Key selected must already have been defined under Keys and Search Criteria above.
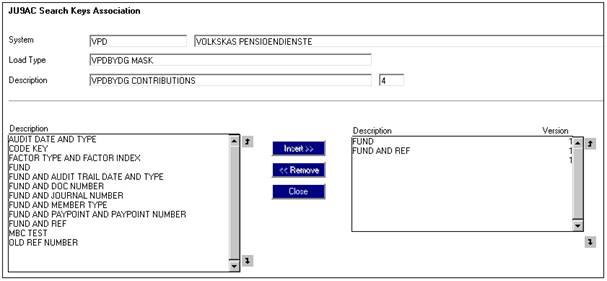
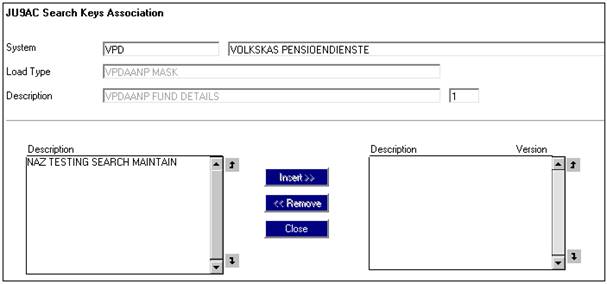
To associate a key, highlight a Mask (Load Type) on the JU9AC Data Element Load List screen, and click ASSOC KEY.
The JU9AC Search Keys Association screen will be displayed.
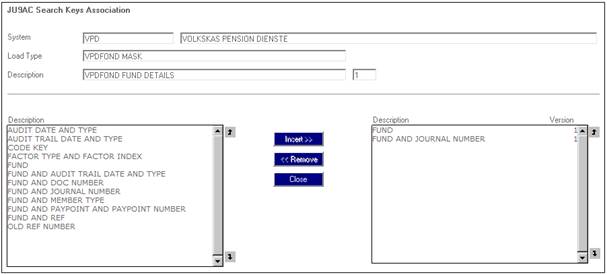
This screen displays a list of the Data Elements for the selected Mask (Load Type).
The pane on the left displays all the Data Elements that are available for selection.
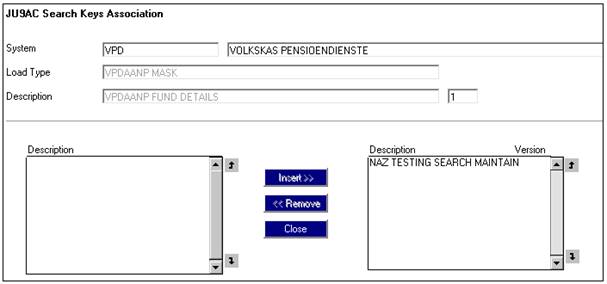
Inserting Keys
Highlight the required Data Element to be defined as a Key and click INSERT.
Note:
Only one of the Data Elements may be selected at a time.
The Key will be displayed in the pane on the right.
If the Data Element selected as a Key has not been defined as a Key under Key and Search Criteria (above), the following error message will be displayed:
Selected Association contains fields that are not defined in Data Load.
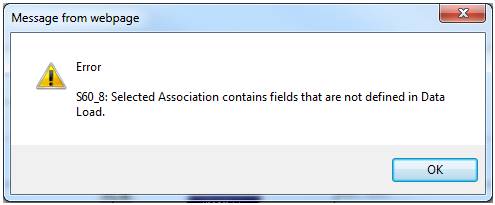
Click OK to remove the message. Create a new Load and add a new Key association.
Removing Keys
The pane on the right displays all the Keys that have been selected as Search Keys. Highlight the required Key and click REMOVE.
Note:
Only one of the Data Elements may be selected at a time.
The Key will be displayed in pane on the left.
Click CLOSE to return to the JU9AC Data Element Load List screen.
Associate Search
This functionality allows for a Search to be defined for the data linked to the Mask (in LINK DATA above).
Note:
The Search selected must already have been defined under Keys and Search Criteria above.
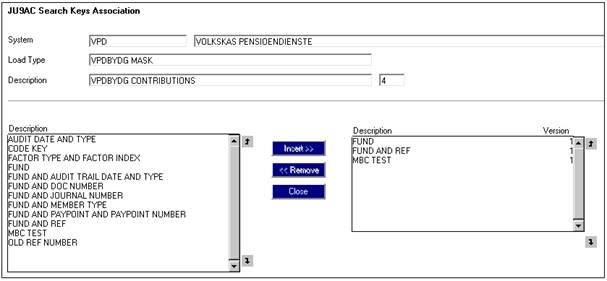
To associate a Search, highlight a Mask (Load Type) on the JU9AC Data Element Load List screen, and click ASSOC SEARCH.
The JU9AC Search Keys Association screen will be displayed.
This screen displays a list of the Data Elements for the selected Mask (Load Type).
The pane on the left displays all the Data Elements that are available for selection.
Inserting Search
Highlight the required Data Element to be defined as a Search and click INSERT.
Note:
Only one of the Data Elements may be selected at a time.
The Search will be displayed in the pane on the right.
If the Data Element selected as a Search has not been defined as a Search under Key and Search Criteria (above), the following error message will be displayed:
Selected Association contains fields that are not defined in Data Load.
Click OK to remove the message. Create a new Load and add a new Search association.
Removing Searches
The pane on the right displays all the Searches that have been selected as Search Keys. Highlight the required Search and click REMOVE.
Note:
Only one of the Data Elements may be selected at a time.
The Search will be displayed in pane on the left.
Click CLOSE to return to the JU9AC Data Element Load List screen.