In this process, the following steps must be followed:
- Create a Benefit Statement format
- Define Projection Assumptions
- Maintain Batch Schedule
- Submit Batch Job
- View Report
Note:
Ensure that the product has a Benefit Statement Format setup. (This should be a once-off exercise).
Navigation: Homepage > Products
Select List from the top menu.
![]()
Select a product from the JU1BK List screen.
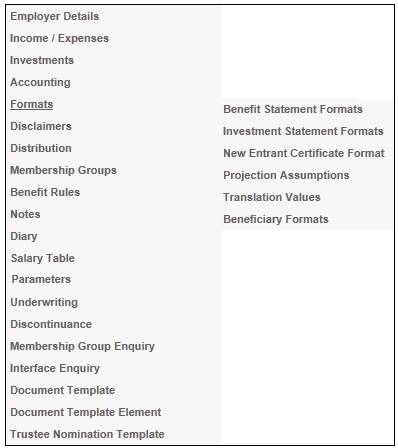
Select Formats > Benefit Statement Formats from the sub-menu on the left.
On the JAJW Benefit Statement Format screen, click NEW.
The JAJW Benefit Statement Format Details screen will be displayed.
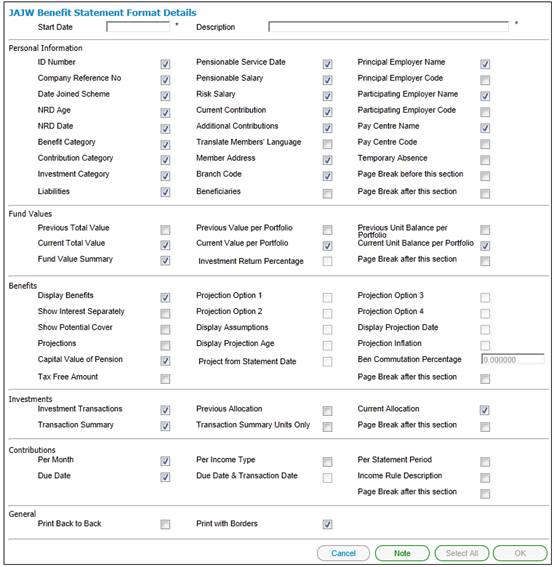
Ensure that the following fields ticked on the screen above are also included (in addition to the standard settings).
Personal Information
- ID number
- Company Reference No
- Date Joined Scheme
- NRD Age
- NRD Date
- Benefit Category
- Contribution Category
- Investment Category
- Liabilities
- Pensionable Service Date
- Pensionable Salary
- Current Contribution
- Additional Contributions
- Member Address
- Branch Code
- Beneficiaries
- Principal Employer
- Participating Employer Name
- Pay Centre Name
Fund Values
- Current Total Value
- Fund Value Summary
- Current Value Per Portfolio
- Current Unit Balance Per Portfolio
Benefits
- Display Benefits
- Projections
- Tax Free Amount
Investments
- Investment Transactions
- Transaction Summary
- Current Allocation
Contributions
- Per Month
- Due Date
- Per Income Type
Once you have selected all the fields you would like to be displayed, click OK to save the format.
On the JAJW Benefit Statement Format screen, highlight the Benefit Statement Format created and select Benefit Events for Projections from the sub-menu on the left.
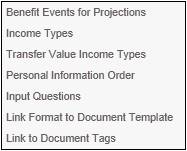
The JAJY Benefit Events for Benefit Statement Projections screen will be displayed.
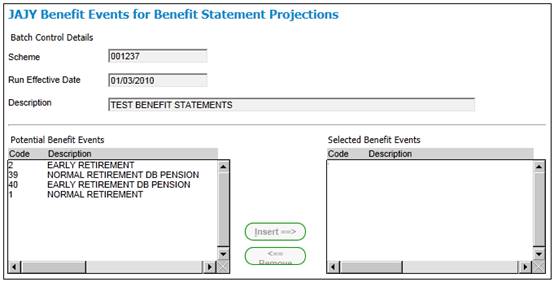
Select Normal Retirement from the Potential Benefit Events column and insert it under Selected Benefit Events column.
For more detailed information, refer to Benefit Statement Formats under
Product Launch Requirements
Additional Menu Options
Formats
On the JU1BK List screen, select the product then select Formats > Projection Assumptions from the sub-menu on the left.
The JU1EO Projection Assumptions screen will be displayed.
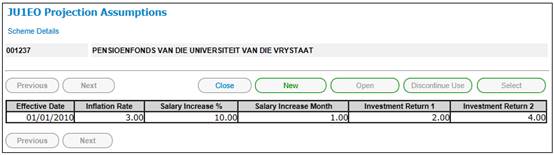
Click NEW.
The JU1EO New Projection Assumptions screen will be displayed.

Capture the values applicable for Projection Assumptions.
For more detailed information, refer to
Product Launch Requirements
Additional Menu Options
Formats
Supplements
Benefit Statement Setup for Projections
Navigation: Homepage > Infrastructure
Select Batch from the top menu.
![]()
Select Maintain Batch Schedule from the sub-menu on the left.
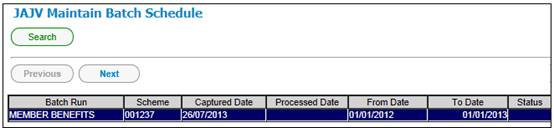
The JAJV Maintain Batch Schedule screen will be displayed.

Click NEW.
The JAJV Schedule Scheme for Batch Run screen will be displayed.
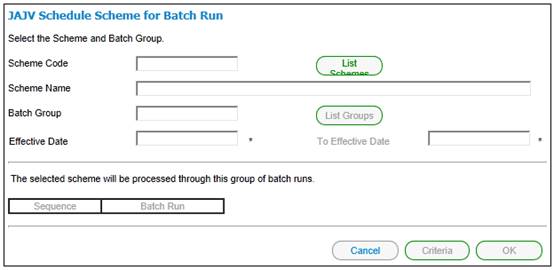
Capture data as follows:
|
Scheme Code |
Click List Schemes and select the scheme from the list. |
|
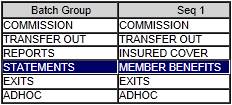
Batch Group |
Click List Groups and select Batch Group: STATEMENTS Seq 1: MEMBER BENEFITS from the list.
|
|
From Effective Date
To Effective Date |
Capture the dates to define the period. |
Click Criteria.
The JAJV Report Criteria screen will be displayed.
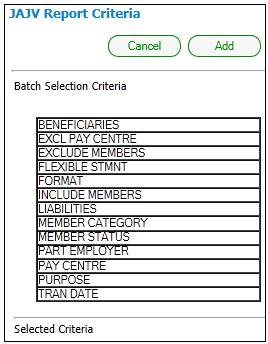
Select FLEXIBLE STMNT from the Criteria list and click ADD.
Select FORMAT from the Criteria list and click ADD.
The JAJW Benefit Statement Format screen will be displayed. Select the format that was created with the additional fields.
The JAJV Report Criteria screen will be displayed again.
Select PURPOSE from the Criteria list and click ADD.
The Benefit Statement Purpose Selection screen will be displayed.
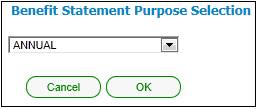
Select a purpose from the drop-down list.
|
OTHER |
General running of Benefit Statements, Drafts, etc |
|
ANNUAL |
The version that, when Authorised, will be published on the Member and Employer Websites. |
Click OK.
Once all of the criteria have been selected, click CANCEL on the JAJV Report Criteria screento return to the JAJV Schedule Scheme for Batch Run screen.
Click OK on the JAJV Schedule Scheme for Batch Run screen to save the control record.
For more detailed information, refer to
Infrastructure
Batch
Maintain Batch Schedule
Select Batch from the top menu.
![]()
Select Batch Jobs from the sub-menu on the left.
The Batch Job Submission screen will be displayed.
Locate and submit the following batch job:
![]()
Check the Error Log.
Navigation: Infrastructure > System Management > System Logs > General Error Log.
If there are no errors for the BJU3AR Member Load Program, submit the following batch job:
![]()
This batch job converts the Benefit Statement to the new Flexible Format.
Check the Error Log.
Navigation: Infrastructure > System Management > System Logs > General Error Log.
If there are no errors for BJU3HB Convert Ben Statement Data to Template then the Benefit Statement is ready for viewing.
For more detailed information, refer to
Infrastructure
Batch
Batch
For more detailed information, refer to General Error Log under
Infrastructure
System Management
System Logs
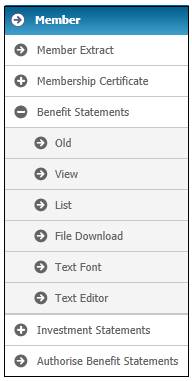
To view the Benefit Statement, select the Benefit Statements Report.
Navigation: Homepage > Reports
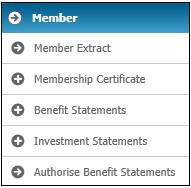
Select the scheme then select Member from the top menu.
![]()
Select Benefit Statements > View from the sub-menu on the left.
Click on the hyperlinked display and the benefit statements will be available for viewing.

When the Benefit Statements screen is displayed, click Create PDF alongside the member.
For more detailed information refer to
Reports
Member
Benefit Statements
To authorise a Benefit Statement, select Authorise Benefit Statements from the sub-menu on the left.
The Authorise Benefit Statements screen will be displayed.
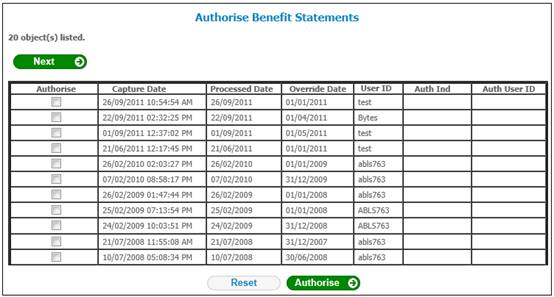
Note:
Only Benefit Statements with a purpose of ANNUAL will be displayed.
Only Benefit Statements that are authorised will display on the Member and Employer websites.
Select the benefit statements to authorise by matching to the processed date.
Click the box in the Authorise column then click AUTHORISE.
For more detailed information refer to
Reports
Member
Authorise Benefit Statements