In this process, the following steps must be followed:
|
Process Step |
Description |
|
Registration |
Confirm the new Administrator’s registration. |
|
Access Control |
Define access to the CORE system (Example: Members of a scheme, Schemes, Accounting, etc) |
|
Team Definition |
Enable the user to access specific Schemes. |
|
Payroll Registration |
Confirm registration. |
|
Payroll roles |
Assign Roles to the user. (Example: Data Capture, Fund Management, System Administration). |
|
Payroll – link user to paycentres |
Link the user to Pay Centres. |
|
Income access |
Enable the user to complete the Income Process. |
Navigation: Homepage > Infrastructure
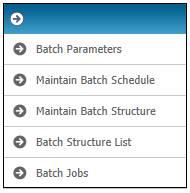
Select Batch from the top menu.
![]()
Select Maintain Batch Schedule from the sub-menu on the left.
The JAJV Maintain Batch Schedule screen will be displayed.
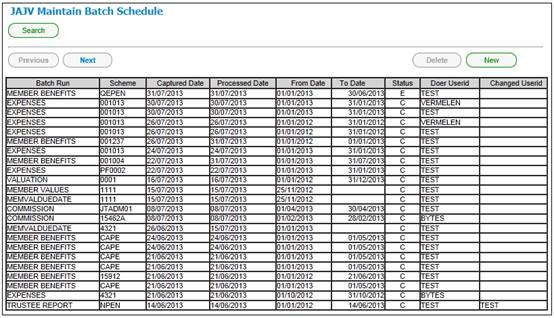
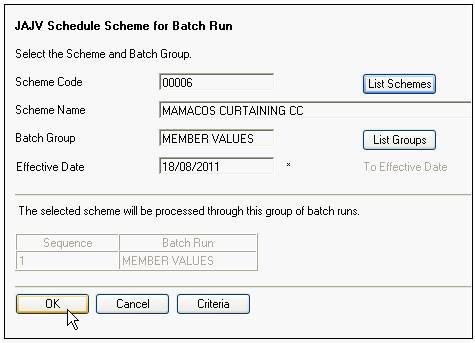
Click NEW to create a Schedule.
Click on the LIST SCHEMES button and select the fund.
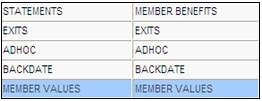
Click on the LIST GROUPS button and from list, highlight MEMBER VALUES and click SELECT.
The effective date will be the date that you wish to see the Members Values at.
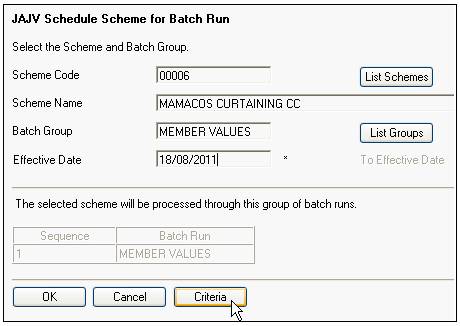
Click on the CRITERIA button.
This report can be displayed in EXCEL or PDF. In addition, it can be run for specific pay centres / portfolios
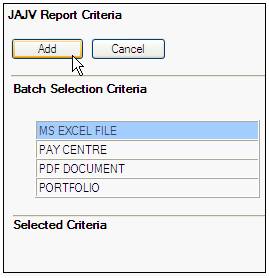
Highlight the criteria and click on the ADD button.
Once all the criteria have been selected, click on the CANCEL button to return to the 1st screen.
The schedule is complete – click on the OK button to save the schedule.
To run the batch job – click on the BATCH menu on top.

From the LEFT menu click on the BATCH JOBS.
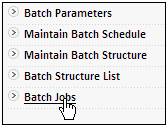
Submit Batch Job 25
![]()
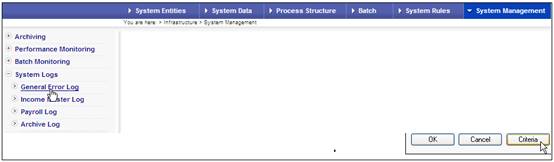
Check the error log for errors.
![]()
If there are no errors – the report can be viewed / extracted
From the HOMEPAGE click on reports.
Click on MEMBER from the TOP menu.
On the LEFT menu – click on Member Investment Values.
If you selected PDF / EXCEL in your criteria, click on the relevant menu.
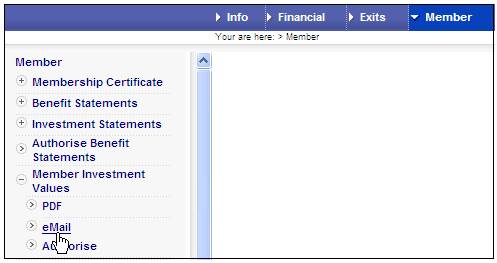
The excel report can be emailed to the user.

For more detailed information refer to
Security
Registration
Registration Process by the Administrator
System Reports
Audit
Access Control Report
Navigation: Homepage > Security
Select Access from the top menu.
![]()
Select Registration from the sub-menu on the left.
The JU0AF Registration screen will be displayed.
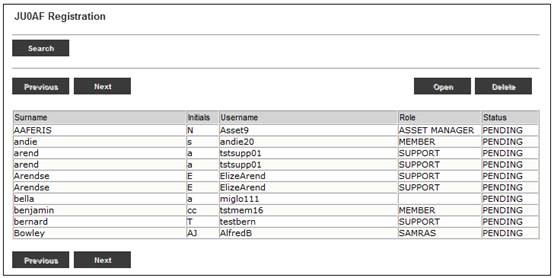
This screen displays a list of pending registrations.
Highlight the registration you wish to confirm and click OPEN.
The JU0AF Registration Maintain screen will display the details that the new user captured.
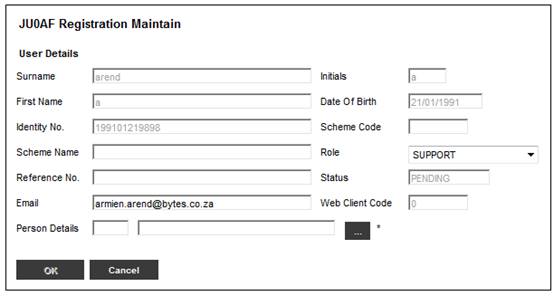
Click the LIST button for the Person Details to locate this person on the system.
The JU1BA Search Criteria screen will be displayed:
- If the user already exists on the system, then search for the user.
- If the user does not exist on the system, click NEW to add the user details to the system.
The JU1BA Client Details screen will be displayed.
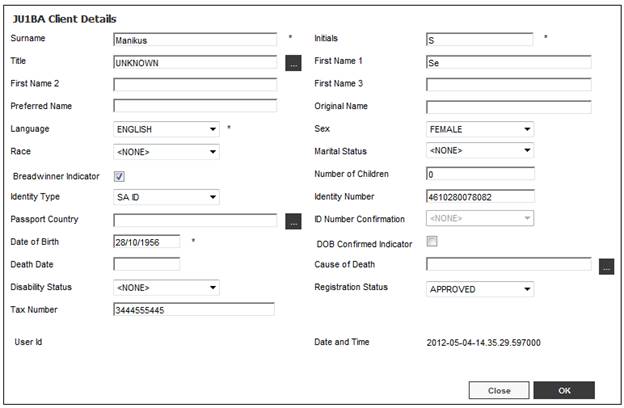
Once the personal details have been located / captured, highlight the row and click SELECT on the JU1BA Client List screen.
The JU0AF Registration Maintain screen will be populated and OK will be enabled.
Once the screen is refreshed, the confirmed registration will no longer be listed on the JU0AF Registration screen.
Define access to the CORE system (Example: Members of a scheme, Schemes, Accounting, etc)
For more detailed information refer to
Security
Functional
Maintaining a User
Select Access from the top menu.
![]()
Select User > Maintain from the sub-menu on the left.
The EA814 User Maintain screen will be displayed.
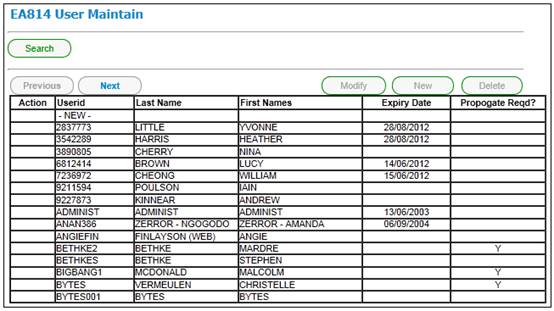
Highlight the – NEW - that is displayed in the first row and click NEW.
The EA814 Maintain User screen will be displayed.
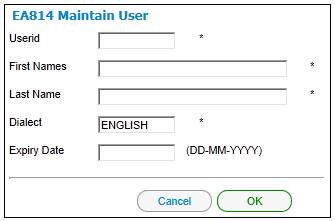
Capture the following fields:
- USERID
- FIRST NAMES
- LAST NAMES
Select Access from the top menu.
![]()
Select User > Assign User Groups from the sub-menu on the left.
The EA816 User Groups to a User screen will be displayed.
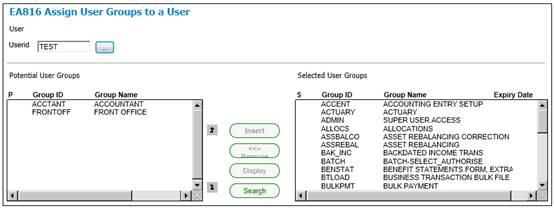
Click the LIST button alongside Userid to select the new User.
The EA810 User List screen will be displayed.
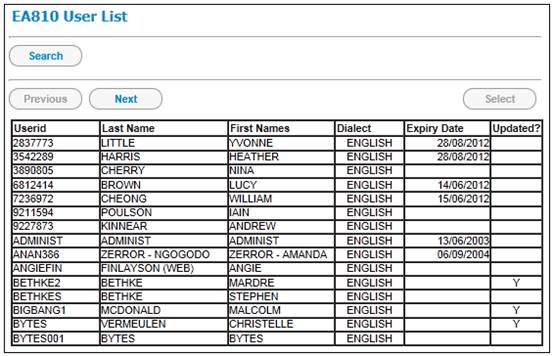
Highlight the User and click SELECT.
On the EA816 Assign User Groups to a User screen, select the User Group from the Potential User Groups column and click INSERT to move it to the Selected User Groups column to allocate the relevant accesses.
To confirm this access, the user’s role must be PROPAGATED.
For more detailed information refer to
Security
Functional
Propagate User Changes
Select Access from the top menu.
![]()
Select User > User Maintain from the sub-menu on the left.
The EA814 User Maintain screen will be displayed.
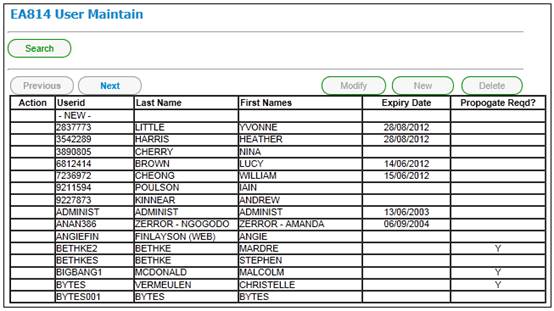
The new user will have a ‘Y’ under the Propagate Reqd? column.
Select Propagate All from the sub-menu on the left.
![]()
Enable the user to access specific Schemes.
For more detailed information refer to
Security
Team Definition
Team Definition
Security
Functional
Assign a User to a User Group
Select Team Definition from the top menu.
![]()
The JU4AT Team List screen will be displayed.
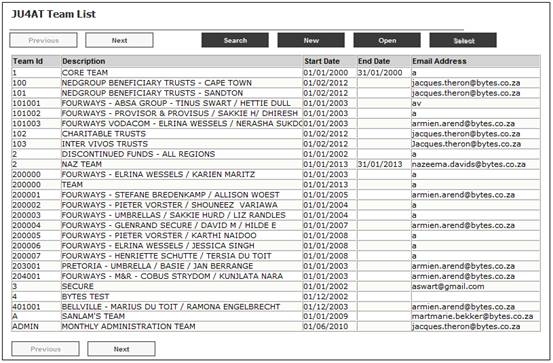
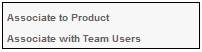
Highlight the Team that the user must to be linked to and select Associate with Team Users from the sub-menu on the left.
The JU4AV Team / User Association screen will be displayed.
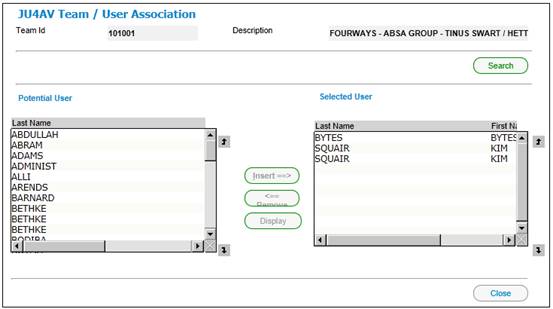
Select the User from the Potential User column and click INSERT to move the User to the Selected User column.
The JU4AV Team / Team User Relationship Details screen will be displayed.
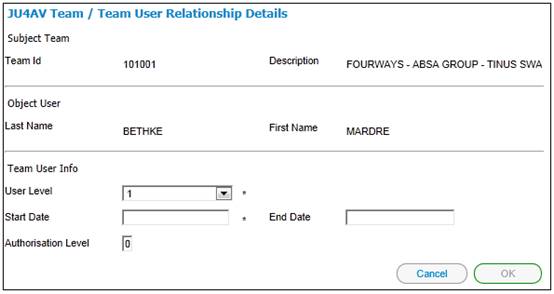
Capture the following fields:
- USER LEVEL
- START DATE
- AUTHORISATION LEVEL
Click OK.
Confirm registration so that the user has access to Pay Centres and to process Monthly Cycles.
For more detailed information refer to
Security
Access
Pending Registration
For more details refer to List pending registrations under
Processes
Contributions
Payroll
Payroll Processing and Field Conversion
Payroll Processing
Navigation: Homepage > Processes > Contributions
Select Payroll from the top menu.
![]()
Select System Administration from the top menu.
![]()
Select Access Control > List Pending Registrations from the sub-menu on the left.
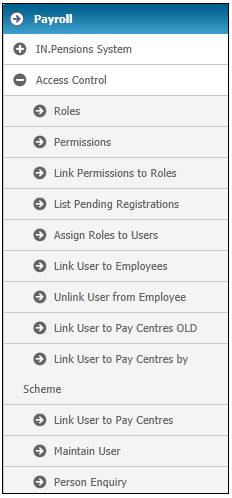
The List Pending Registrations screen will be displayed.
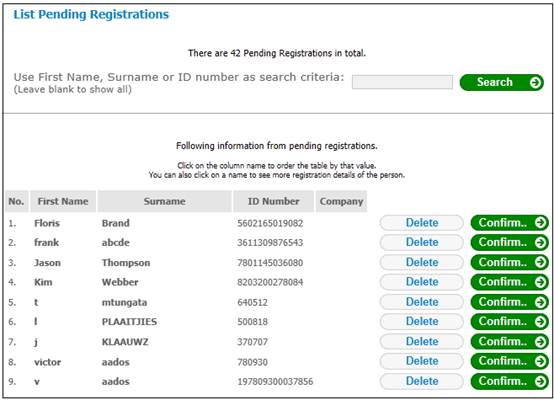
This screen displays a list of all users with a Pending (payroll) Registration.
Click CONFIRM next to the new user.
The Confirm Registration screen will be displayed.
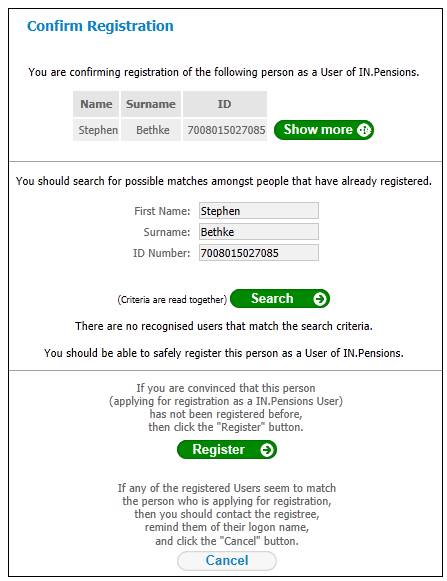
This screen asks you to confirm that you have selected the correct user. If the details are correct, click REGISTER.
A confirmation message will be displayed:
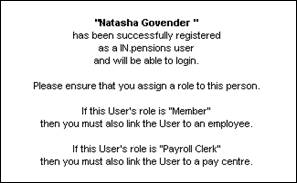
Assign Roles to the user so that the user has access to Pay Centres and to process Monthly Cycles. (Example: Data Capture, Fund Management, System Administration).
For more detailed information refer to
Security
Access
Functional Security
For more details refer to Assign roles to users under
Processes
Contributions
Payroll
Payroll Processing and Field Conversion
Payroll Processing
Select System Administration from the top menu.
![]()
Select Access Control > Assign Roles to Users from the sub-menu on the left.
The Search Users screen will be displayed.
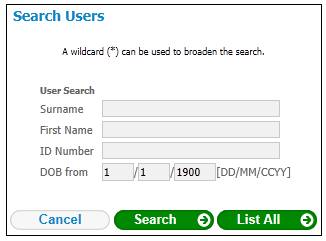
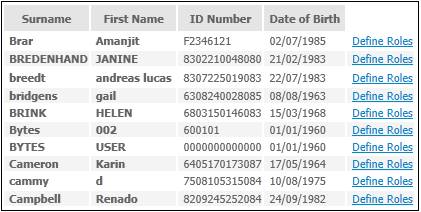
Search to locate the user.
Click on the Define Roles hyperlink on the right next to the relevant user.
The Assign Roles to User screen will be displayed.
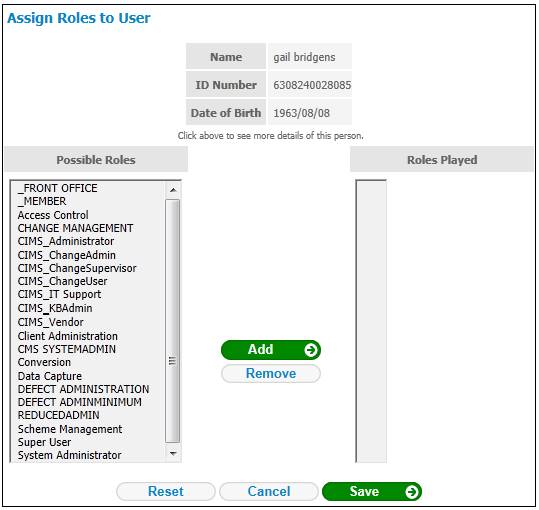
Select the access from the Possible Roles column and click ADD to move the selection to the Roles Played column.
Click SAVE.
Link the user to Pay Centres so that the user has access to Pay Centres and to process Monthly Cycles.
For more details refer to Access Control under
Processes
Contributions
Payroll
Payroll Processing and Field Conversion
Payroll Processing
Product Launch Requirements
Additional Menu Options
Company Structure and Initial Load
Company Structure Setup
Select Access Control > Link Users to Pay Centres OLD from the sub-menu on the left.
The Search Users of IN.Pensions screen will be displayed.
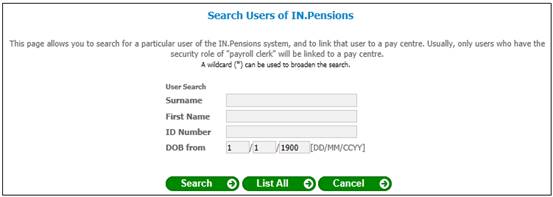
Either capture the Surname of the user or click LIST ALL to view all of the users.
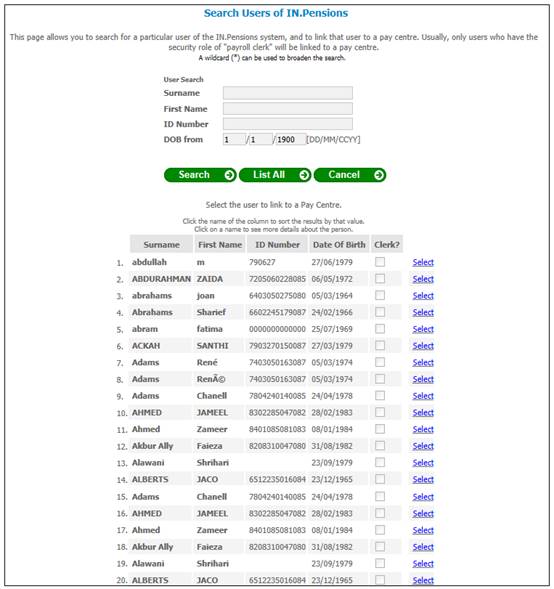
Click on the hyperlinked Select next to the name of the user.
The Show Pay Centres linked to User screen will be displayed.
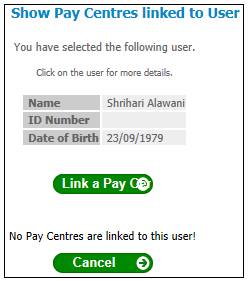
This screen displays a list of pay centres currently linked to the user.
Click LINK A PAYCENTRE to add a new Pay Centre.
The Select Company Node screen will be displayed.
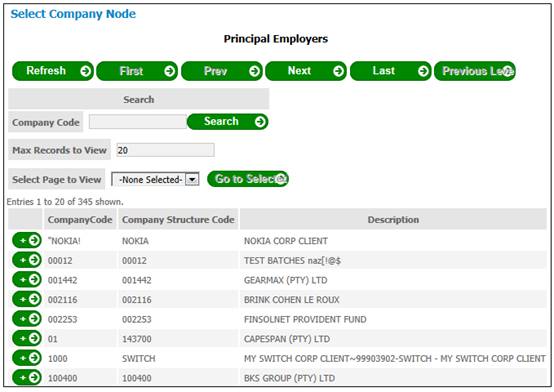
Click the (+) sign next to the PRINCIPAL EMPLOYER (as the Pay Centres are linked to the Participating Employers).
The Select Company Node screen will be displayed.
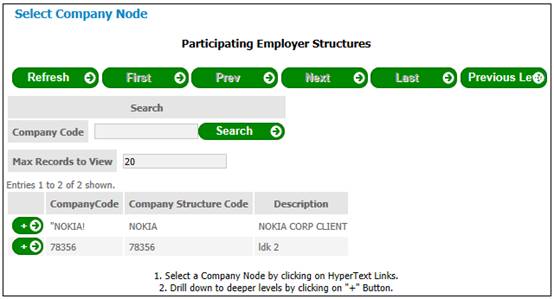
Click on the hyperlinked text in the Description column alongside the Participating Employer.
The Link Users to Pay Centres screen will be displayed.
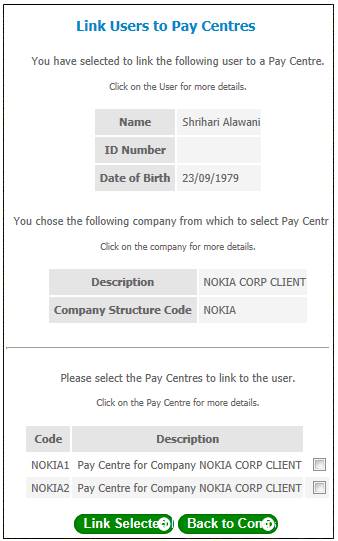
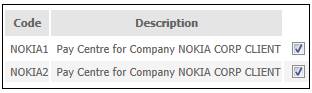
This screen displays a list of the Pay Centres. Tick the Pay Centres that the user requires access to.
Click LINK SELECTED PAYCENTRES.
The user is now linked to the Paycentre.
Enable the user to complete the Income Process.
For more details refer to
Security
Access
Data Level Security
Navigation: Homepage > Processes > Contributions
Select Income from the top menu.
![]()
Select General from the top menu.
![]()
Select Tables from the sub-menu on the left.
The Tables Menu screen will be displayed.
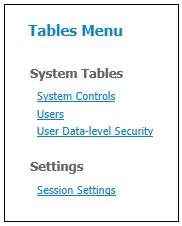
Select the hyperlinked User Data-level Security.
The User Data-level Security screen will be displayed.
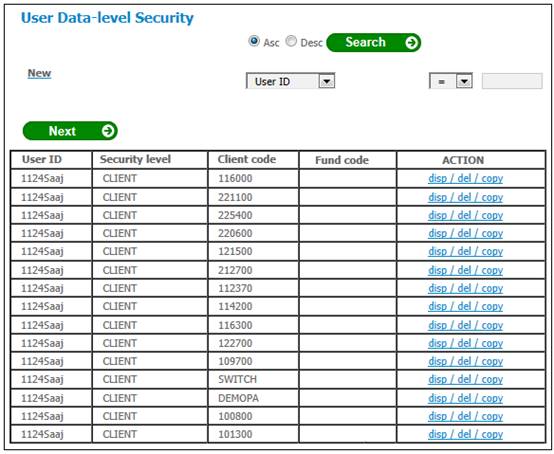
Click the hyperlinked NEW (located in the top left of the screen).
The User Data-level Security screen will be displayed.
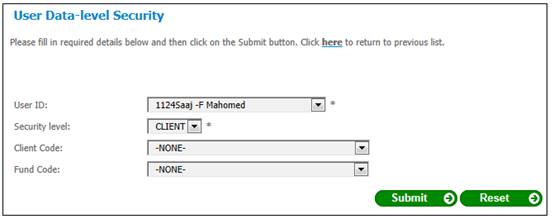
There are 2 types of access:
CLIENT: Employer Code
FUND: Fund Code
Both types of access must be completed. Select the USER-ID of the new user from the drop-down list.
Client Code
If you have chosen SECURITY LEVEL = CLIENT, select the Employer Code from the Client Code drop-down list.
Click SUBMIT once the selection has been made.
Fund Code
If you have chosen SECURITY LEVEL = FUND, select the Fund Code from the Fund Code drop-down list.
Click SUBMIT once the selection has been made.