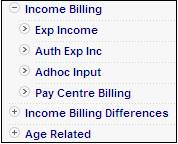
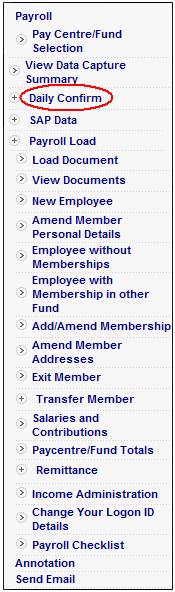
From the Income Billing menu on the top, click ![]() alongside Income Billing on the sub-menu on the left, then select Pay Centre Billing from the list of menu options below it.
alongside Income Billing on the sub-menu on the left, then select Pay Centre Billing from the list of menu options below it.
Note:
Pay Centre Billing will only be enabled for selection if there is a pay centre setting of BILLING, otherwise the existing process will be followed:
The Pay Centre Billing screen will be displayed.
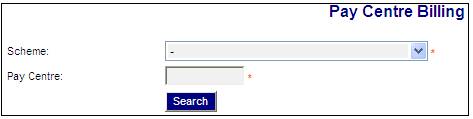
Select a scheme and capture the required pay centre, then click SEARCH.
The JU1FQ Billing Instruction Maintain screen will be displayed.
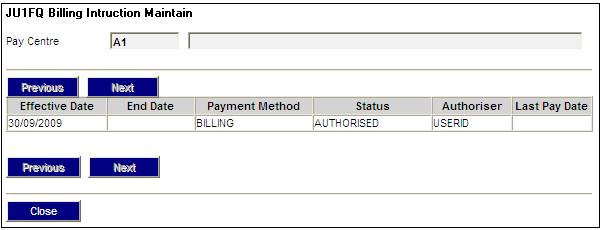
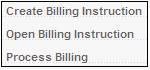
Highlight a billing instruction and select Process Billing from the menu on the left.
Note:
This menu may also be accessed using the navigation of Products > Employer Details > Pay Centres > Billing Instruction.
For more details refer to Pay Centres under
Product Launch Requirements
Additional Menu Options
The JU3ES Income Billing Detail screen will be displayed.
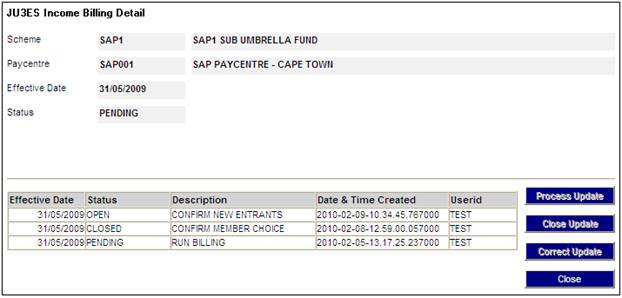
The PROCESS UPDATE Update Type is enabled when a selected item has a Status of OPEN. Selecting the PROCESS UPDATE Update Type will allow further processing to continue.
The CLOSE UPDATE update type is enabled when a selected item has a Status of OPEN or PENDING. To change the Status of an item from OPEN / PENDING to CLOSED, highlight an item with a Status of OPEN / PENDING and click CLOSE UPDATE. The Status is changed to CLOSED.
The CORRECT UPDATE Update Type is enabled when a selected item has a Status of CLOSED. To change the Status of an item from CLOSED to OPEN, highlight an item with a Status of CLOSED and click CORRECT UPDATE. The Status is changed to OPEN.
The RUN BILLING item will display a Status of PENDING until the CONFIRM NEW ENTRANTS and CONFIRM MEMBER CHOICE items have had their Statuses changed to CLOSED for the first time. The Status for the RUN BILLING item will be changed to OPEN when CORRECT UPDATE is selected.
The CONFIRM MEMBER CHOICE item will have a Status of PENDING for the time that the CONFIRM NEW ENTRANTS item is not processed. Once processing has taken place, the Status for the CONFIRM MEMBER CHOICE item will be changed to OPEN.
Note:
Processing of the RUN BILLING item cannot take place until both the CONFIRM NEW ENTRANTS and CONFIRM MEMBER CHOICE items have a status of CLOSED. When both of these statuses are CLOSED and the RUN BILLING item is selected, the PROCESS UPDATE Update Type will be enabled to allow processing to take place. The BJU3GA and BJU3G batch jobs will be started.
Confirm new entrants
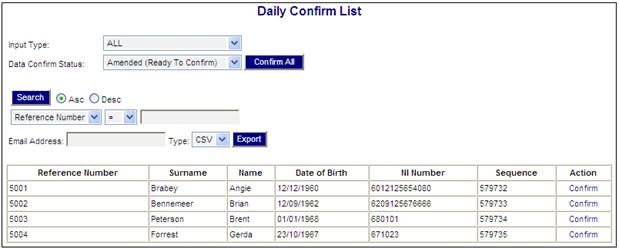
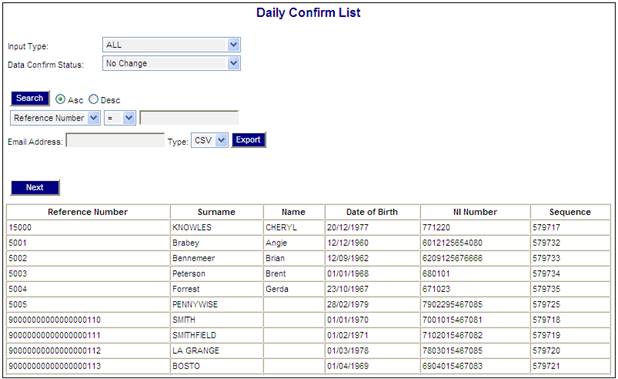
When the CONFIRM NEW ENTRANTS item is selected and the PROCESS UPDATE Update Type is selected, the Daily Confirm List screen will be displayed.
Capture data as follows on the screen:
|
Input Type |
Select one of the following values from the drop-down list: ALL Address Contribution Employee Earning Zeroising Earning New Entrant Period Date |
|
Data Confirm Status |
Select one of the following values from the drop-down list: Amended (Ready To Confirm) Confirmed No Change
Note: The default value is Amended (Ready To Confirm). |
Zero salaries
If an Input Type of Zeroising Earning is selected, the system will assume that zero or no values indicates zeroising of salaries. All empty values for which a non-zero value was received in the previous cycle will be displayed.
The user can at any point confirm this for a single value or for a whole list. Once confirmed, (before the Daily Confirm is authorised), the value will appear on the Confirmed List. There is no regression. The user can however redo the zeroising list. Zeroising will always look at the current cycle in respect of the previous cycle. The user is in control of when zeroising is authorised via Daily Confirm, by dint thereof, it can be done more than once in a cycle.
The system will compare the monthly earning types received in the previous month to those received in the current month. If the latter is null, a zero value will be inserted where start date = current cycle start date. This logic will be applied to both the current month and retro earnings received on the IF4 MTHEARN file in respect t of the following types:
BASIC
MFTEE
ADDH
SHIFT
PDSHF
NIABLE PAY
NMFTE
PEN1
PEN2
PEN3
PEN4
PEN5
PEN6
PEN7
PEN8
PEN9
Note:
The same Daily Confirm List screen is also available from the Payroll menu.
From the Payroll menu, click ![]() alongside Daily Confirm on the sub-menu on the left. Additional options will be displayed.
alongside Daily Confirm on the sub-menu on the left. Additional options will be displayed.
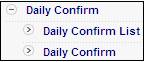
Click Daily Confirm List below Daily Confirm. The Daily Confirm List screen will be displayed.
If the Data Confirm Status of Amended (Ready To Confirm) is selected, the screen will display a list of amended members ready for confirmation.
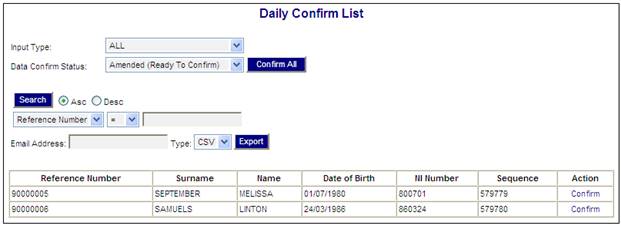
To confirm a member’s data from the list, click on the Confirm hyperlink in the Action column alongside the member.
The selected member will be removed from the screen and will now display on the Daily Confirm List screen for the Data Confirmed Status of Confirmed.
If there are several members then selecting CONFIRM ALL allows all of members listed to be confirmed instead of having to confirm each member individually.
The following Confirmation Message will be displayed.

Click CANCEL to cancel confirmation of all data or click OK to confirm all data. The following screen will be displayed.
The system will display the Daily Confirm List screen for the Data Confirmed Status of Confirmed. The members that have just been confirmed will now be displayed on this screen, but with the option to reverse the confirmation, by selecting the Unconfirm hyperlink in the Action column alongside the required new entrant.
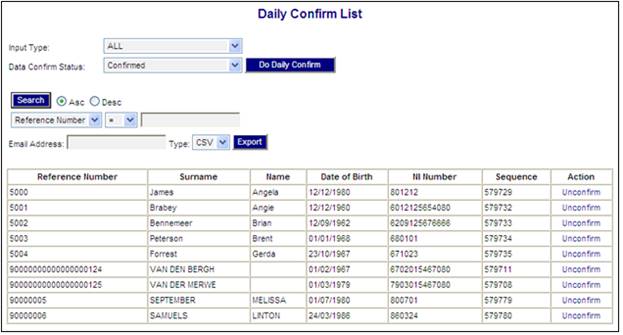
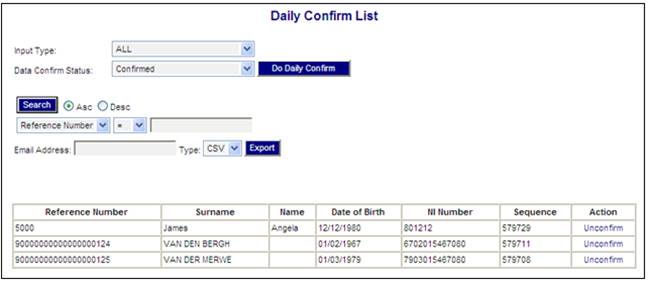
If the Data Confirm Status of Confirmed is selected, the screen will display a list of confirmed members.
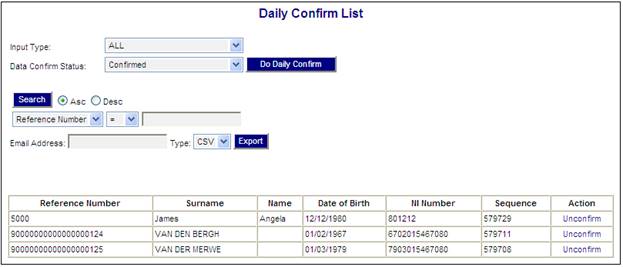
To remove a member from the confirmed list, click on the Unconfirm hyperlink in the Action column alongside the member(s).
The member(s) will be removed from the screen.
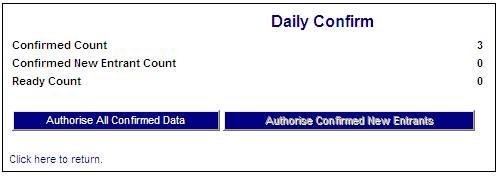
To confirm the confirmed members that are listed on the screen, click DO DAILY CONFIRM. The Daily Confirm screen will be displayed.
Note:
The same Daily Confirm screen is also available from the Payroll menu.
From the Payroll menu, click ![]() alongside Daily Confirm on the sub-menu on the left. Additional options will be displayed.
alongside Daily Confirm on the sub-menu on the left. Additional options will be displayed.
Click Daily Confirm below Daily Confirm. The Daily Confirm screen will be displayed.
To return to the previous screen, click the Click here to return hyperlink.
To authorize the confirmed data, click AUTHORISE ALL CONFIRMED DATA.
The following Confirmation Message will be displayed.
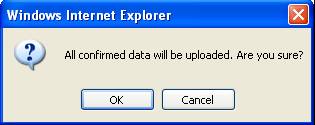
Click CANCEL to cancel authorization or click OK to confirm that confirmed data can be uploaded. The Daily Confirm screen will be displayed.
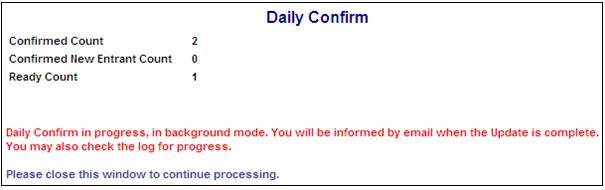
This screen displays a message that the daily confirm is in progress. If you have supplied an e-mail address, you will be informed by e-mail when the update has been completed.
If the Data Confirm Status of No Change is selected, the screen will display a list of members for whom there are no changes.
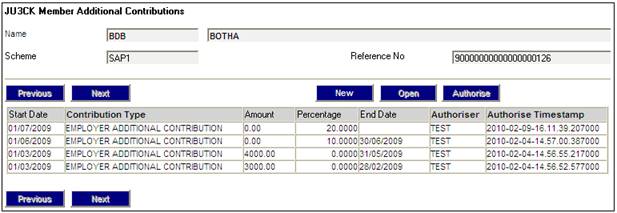
When the CONFIRM MEMBER CHOICE item is highlighted and the PROCESS UPDATE Update Type is selected, the JU3MF Paycentre Additional Contributions List screen will be displayed showing all new entrants that have not been accepted from the payroll site to the core system and for all salary and contribution membership groups that have not been confirmed.
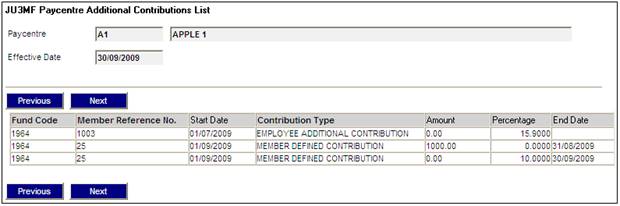
To view a list of additional contributions, highlight a line and select Member Additional Contributions from the sub-menu on the left.
The JU3CK Member Additional Contributions screen will be displayed.
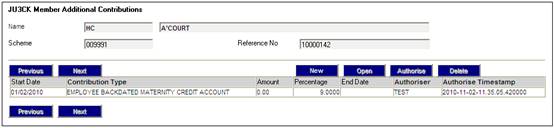
To view details of an additional contribution, highlight a line and select OPEN. The JU3CK Member Additional Contribution Detail screen will be displayed.

To add a new additional contribution, highlight a line and select NEW. The JU3CK Member Additional Contribution Detail screen will be displayed.
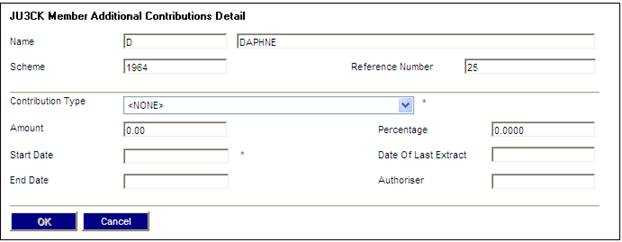
To create a new additional contribution, at least a value for Contribution Type must be selected from the drop-down list and a value in for Amount must be captured. Once the necessary details have been captured, click OK to return to the JU3CK Member Additional Contributions screen.
To authorise an additional contribution, highlight a line and select AUTHORISE. The JU3CK Member Additional Contributions screen will display the User Id of the authorisor in the Authorisor column and the timestamp in the Timestamp column.
Deleting additional contributions
To delete an additional contribution, select the contribution line and click DELETE on the JU3CK Member Additional Contributions screen.
Note:
Only those additional contributions that have not yet been authorised may be deleted.
If the additional contribution has already been authorised, the following message will be displayed:
Cannot Delete an Authorised Payment Detail.
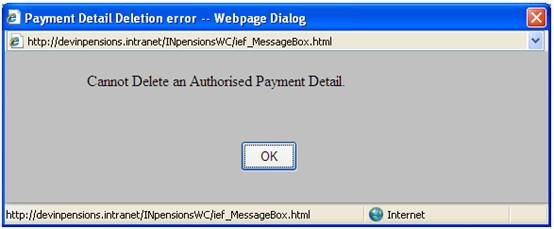
Click OK to remove the message.
If the additional contribution selected has not yet been authorised, the following message will be displayed:
Are you sure you want to Delete this record?
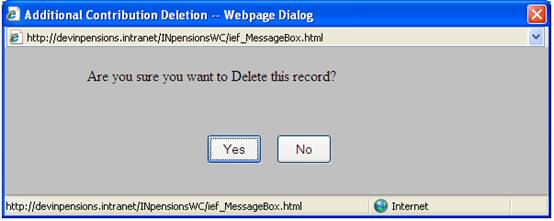
Click NO to cancel the deletion or click YES to confirm the deletion.
The selected record will be deleted.
This facility shows the degree of variance from the previous month's remittance. This is compulsory to execute and accept, by storing the USERID and date and time of the acceptance and then permitting the remittance authorisation to continue. This report will be used as a general check to assist the user with an automated check instead of the user manually validating the differences per cycle.
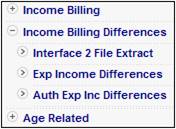
From the Income Billing menu on the top, click ![]() alongside Income Billing Differences on the sub-menu on the left. Additional options will be displayed.
alongside Income Billing Differences on the sub-menu on the left. Additional options will be displayed.
Note:
This menu item will only be enabled if the Data Capture field is set to AUTO.
Click Interface 2 File Extract below Income Billing Differences. The Interface 2 File Extract screen will be displayed.
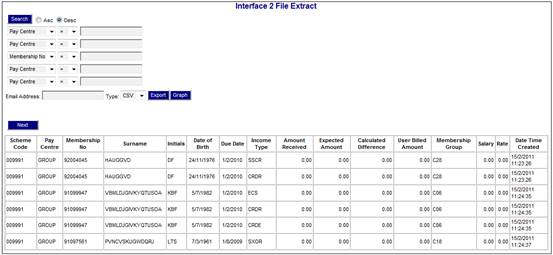
The following fields are displayed:
- Scheme Code
- Pay Centre
- Membership No
- Surname
- Initials
- Date of Birth
- Due Date
- Income Type
- Amount Received
- Expected Amount
- Calculated Difference
- User Billed Amount
- Membership Group
- Salary
- Rate
- Date Time Created
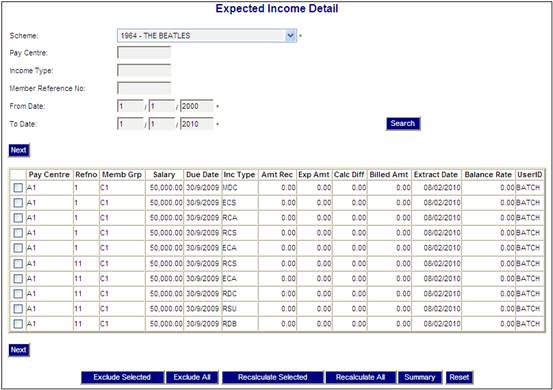
Click Exp Income Differences below Income Billing Differences. The Expected Income Detail screen will be displayed.
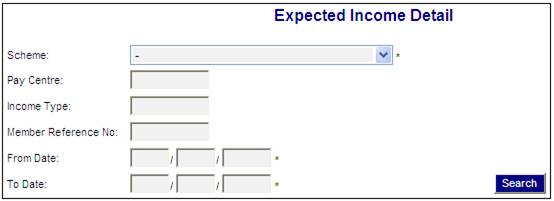
Capture the following details:
|
Scheme |
Select a scheme from the drop-down box. Note: The capture of a scheme is mandatory. |
|
Pay Centre |
Capture a pay centre code. Note: The capture of pay centre is optional. |
|
Income Type |
Capture an income type. Note: The capture of income type is optional. |
|
Member Reference No |
Capture a member reference number to view details for that member. Note: The capture of a member reference number is optional. |
|
From Date |
Capture the date from which the required details must be displayed. Note: The capture of a from date is mandatory. |
|
To Date |
Capture the date to which the required details must be displayed. Note: The capture of a to date is mandatory. |
Click SEARCH.
The Expected Income Detail screen will be displayed.
For more information on this screen, refer to
Processes
Contributions
Income
Income Billing
Process Expected Income
Click Auth Exp Inc Differences below Income Billing Differences. The Authorise Expected Income screen will be displayed.
Capture the following details:
|
Scheme |
Select a scheme from the drop-down box. Note: The capture of a scheme is mandatory. |
|
Pay Centre |
Capture a pay centre code. Note: The capture of pay centre is optional. |
|
Income Type |
Capture an income type. Note: The capture of income type is optional. |
|
From Date |
Capture the date from which the required details must be displayed. Note: The capture of a from date is mandatory. |
|
To Date |
Capture the date to which the required details must be displayed. Note: The capture of a to date is mandatory. |
Click SEARCH.
From the Income Billing menu on the top, click ![]() alongside Income Billing on the sub-menu on the left, then select Exp Income from the list of menu options below it.
alongside Income Billing on the sub-menu on the left, then select Exp Income from the list of menu options below it.

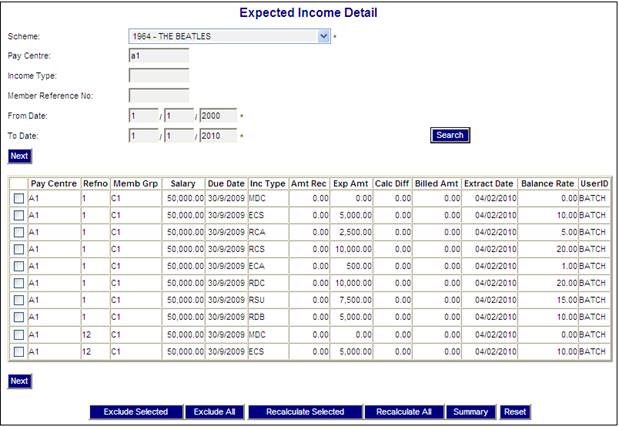
The Expected Income Detail screen will be displayed.
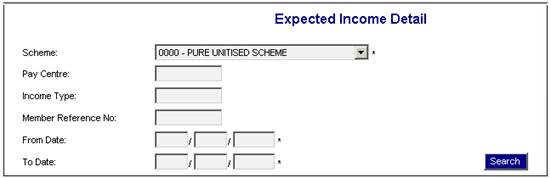
Capture the following details:
|
Scheme |
Select a scheme from the drop-down box. Note: The selection of a scheme is mandatory. |
|
Pay Centre |
Capture the pay centre code. Details for all members of the specified pay centre will be displayed. Note: The selection of pay centre is optional. |
|
Income Type |
Capture the scheme income type. Details for the selected pay centre and/or members, and with the specified income type, will be displayed. Note: The selection of income type is optional. |
|
Member Reference No |
Capture the reference number of a member. Details for the specified member will be displayed. Note: The selection of a member reference number is optional. |
|
From Date |
The date from which the specified data must be extracted. Note: This date is mandatory. |
|
To Date |
The date up to which the specified data must be extracted. Note: This date is mandatory. |
Click SEARCH. The Expected Income Detail screen will be displayed.
Note:
If the scheme parameter is Interface 2, then only the changes that will be included in the file will be shown.
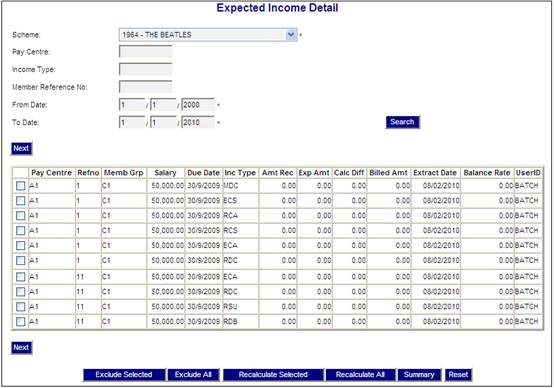
Note:
Where the calculation difference is zero, no accounting transaction will be generated.
To exclude a specific calculation difference amount from the billing process, tick the box alongside Pay Centre, then click EXCLUDE SELECTED. A confirmation message will be displayed.
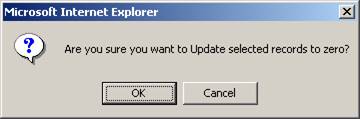
Click CANCEL to reverse the update action, or click OK to update the selected records to zero. The Expected Income Detail screen will now show zeros in the Billed Amt column for the selected records.
To exclude calculation difference amounts from the billing process for all members, click EXCLUDE ALL. A confirmation message will be displayed.
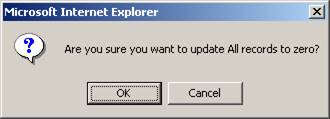
Click CANCEL to reverse the update action, or click OK to update all records to zero. The Expected Income Detail screen will now show zeros in the Billed Amt column for all the records.
If EXCLUDE ALL was used to exclude all amounts in the Billed Amt column, and you want to restore them all back to the original values, leave all the boxes alongside Pay Centre unticked, then click RECALCULATE ALL. A confirmation message will be displayed.
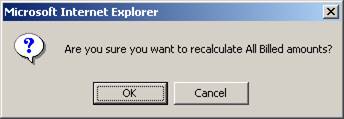
Click CANCEL to reverse the update action, or click OK to update all records to the original values. The Expected Income Detail screen will now show the original values in the Billed Amt column for all the records.
If EXCLUDE ALL was used to exclude all amounts in the Billed Amt column, and you want to restore specific items only, tick the box alongside Pay Centre, then click RECALCULATE SELECTED. A confirmation message will be displayed:
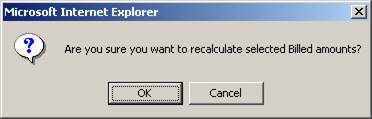
Click CANCEL to reverse the update action, or click OK to update the selected records to the original values. The Expected Income Detail screen will now show the original values in the Billed Amt column for the selected records.
To view a summary (per scheme income type) of the amounts for which the client will be billed click SUMMARY. The Authorise Expected Income screen will be displayed.

To return to the Expected Income Detail screen, click DETAIL.
Note:
This screen can also be accessed by selecting Auth Exp Inc from the menu on the left. Refer to Authorise Expected Income for a description of the authorisation process.
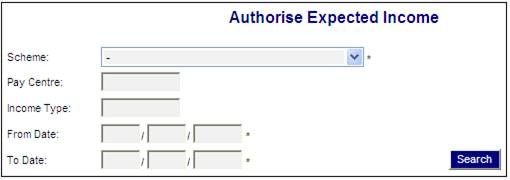
From the Income Billing menu on the top, click ![]() alongside Income Billing on the sub-menu on the left, then select Auth Exp Inc from the list of menu options below it.
alongside Income Billing on the sub-menu on the left, then select Auth Exp Inc from the list of menu options below it.
The Authorise Expected Income screen will be displayed.
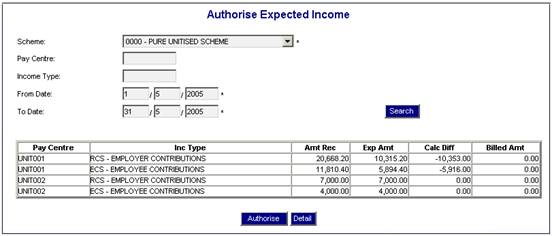
This screen displays a summary (per Scheme Income Type) of the amounts for which the client will be billed. To view more details, click DETAIL. TheExpected Income Detail screen will be displayed.
This screen displays a summary (per Scheme Income Type) of the amounts for which the client will be billed.
To authorise, click AUTHORISE. The following confirmation message will be displayed:
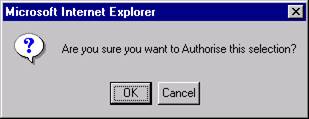
Click CANCEL to reverse the authorisation action, or click OK to authorize. The Authorise Expected Income screen will be re-displayed, and a message will indicate that the transactions are being created.
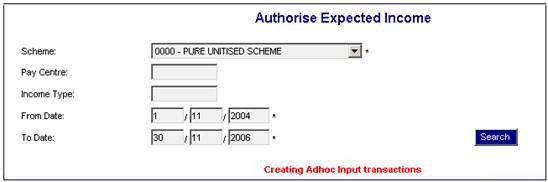
Once the expected income has been authorised, the system will create input transactions that can be viewed under the Adhoc Input menu item. Refer to
Processes
Contributions
Income
Income Billing
Process Ad-hoc Income
If the scheme parameter is set to INTERFACE 2, the adhoc input will be a display of the file that has been created as Interface 2. On the Adhoc income page, all actions are disabled and only viewing is allowed.