There are setup tasks that will be done once the scheme is launched and authorised to the payroll component. This setup will only occur in the beginning of the scheme launch process.
The following functions are covered:
- Setting up the parameter tables for PIP and AFTERWORK.
- Setting up the Interface 1 and the Interface 4 MASK called INT1 and INT4 respectively. The names and the layout of the masks will be updated in the specification at the time of development release.
- Setting up / checking the additional salary/hours/earnings fields.
- Setting up the translations and default values where SAP has a one character and Vision has a different character or a number of characters.
- Linking the mask to the 3 SAP pay centres.
As part of the initial setup of SAP, the PIP and AFTERWORK parameters tables must be updated to display their fund codes.
Note:
At least one pay centre each of type WEALTH, BARCAP and GROUP must exist.
From the Payroll > System Administration menu, click ![]() alongside IN.pensions System on the sub-menu on the left. Additional options will be displayed.
alongside IN.pensions System on the sub-menu on the left. Additional options will be displayed.

Click Miscellaneous below IN.pensions System. The Miscellaneous screen will be displayed.
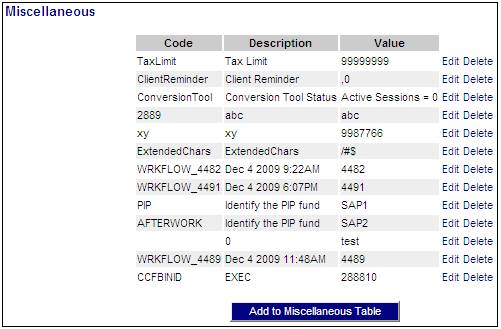
This screen displays miscellaneous parameter tables that may be set.
Find PIP and AFTERWORK in the Code column of the Miscellaneous screen. Click the Edit hyperlink on the right. The Edit Miscellaneous Value screen will be displayed.
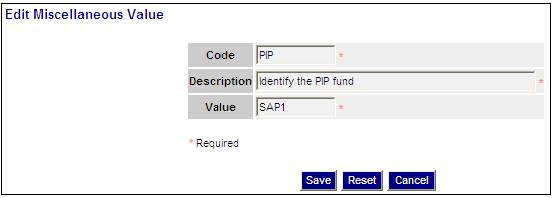
Descriptions of the fields on this screen appear below.
|
Code |
The code identifying the value (in this case PIP or AFTERWORK). |
|
Description |
The text description of the value |
|
Value |
The value (in this case, the code that identifies the PIP or AFTERWORK fund). |
Once the table has been edited, click SAVE. The Miscellaneous screen will be re-displayed.
To add a new table click ADD TO MISCELLANEOUS TABLE. The New Miscellaneous Value screen will be displayed.

Descriptions of the input fields on this screen appear below.
|
Code |
A code that will identify the Value. |
|
Description |
A text description of the value |
|
Value |
The value. |
Note:
The capture of data is mandatory for each field.
Enter the required data, then click SAVE. The Miscellaneous screen will be re-displayed. The value just added will be listed.
To delete a parameter table, click the Edit hyperlink on the right of the parameter. A confirmation message will be displayed.
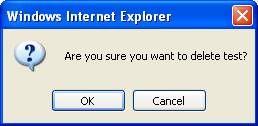
Click to CANCEL cancel the deletion, or click OK to confirm the deletion.
The selected parameter table will be deleted on the miscellaneous screen.
Note:
The new masks should be called MASK CODE = INT1 and MASK CODE = INT4 with a description SAP Interface 1 or 4, but it can be called anything that has meaning to the user. The MASK layout must map exactly to the SAP Interface 1 and 4 layouts.
The ability to configure the MASK has been done in case there is a change to the SAP interface or a requirement to have two different interfaces for the changes that are occurring or may occur. If more fields, like additional income types or salary records are required at any stage, these fields can be added without the assistance of the Vendor.
To set up the new MASK CODE, from the Payroll > System Administration menu, click ![]() alongside Global Data on the sub-menu on the left. Additional options will be displayed.
alongside Global Data on the sub-menu on the left. Additional options will be displayed.

Click Payroll Mask below Global Data. The Payroll Masks screen will be displayed.
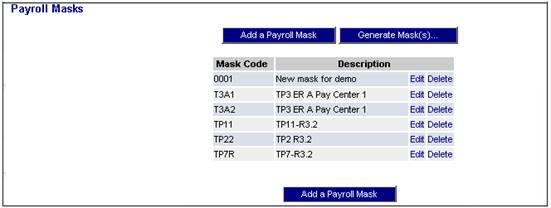
Click ADD A PAYROLL MASK. The Add a Payroll Mask screen will be displayed.

Provide a mask code in the New Mask Code field. You can copy an existing mask by selecting a mask from the drop-down list.
Click NEXT. The Edit a Payroll Mask screen will be displayed.
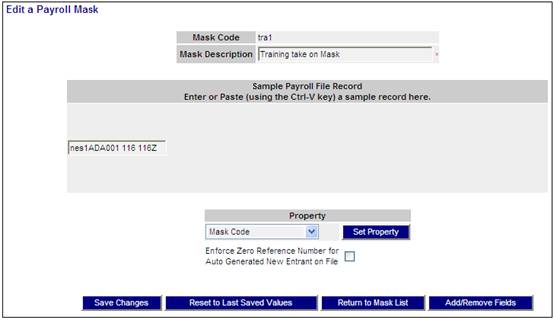
Provide a description for the new mask code and click SAVE CHANGES. The Edit a Payroll Mask screen will be re-displayed.
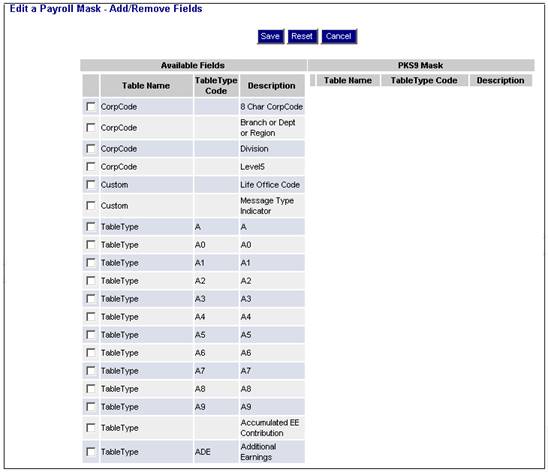
Click ADD / REMOVE FIELDS. The Edit a Payroll Mask - Add/Remove Fields screen will be displayed. Link in all of the fields that are on the interface.
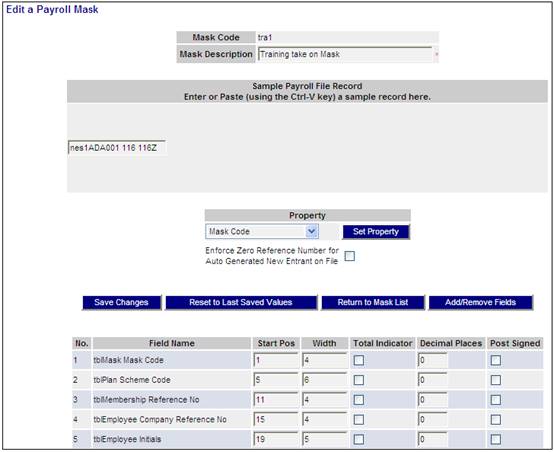
You now need to set the properties of the mask. There are two ways to do this:
- Provide the start position and width of each field, whether the field contains decimal places, and whether the field is signed.
- Copy a sample of the payroll record into the box, i.e. one record in the payroll file. From the Property drop-down list, select the field to set, and then highlight the field in the sample area and click SET PROPERTY. The start position and width of each field will automatically be calculated.
Once all the details and properties have been set correctly, click SAVE CHANGES, then click RETURN TO MASK LIST.
The image below details where the properties are set for each field.
Once the Interface 1 / 4 MASKs have been defined, the mask is generated to be applied to the system.
Once new masks have been created, or existing masks have been edited, they must be generated and applied to the database in order for the system to recognise them as valid masks.
From the Payroll Masks screen, click GENERATE MASK(S). The Generate Masks screen will be displayed. The masks can be generated as programs or for speed which is recommended, generated as a stored procedure that will be e-mailed to the database administrator or placed for the Autodeployer to apply to the database.
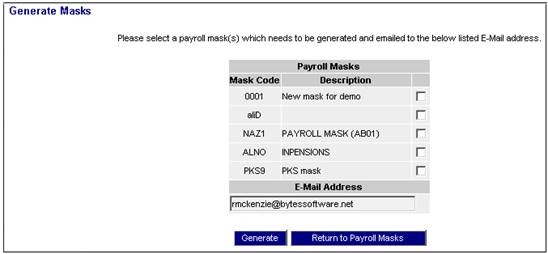
The Generate Masks screen will be displayed and will confirm that generation of the mask is in progress.

From the System Administration menu, click ![]() alongside Global Data on the sub-menu on the left. Additional options will be displayed.
alongside Global Data on the sub-menu on the left. Additional options will be displayed.
Click Payroll Mask below Global Data. The Payroll Masks screen will be displayed.
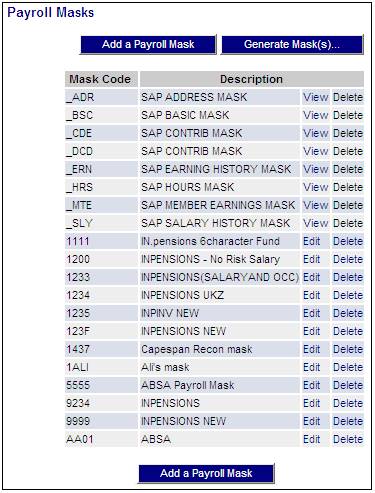
Select the mask for editing by clicking View alongside the mask code.
The Edit a Payroll Mask screen will be displayed.
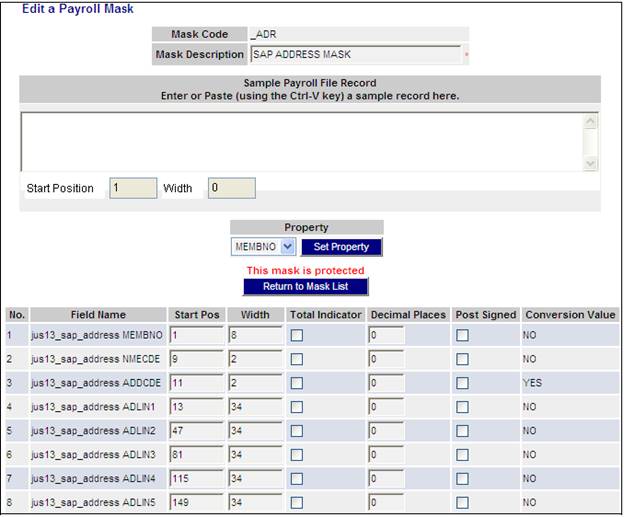
The YES or NO value displayed in the Conversion Value column indicates whether the field must be translated or not.
For more information refer to
Processes
Contributions
Payroll
If the type of record for HOURS, EARNINGS, and SHIFT has not been created and linked to the fund during the authorise process, or if there are additional types of earnings, this data must be created as follows:
From the Payroll sub-menu, click ![]() alongside Global Data on the sub-menu on the left. Additional options will be displayed.
alongside Global Data on the sub-menu on the left. Additional options will be displayed.
Select Income and Expense Types below Global Data. The Income and Expense Types screen will be displayed.
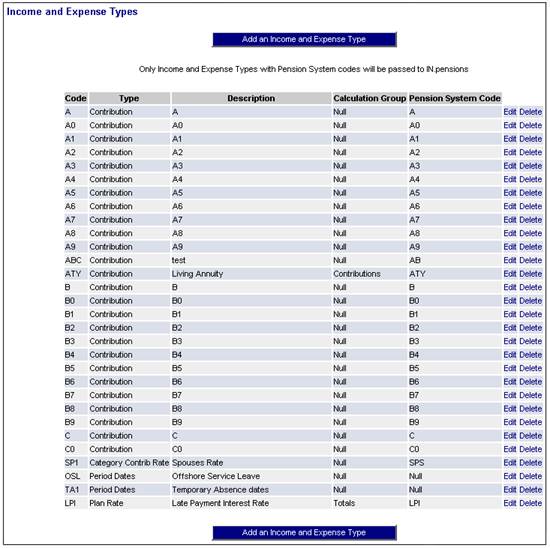
This screen displays a list of all income and expense types currently available. To add a new income type, click ADD AN INCOME AND EXPENSE TYPE.
The Add an Income and Expense Type screen will be displayed.
Descriptions of the input fields on this screen appear below.
|
Code |
COM |
|
Type |
Select an income type from the drop-down box. |
|
Description |
A description / name of the income type to be added. |
|
Calculation Group |
NULL |
|
Pension System Code |
Enter a code to identify the income type on the system that will be created in the accounting engine. |
Enter the required data, then click SAVE. The Income and Expense Types screen will be re-displayed. The type just added will be listed.
The new income type that has been added must be linked to a scheme.
Select Fund Management from the top menu. The Select Fund and Date Effective screen will be displayed.

Select the required Fund (scheme) and Date Effective, then click NEXT.
The Fund Management screen will be displayed.
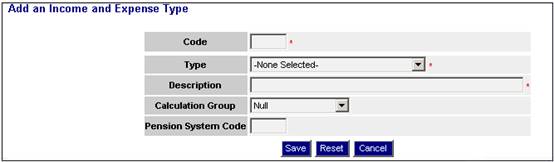
Select Fund Details from the sub-menu on the left. The Fund Details List screen will be displayed.

From the Fund Details List screen, click Edit at the end of the required line. The Edit Fund Details screen will be displayed.
This screen allows values for certain fields to be updated.
Alternate fund code
Some schemes may have separate codes for employee and employer contributions (e.g. employee contributions may go to a pension fund while employer contributions go to a provident fund). In order to avoid the duplication of submitting a payroll file for each scheme, a facility exists to allocate each set of contributions into the relevant schemes. This is done by setting an alternate fund code.
Alternate fund codes are relevant only in cases where payroll files are loaded, and will have the following effects:
- the employer contributions (RCS) are loaded to the main scheme, and the employee contributions (ECS) are loaded to the alternate fund code
- if there are new entrants on the payroll file, they will be loaded to both the main scheme and the alternate fund code
Expenses usually come from the main fund.
From the Fund Details List screen, click Edit at the end of the required line. The Edit Fund Details screen will be displayed.
Enter the alternate fund code, then click SAVE.

The Fund Details List screen will be re-displayed, and the alternate fund code will appear in the relevant column.
This completes the scheme launch process and the system is now ready for the first update cycle to begin.
Member Expenses?
You will be able to upload the payroll file with fees and premiums regardless of whether the Member Expenses Flag is ticked or not. However, the Member Expenses Flag must be ticked in order for the expenses to automatically be calculated by the remittance.
Note:
When the Member Expenses Flag is ticked, the remittance will still override the values loaded.
If you are satisfied that the correct scheme has been selected, select Income and Expense Types from the sub-menu on the left. The Scheme Income And Expense Types List screen will be displayed.
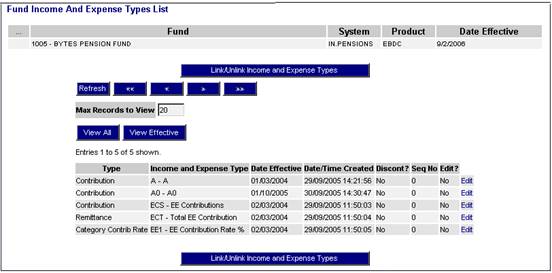
This screen displays a list of all income and expense types that are currently linked to the scheme selected. If the income types have been setup on the rules when launching the scheme, then all will appear on this screen.
It is only necessary to add more if there is something that needs to be manipulated on the payroll file, e.g. the system works with monthly salary but some payrolls have only annual salary and hence a new income type would be set up for the annual salary to be mapped to and then the monthly salary income type would have a calculation linked to it that divided the annual salary by 12.
Click LINK / UNLINK INCOME AND EXPENSE TYPES.
The Link/Unlink Income and Expense Types screen will be displayed.
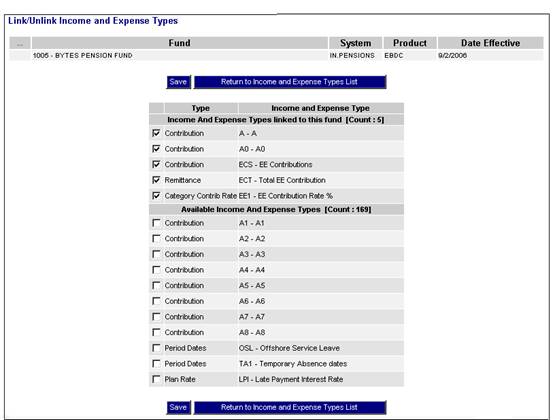
The first section of the screen displays all of the income and expense types that are currently linked to this scheme. These items have a tick alongside them. The lower portion of the screen lists income and expense types that are NOT currently linked to this scheme.
To link income and expense types to this scheme, click in the empty box alongside the appropriate item in the list. A tick will appear in the box. Once all the required items have been selected, click SAVE.
The Link/Unlink Income and Expense Types screen will be re-displayed. The types just added will be listed in the first section of the screen.
The new income type has now been linked to the scheme.
Conversion Fields on Fund Fields
If the field values held on the payroll input file differ to the values required by the system, they will need to be converted before the data can be imported into the system. This can be done as part of the payroll import process, provided the values to be converted have been identified, and set up in a conversion table.
From the main menu on the top, select Fund Management. The Select Fund and Date Effective screen will be displayed.
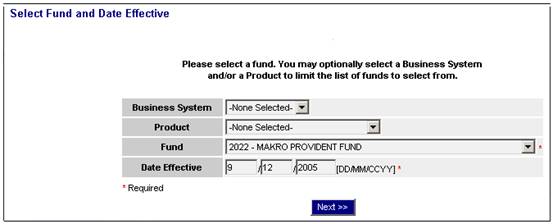
Select the required Business System, Product, Fund (scheme) and Date Effective, and then click NEXT.
The Fund Management screen will be displayed.
From the sub-menu on the left, select Fund Fields. The Fund Fields screen will be displayed.
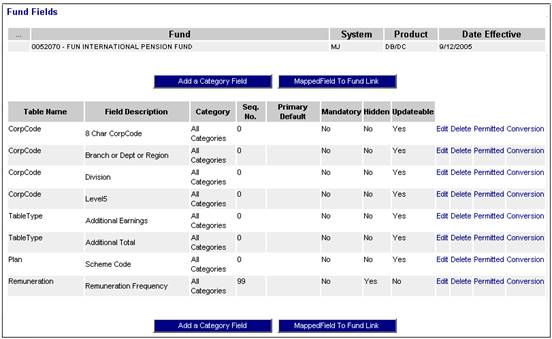
Scroll to the field requiring conversion, and then click the Conversion hyperlink on the right.
The Conversion Values for Field (xxx) of Fund (yyy) screen will be displayed.

Click ADD A CONVERSION VALUE.
The Add a Conversion Value for Field (xxx) of Fund (yyy) screen will be displayed.
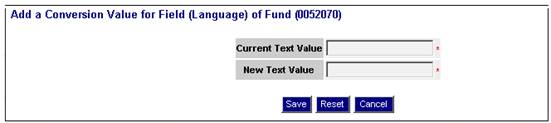
Provide the current text value (i.e. the value that appears on your input file), and provide a new text value (i.e. the value to which it must be changed). Click SAVE.
The Conversion Values for Field (xxx) of Fund (yyy) screen will be displayed, and will show the values that you have just captured.

The values provided will be stored in a table, and will be used for converting the applicable fields on the payroll input file. These values can be edited and deleted (if and when necessary) by clicking on the appropriate hyperlinks.
For example, for language the E from the SAP interface will be converted to ENGLISH or if language is not on the SAP interface, then this will be used to create the default so that when spaces are received, ENGLISH will be inserted.
Pay centre settings
From the Payroll, Client Administration menu, select Pay Centre Setting from the sub-menu on the left.
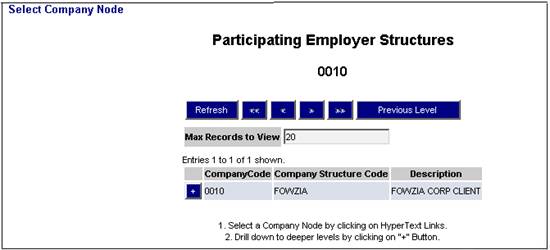
The Select Company Node (Principal Employers) screen will be displayed, listing all the principal employers.
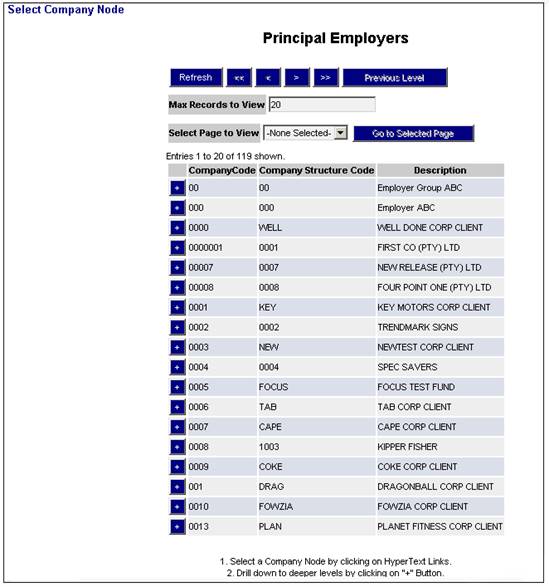
Click ![]() to drill down to the next level. The Select Company Node (Participating Employer Structures) screen will be displayed, listing all the participating employers for the selected principal employer. This will be the three participating employers that have the pay centre linked to them.
to drill down to the next level. The Select Company Node (Participating Employer Structures) screen will be displayed, listing all the participating employers for the selected principal employer. This will be the three participating employers that have the pay centre linked to them.
Select the participating employer to which the pay centre is to be associated, by clicking the name in the Description column alongside the required employer.
The Pay Centres screen will be displayed, listing the pay centres for the selected participating employer.
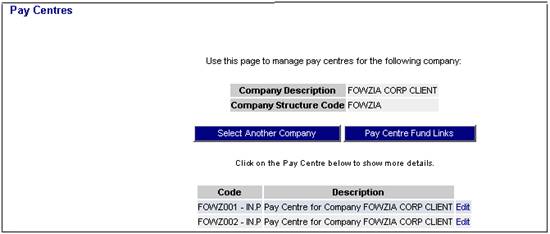
Click Edit at the end of the line alongside the pay centre you wish to access.
The Edit a Pay Centre screen will be displayed.
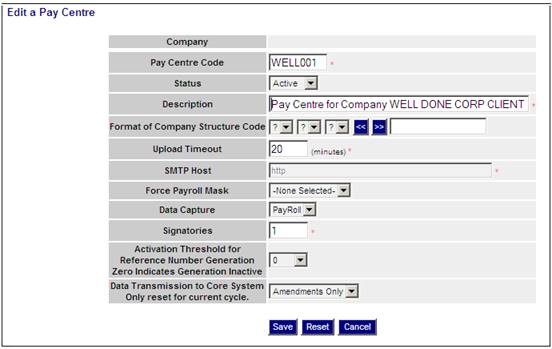
In the screen above, select the data capture option of AUTO, and select the force payroll mask of INT1 / 4 or the mask that has been setup for Interface 1 / 4.
Note:
The system allows for two payroll MASKS to be setup when AUTO is selected – one for Interface 1 and one for Interface 4.
All the setup data has now been completed.
Note:
UK Pension Administration will continue to provide SAP with number ranges from which they will allocate pension numbers, which will in turn be used by Vision as the unique number across all membership (Membno).
SAP must ensure that they consistently provide the membership number in the same field across all interface files of the same type. In all files, Membno will be the first field in all inbound files.
Pay centre reference numbers and payment method
Before membership details can be added, a valid range of reference numbers must exist for the pay centre.
From the Client Administration menu, select Pay Centre Reference Numbers from the sub-menu on the left. The Select Business System and Product screen will be displayed.
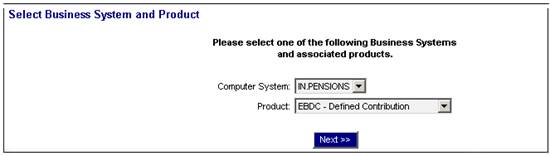
Select the required computer system and product, and then click NEXT.
The Reference Number Allocation for Pay Centres screen will be displayed.
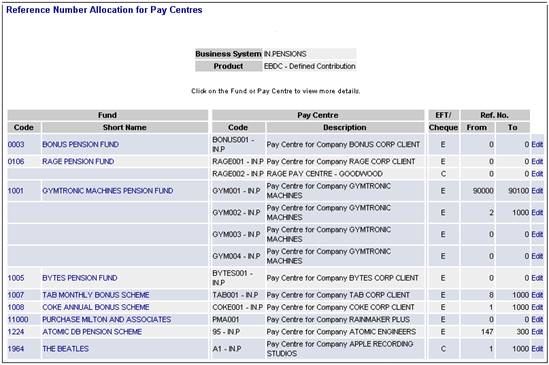
Click Edit at the end of the line alongside the Pay Centre you wish to access. The Edit Reference Number Allocation and Payment Method for a Pay Centre screen will be displayed.

Descriptions of the input fields on this screen appear below.
|
EFT / Cheque |
Select the method of payment for the Pay Centre |
|
Reserved Reference Number FROM |
Provide the first number in the range |
|
Reserved Reference Number TO |
Provide the last number in the range |
Note:
- If the activation threshold is inactive (i.e. if it has been coded as 0), then the GENERATE NEW RANGE button will be greyed out.
- If the activation threshold is active (i.e. if one of the values has been selected) then the GENERATE NEW RANGE button will be available. When this button is clicked, the range of numbers changes as follows:
Reserved Reference Number FROM becomes the next available number for the fund and pay centre.
Reserved Reference Number TO becomes 10000 more than the FROM number. This number can then be changed manually, if required.
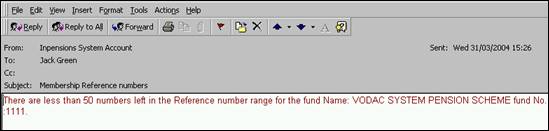
- When the difference between the FROM and TO numbers reaches the value selected in the activation threshold, an e-mail is generated and sent to the administrator. If the activation threshold is inactive, then this e-mail is generated when there are 50 numbers left (example below).