Once a new scheme has been authorised, and the initial load process, which is used to load the scheme's table types, pay centres, and company details has been completed (Data Setup Wizard), the system will automatically recreate the values created during the scheme launch, on Payroll.
The only tasks remaining are to configure the Remittance Advice and the Calculations.
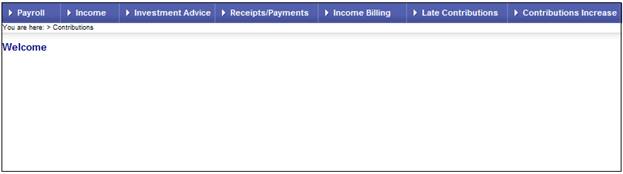
Log in to the system from the Logon page.
Click processes, then click contributions.
Note:
This will only be available to users with PAYROLL or SUPER USER security access.
The Welcome screen will be displayed.
From the main menu on the top, select Payroll. The Payroll screen will be displayed.

To view the scheme launch data created on Payroll, select FUND MANAGEMENT from the menu on top.
The system will prompt you to select a Fund and an Effective Date.
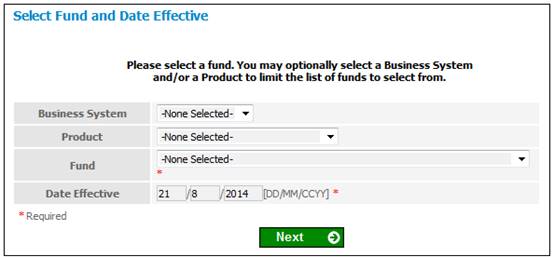
Field notes:
|
Business System |
The particular System that must be interfaced to. If no selection is made from the drop down list then the system will default to IN.PENSIONS. |
|
Product |
The specific pension product used by the Fund to be selected. The selection that is made from the drop down list will determine which Funds are displayed for selection in the Fund field following. If no selection is made, the Product field will take the value of the Product for the Fund selected below. |
|
Fund |
The specific fund. Select a fund from the drop down list. If a product was selected from the Product drop down list then only those funds that use that product are displayed for selection. If no selection was made from the Product drop down list then all funds will be displayed for selection in the Fund drop down list. The selection of a fund is mandatory. |
|
Date Effective |
The effective date of the business system. If no date is input, then the system will default to the current date. |
Once all of the required data has been captured, click NEXT.
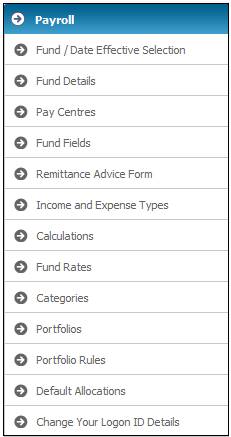
The Fund Management screen will be displayed with the Payroll sub-menu on the left.
Note:
Selecting Fund / Date Effective Selection from the menu will also display the Select Fund and Date Effective screen.
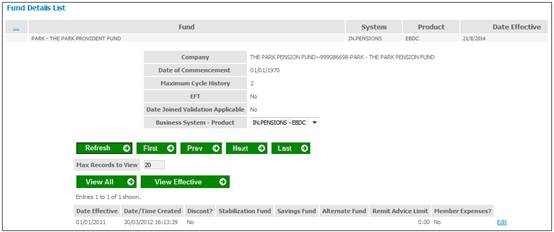
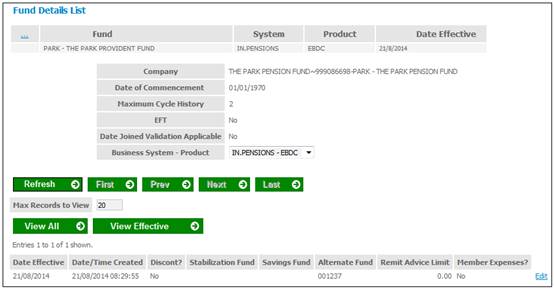
From the sub-menu on the left, select Fund Details. The Fund Details List screen will be displayed.
Editing fund details
From the Fund Details List screen, click Edit at the end of the required line. The Edit Fund Details screen will be displayed.
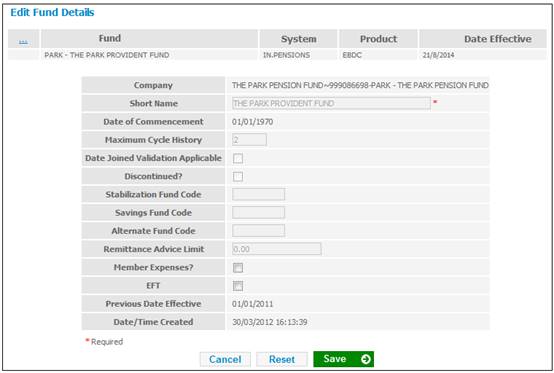
This screen allows values for certain fields to be updated.
Alternate fund code
Some schemes may have separate codes for employee and employer contributions (e.g. employee contributions may go to a pension fund while employer contributions go to a provident fund). In order to avoid the duplication of submitting a payroll file for each scheme, a facility exists to allocate each set of contributions into the relevant schemes. This is done by setting an alternate fund code.
Alternate fund codes are relevant only in cases where payroll files are loaded, and will have the following effects:
- the employer contributions (RCS) are loaded to the main scheme, and the employee contributions (ECS) are loaded to the alternate fund code
- if there are new entrants on the payroll file, they will be loaded to both the main scheme and the alternate fund code
Expenses usually come from the main fund.
From the Fund Details List screen, click Edit at the end of the required line. The Edit Fund Details screen will be displayed.
Enter the alternate fund code, then click SAVE.
The Fund Details List screen will be re-displayed, and the alternate fund code will appear in the relevant column.
This completes the scheme launch process and the system is now ready for the first update cycle to begin.
From the sub-menu on the left, select Pay Centres. The List Pay centres for a Fund screen will be displayed.
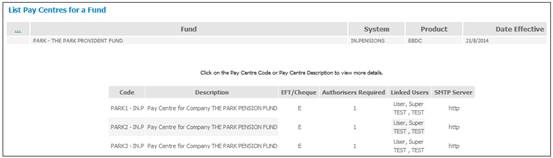
This screen displays the following details:
|
Code |
The Code of the Pay Centre |
|
Description |
The name of the Pay Centre |
|
EFT / Cheque |
Whether benefits are payable by EFT or by Cheque. |
|
Authorisers Required |
The number of Users required for authorisation purposes. |
|
Linked Users |
The User Id’s of the Users linked to the Pay Centre. |
|
SMTP Server |
The name of the SMTP Host. |
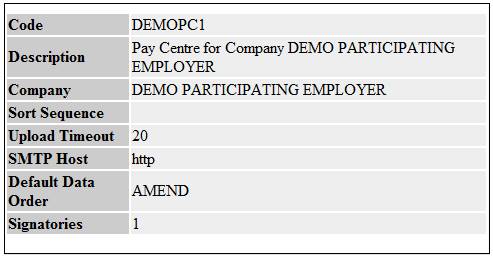
To view details of the Pay Centre, click on the hyperlinked Code or Description.
The details of the Pay Centre will be displayed.
From the sub-menu on the left, select Fund Fields. The Fund Fields screen will be displayed.
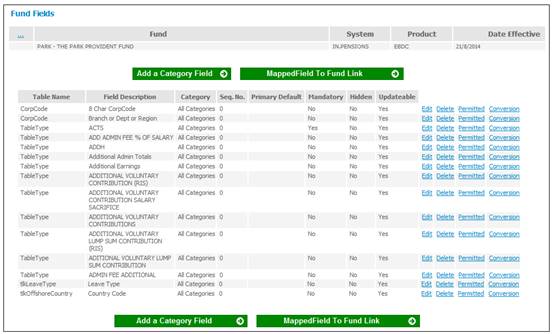
Mapped Field To Fund Link
To link a field to a fund, click MAPPED FIELD TO FUND LINK. The Mapped Field To Fund Link screen will be displayed.
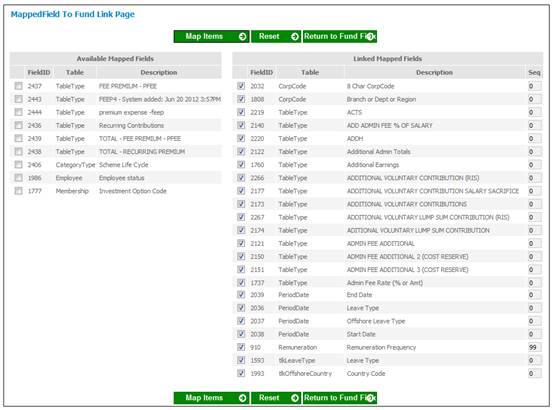
The fields already selected are displayed in the Linked Mapped Fields column.
The fields available for selection are displayed in the Available Mapped Fields column.
To select a field, click on the tick-box in the Available Mapped Fields column. The field is now selected (ticked).E.g.
![]()
To complete the mapping of the selected item, click MAP ITEMS. The selected field will be removed from the Available Mapped Fields column and displayed as a ticked field in the Linked Mapped Fields column.
To deselect a field, click on ticked tick-box in the Linked Mapped Fields column. The field is now deselected (un-ticked).E.g.
![]()
To complete the de-selection of the selected item, click MAP ITEMS. The selected field will be removed from the Linked Mapped Fields column and displayed as an un-ticked field in the Available Mapped Fields column.
Edit
Scroll to the required field, then click the Edit hyperlink on the right. The Edit a Fund Field screen will be displayed.

Click SAVE once the edits to the screen fields have been made.
Delete
Scroll to the required field, then click the Delete hyperlink on the right.
The following message will be displayed:
Are you sure you want to delete?
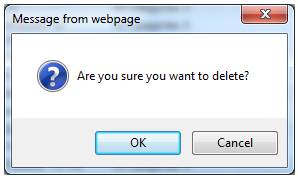
Click OK to confirm deletion.
The field will be deleted on the Fund Fields screen.
Permitted
Scroll to the following field, then click the Permitted hyperlink on the right:
- Table Name = Employee
- Field Description = Occupation
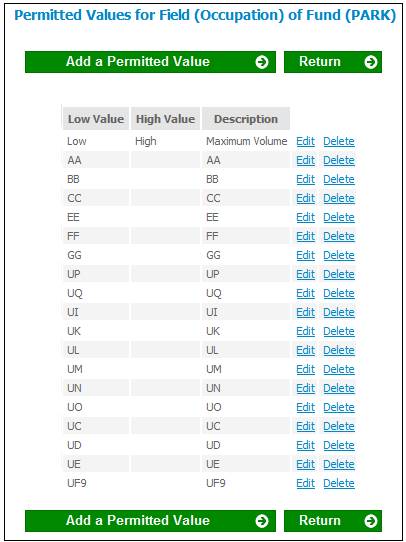
The Permitted Values for Field (Occupation) of Fund (xxxx) screen will be displayed.
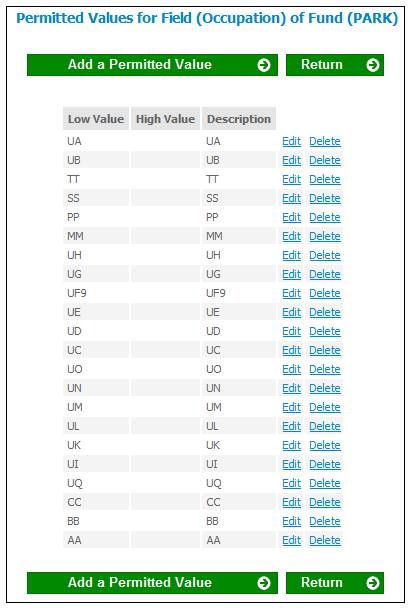
Click ADD A PERMITTED VALUE. The Add a Permitted Value for Field (xxxx) of Fund (Occupation) screen will be displayed.
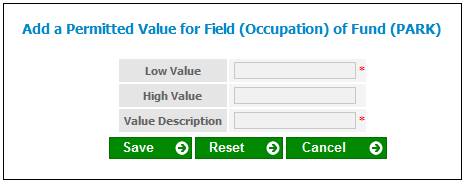
Note:
The value for LOW VALUE is the code as it will appear on a payroll site where a payroll file is loaded each month.
The value for DESCRIPTION is the text that will be displayed on the member screen under DATA CAPTURE. Refer to Field available for use.
Enter the required details, then click SAVE.
The Add a Permitted Value for Field (Occupation) of Fund (xxxx) screen will be re-displayed, and the captured value will be displayed.
Conversion
If the field values held on the payroll input file differ to the values required by the system, they will need to be converted before the data can be imported into the system. This can be done as part of the payroll import process, provided the values to be converted have been identified, and set up in a conversion table.
Scroll to the field requiring conversion, then click the Conversion hyperlink on the right.
The Conversion Values for Field (xxx) of Fund (yyy) screen will be displayed.
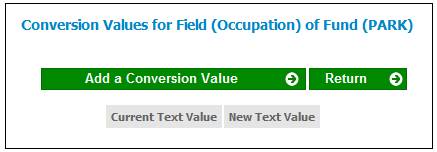
Click ADD A CONVERSION VALUE.
The Add a Conversion Value for Field (xxx) of Fund (yyy) screen will be displayed.
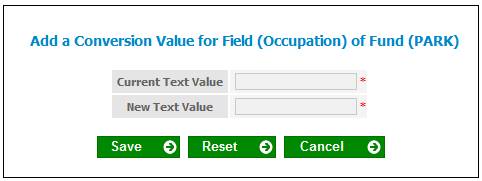
Provide the current text value (i.e. the value that appears on your input file), and provide a new text value (i.e. the value to which it must be changed). Click SAVE.
The Conversion Values for Field (xxx) of Fund (yyy) screen will be displayed, and will show the values that you have just captured.
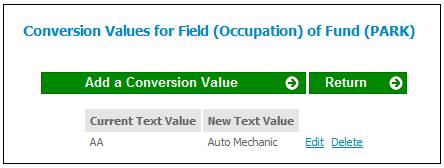
The values provided will be stored in a table, and will be used for converting the applicable fields on the payroll input file. These values can be edited and deleted (if and when necessary) by clicking on the appropriate hyperlinks.
Note:
Ensure the effective date is the cycle month from which the new field should be available.
The Fund Management screen will be displayed.
Select Fund Fields from the sub-menu on the left. The Fund Fields screen will be displayed.

From the sub-menu on the left, select Remittance Advice Form. The Show Remittance Advice Details screen will be displayed.
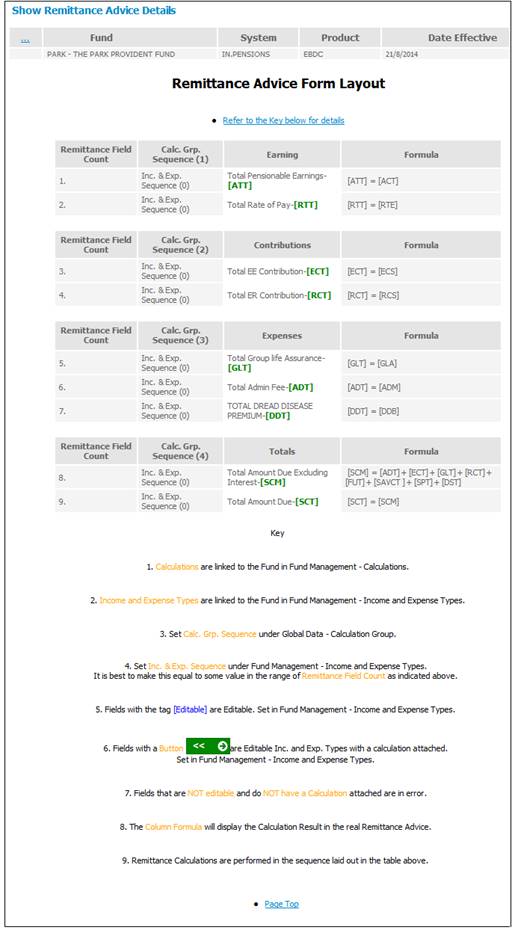
This screen must be checked in order to confirm that what was captured under the Income and Expense Types and Calculations menu selections is displayed. (Refer to these sections below).
Note:
The formula displayed in the Formula column displays the Calculation Result in the real Remittance Advice.
Remittance Calculations are performed in the sequence laid out in the Calc. Grp. Sequence column.
From the sub-menu on the left, select Income and Expense Types. The Fund Income And Expense Types List screen will be displayed.
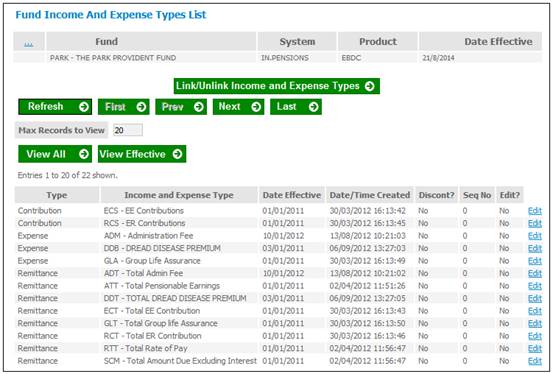
This screen displays a list of all income and expense types that are currently linked to the scheme selected.
Link / Unlink Income and Expense Types
Click LINK/UNLINK INCOME AND EXPENSE TYPES. The Link/Unlink Income and Expense Types screen will be displayed.

The various income and expense types may be selected by ticking / un-ticking the boxes.
Income And Expense Types linked to this fund
The first section of the screen displays all of the income and expense types that are currently linked to this scheme. These items have a tick alongside them.
Available Income And Expense Types
The lower portion of the screen lists income and expense types that are NOT currently linked to this scheme.
To link income and expense types to this scheme, click in the empty box alongside the appropriate item in the list. A tick will appear in the box. Once all the required items have been selected, click SAVE.
The Link/Unlink Income and Expense Types screen will be re-displayed. The types just added will be listed in the first section of the screen.
The new income type has now been linked to the scheme.
Any calculations necessary for the new income type must now be linked to the scheme, so that calculations can be performed automatically when necessary.
Edit
Scroll to the required field and click the edit hyperlink on the right. The Fund Income and Expense Type Edit screen will be displayed.
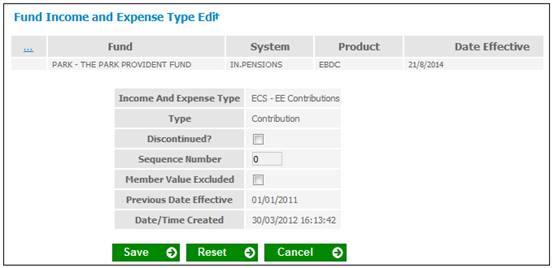
The following fields may be edited using the tick-boxes:
Discontinued?
Member Value Excluded
Once the changes have been made, click SAVE.
From the sub-menu on the left, select Calculations. The Fund Calculation Summary screen will be displayed.
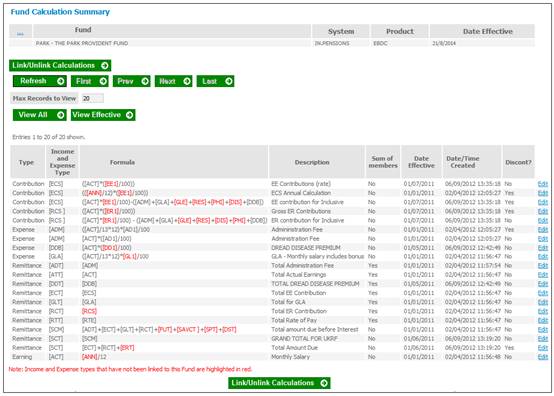
Link / Unlink Calculations
Click LINK/UNLINK CALCULATIONS. The Calculations screen will be displayed.
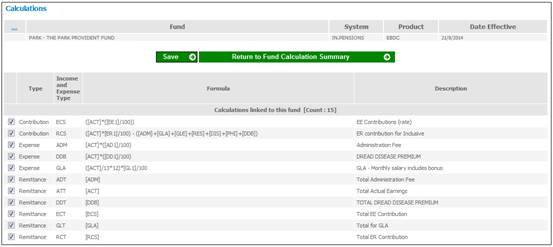
The first section of the screen displays all of the calculations that are currently linked to this scheme. These items have a tick alongside them. The lower portion of the screen lists calculations that are NOT currently linked to this scheme.
To link calculations to this scheme, click in the empty box alongside the appropriate item in the list. A tick will appear in the box. Once all the required items have been selected, click SAVE.
The Calculations screen will be re-displayed. The calculations just added will be listed in the first section of the screen.
The calculation for the new income type has now been linked to the scheme.
Edit
On the Fund Calculation Summary screen, scroll to the required field and click the edit hyperlink on the right. The Fund Calculation Edit screen will be displayed.
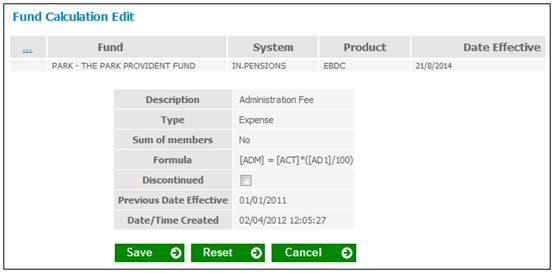
The Discontinue field may be edited using the tick-box. Once the change has been made, click SAVE.
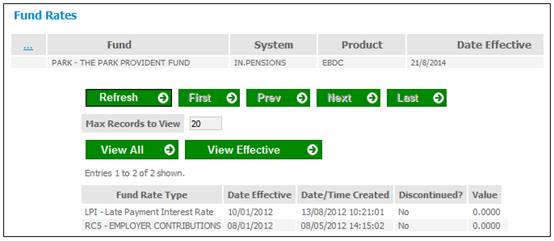
From the sub-menu on the left, select Fund Rates. The Fund Rates screen will be displayed.
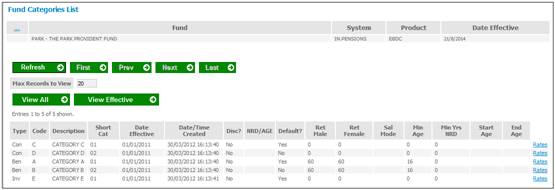
From the sub-menu on the left, select Categories. The Fund Categories List screen will be displayed.
Scroll to the required field and click the Rates hyperlink on the right. The Fund Category Rates List screen will be displayed.
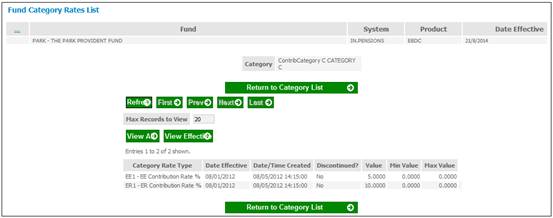
This screen displays the rates defined for the selected Category.
From the sub-menu on the left, select Portfolios. The Fund Portfolios List screen will be displayed.
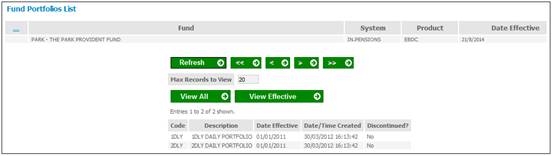
This screen displays the Portfolios linked to the selected scheme.
From the sub-menu on the left, select Portfolio Rules. The Portfolio Rules List screen will be displayed.
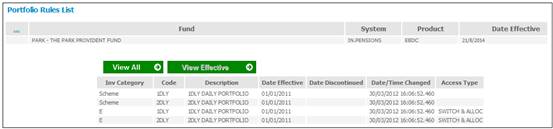
This screen displays the Portfolio Rules for the Portfolios linked to the scheme.
From the sub-menu on the left, select Default Allocations. The Default Allocations List screen will be displayed.
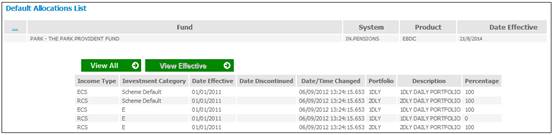
This screen displays the default allocation of contributions to portfolios as defined in the Scheme Rules.