To add a new employee, from the Data Capture menu, click ![]() alongside Employee on the sub-menu on the left. Additional options will be displayed.
alongside Employee on the sub-menu on the left. Additional options will be displayed.
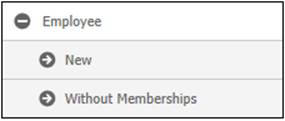
Click New below Employee.
The Select Company Node Participating Employer Structures - Level (3) screen will be displayed (level 3 is the company branch).
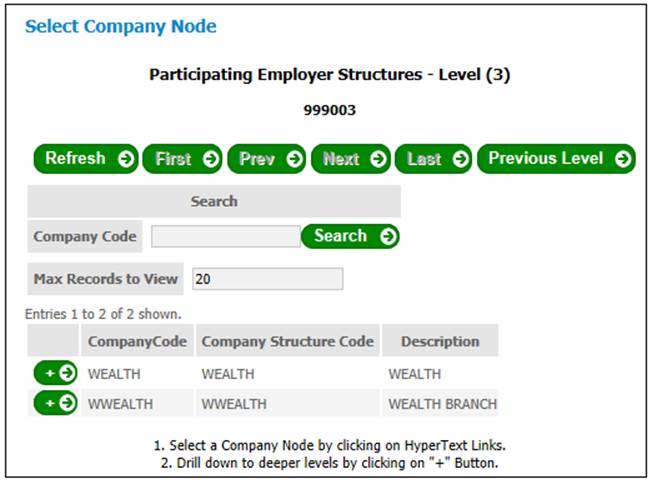
To display the associated pay centre, click the hyperlinked name in the Description column.
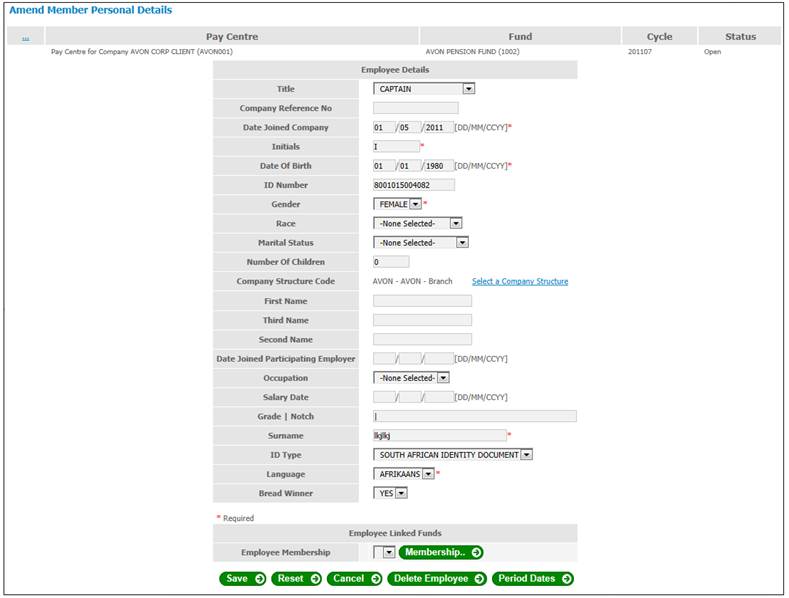
The New Employee screen for the selected pay centre will be displayed.
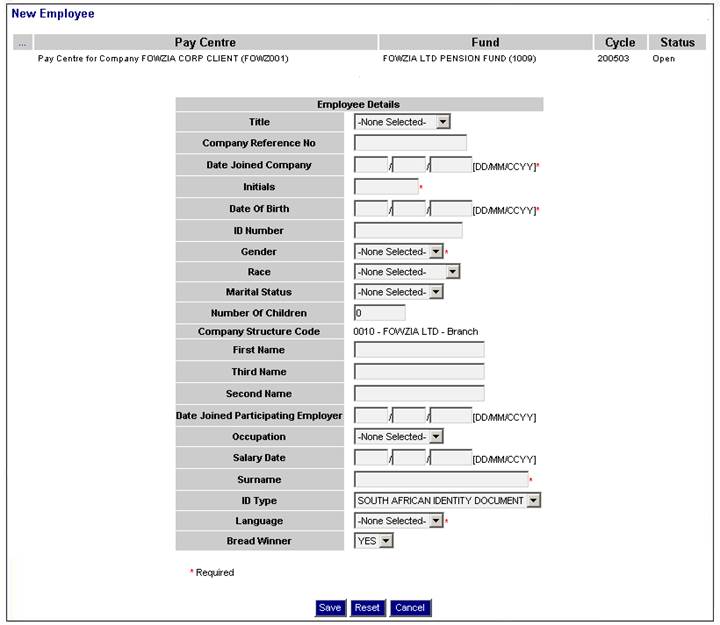
Descriptions of the input fields on this screen appear below.
|
Employee Details |
|
|
Surname |
The surname of the employee |
|
Title |
The title with which the employee's name should be prefixed. The following options are available in the drop down box: - MASTER - THE HONORABLE - CAPTAIN - DOCTOR - LADY - LORD - MAJOR - MISS - MISS / MRS - MISTER - MISSUS - PROFESSOR - PASTOR - REVEREND - SIR |
|
Company Reference No |
The unique number allocated to the employee by the company |
|
Date Joined Company |
The date on which an employee joined the company |
|
Initials |
The initials of the employee |
|
Date of Birth |
The birth date of the employee |
|
ID Number |
The national identity number of the employee |
|
Gender |
The sex of the employee. The following options are available from the drop-down list: - FEMALE - MALE |
|
Race |
The racial classification of the employee. The following options are available from the drop-down list: - NON RACIAL BASIS - ASIAN - WHITE - COLOURED - BLACK |
|
Marital Status |
The current marital status of the employee. The following options are available from the drop-down list: - SEPARATED - SINGLE - MARRIED - WIDOWED - DIVORCED |
|
Number Of Children |
The number of children dependent on the employee |
|
Company Structure Code |
The company structure defined at level 3 |
|
First Name |
The first name of the employee |
|
Date joined Participating Employer |
The date on which the employee joined the participating employer |
|
ID Type |
The country of origin of the employee's identification document. The following options are available from the drop-down list: - SOUTH AFRICAN IDENTITY DOCUMENT - OTHER |
|
Language |
The language by which the employee wishes to be addressed. The following options are available from the drop-down list: - ENGLISH - AFRIKAANS |
|
Bread Winner |
This field indicates whether or not the employee is the breadwinner of the family. The following options are available from the drop-down list: - NO - YES |
Note:
A red asterisk (*) alongside a field indicates that the entry of data is mandatory, i.e. this field may not be blank.
Complete the required data, then click SAVE.
The Amend Member Personal Details screen will be displayed.
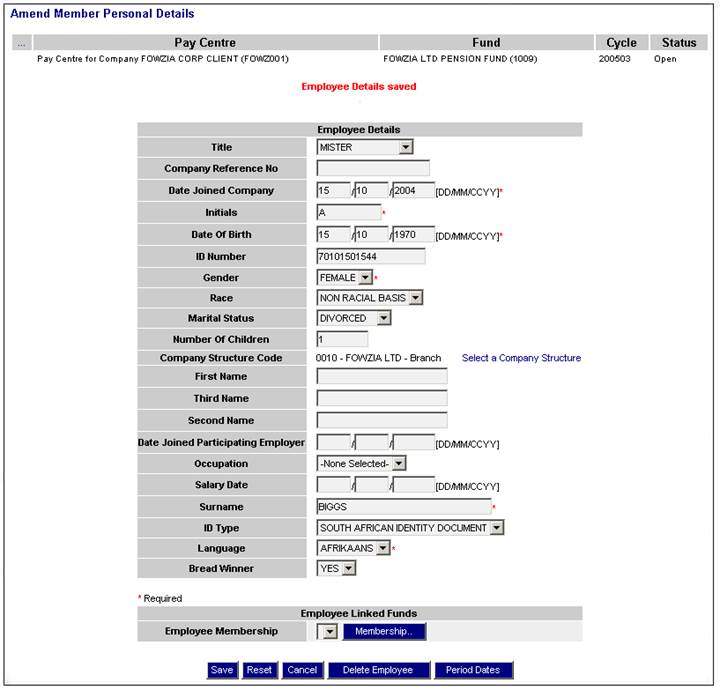
A message at the top of the screen will confirm that the employee details have been saved.
Displays employees who do not have memberships and enables them to be created as members.
From the Data Capture menu, click ![]() alongside Employee on the sub-menu on the left. Additional options will be displayed.
alongside Employee on the sub-menu on the left. Additional options will be displayed.
Click Without Memberships below Employee. The Amend Employee Details / Add Membership screen is displayed.
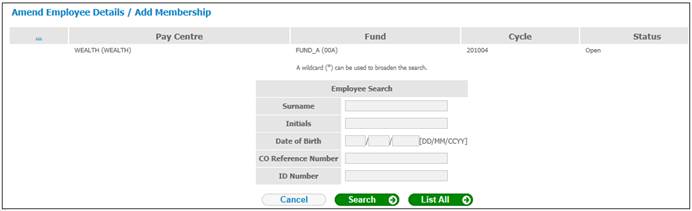
Click LIST ALL. Details will be displayed at the bottom of the screen.
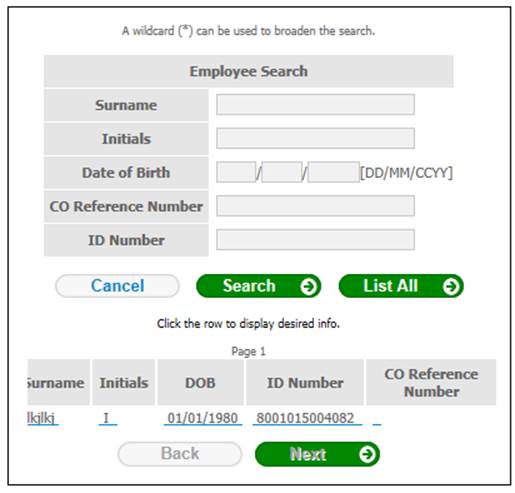
Click on a hyperlinked Surname. The Amend Member Personal Details screen will be displayed.
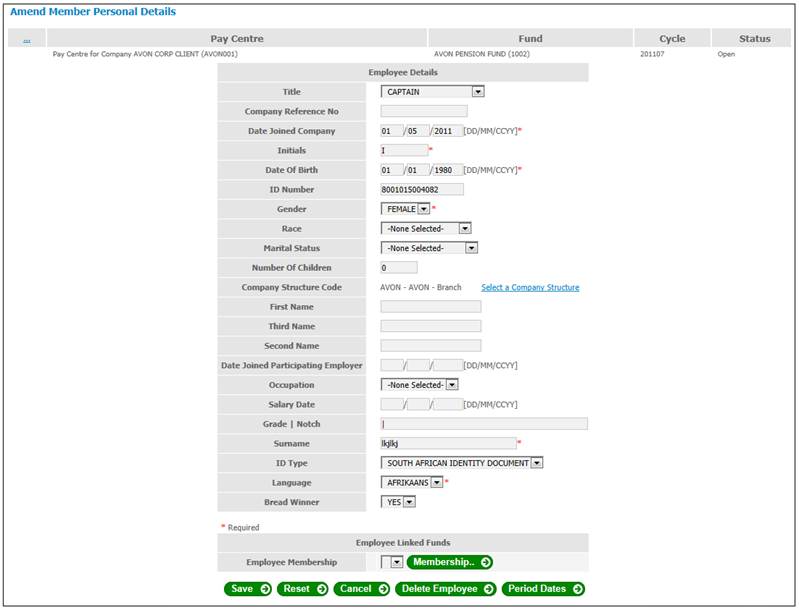
On this screen you can amend any of the employee details captured.
Delete
To delete the employee, click DELETE EMPLOYEE.
Period Dates
Click PERIOD DATES. The Period Date Details screen is displayed.
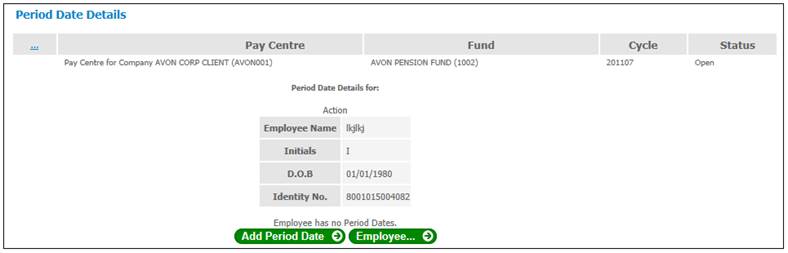
Click ADD PERIOD DATE. The following section is displayed at the bottom of the screen.
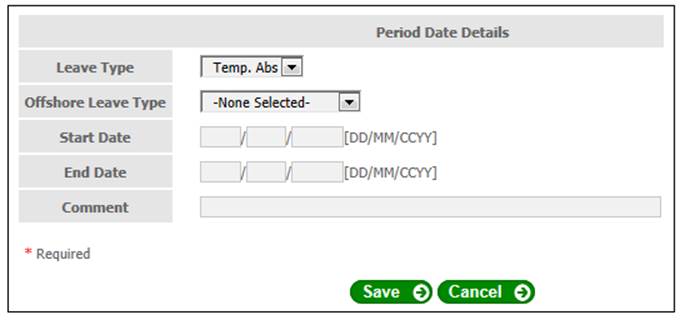
Click SAVE or click EMPLOYEE… to return to the Amend Member Personal Details screen.
Membership
To convert the employee details to membership details, click MEMBERSHIP. The Add/Update Membership Details screen will be displayed.
On this screen you can update any of the employee details captured.
Note:
Before membership details can be updated, a valid range of reference numbers must exist for the pay centre. When MEMBERSHIP is selected, the system will display the following message if a reference number range must first be allocated:
A range must first be allocated before new memberships can be processed. Please contact your system administrator. Back

To define a range of reference numbers for the Pay Centre, select Client Administration > Pay Centre Reference Numbers.
Refer to Pay centre reference numbers and payment method under
Product launch Requirements
Company Structure and Initial Load
Initial Load
Note:
To add a member to individual investment funds (e.g. preservation funds), refer to
Products
Preservation Fund
Select Client Administration > Pay Centre Reference Numbers. The Select Business System and Product screen is displayed.
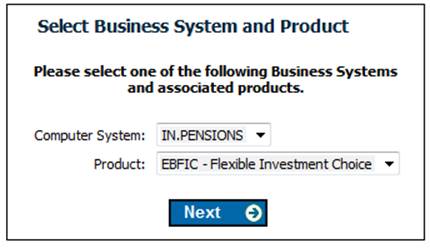
Make the necessary selections and click NEXT. The Reference Number Allocation for Pay Centres screen is displayed.
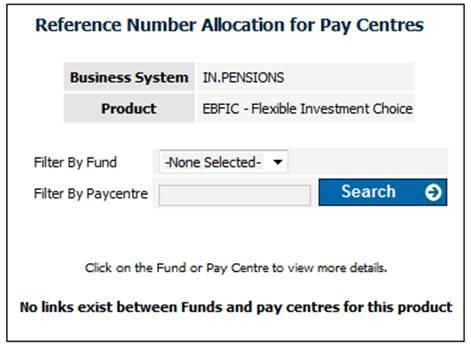
Capture the Fund number in the Filter by Fund field. The Pay Centres for the Fund are displayed on the screen.
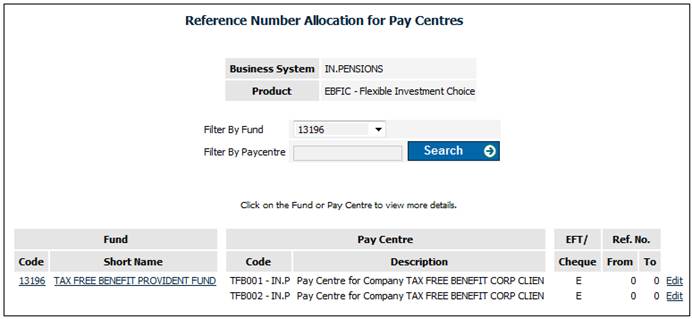
Click Edit alongside a Pay Centre. The Edit Reference Number Allocation and Payment Method for a Pay Centre screen is displayed.
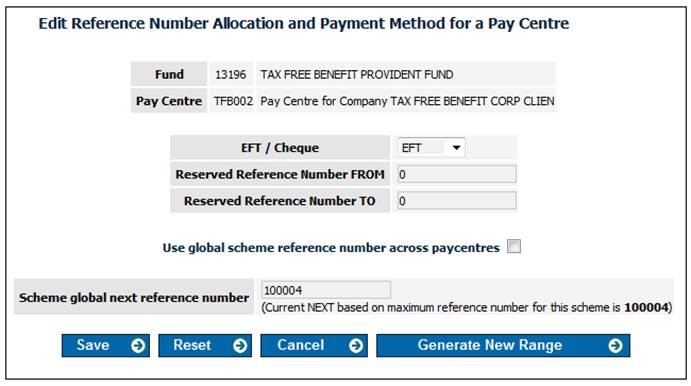
Descriptions of the input fields on this screen appear below:
|
EFT / Cheque |
Select the method of payment for the pay centre |
|
Reserved Reference Number FROM |
Provide the first number in the range |
|
Reserved Reference Number TO |
Provide the last number in the range |
Click SAVE.
Note:
Refer to Data setup wizard Step 2.
- If the activation threshold is inactive (i.e. if it has been coded as 0), then the GENERATE NEW RANGE button will be greyed out.
- If the activation threshold is active (i.e. if one of the values has been selected) then the GENERATE NEW RANGE button will be available. When this button is clicked, the range of numbers changes as follows:
- Reserved Reference Number FROM becomes the next available number for the product and pay centre.
- Reserved Reference Number TO becomes 10000 more than the FROM number. This number can then be changed manually, if required.
- When the difference between the FROM and TO numbers reaches the value selected in the activation threshold, an e-mail is generated and sent to the administrator. If the activation threshold is inactive, then this e-mail is generated when there are 50 numbers left (example below).
Click SAVE.
Select Data Capture > Employee > Without Memberships. Click LIST ALL and select the person from the list on the Amend Employee Details / Add Membership screen.
The Amend Employee Details / Add Membership screen is displayed.

Click LIST ALL and click on the employee. The Amend Member Personal Details screen is displayed.
Click MEMBERSHIP.
The Add/Update Membership Details screen us displayed.
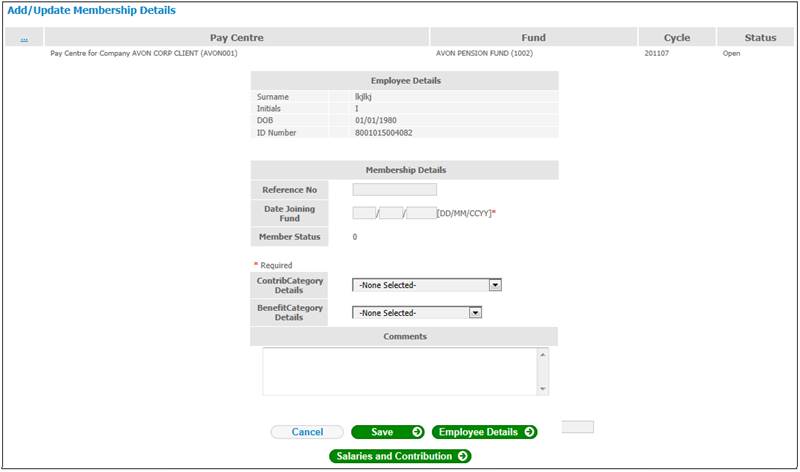
This screen displays the employee details, and additional membership fields will be displayed for completion.
Descriptions of the input fields on this screen appear below.
|
Membership Details |
|
|
Date Joining Fund |
The date on which the employee will be joining the fund as a member |
|
Contrib Category Details |
The membership group for contributions to which the member will belong |
|
Benefit Category Details |
The membership group for benefits to which the member will belong |
|
Comments |
Any free form text regarding the member can be entered |
Note:
A red asterisk (*) alongside a field indicates that the entry of data is mandatory, i.e. this field may not be blank.
Complete the required data, then click SAVE.
Click EMPLOYEE DETAILS to return to the Amend Member Personal Details screen
Salaries and Contributions
To add salaries and contributions to the membership, click SALARIES AND CONTRIBUTIONS.
The Salary and Contribution Details section will be displayed on the lower portion of the screen.
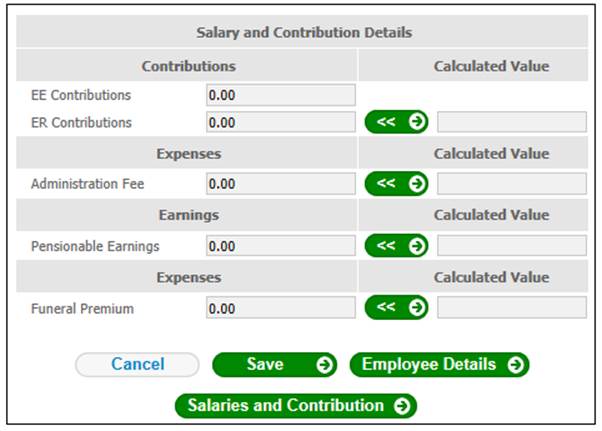
Descriptions of the input fields on this screen appear below.
|
Salary and Contribution Details |
|
|
Contributions |
The screen will display only those contribution types that have been defined for this scheme |
|
EE Contributions |
The amount of employee contributions due |
|
ER Contributions |
The amount of employer contributions due |
|
Expenses |
The screen will display only those expense types that have been defined for this scheme |
|
Administration Fee |
The amount of administration fees due by the employer |
|
Remuneration |
Details of the employee's earnings |
|
Remuneration Frequency |
The frequency with which the member is paid. The following options are available from the drop-down list: MONTHLY |
|
Rate of Pay |
The amount that the member is paid |
|
Pensionable Earnings |
The amount of earnings on which the member's contributions must be calculated. This amount may differ from the member's rate of pay. |
Click SAVE.
Click EMPLOYEE DETAILS to return to the Amend Member Personal Details screen.
The calculation of contributions, expenses, rate of pay and earnings may be done at either an individual member level or at a bulk level. Calculation is done using the percentages already stored for this scheme and for the membership group.
Enter an amount in the pensionable earnings field, then click SAVE.
The Add/Update Membership Details screen will be re-displayed, and a message above Membership Details will confirm that the membership details have been saved.
Click SALARIES AND CONTRIBUTION to display the salary and contribution details portion again.
For each of the salary and contribution detail types displayed, click ![]() .
.
A message similar to the following will be displayed:
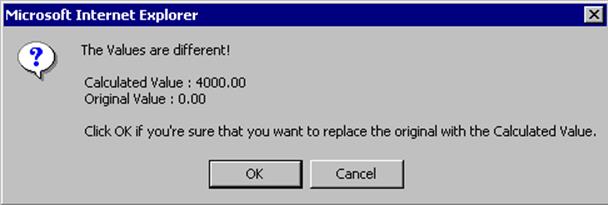
To accept the calculated value, click OK.
The calculated value will be displayed in both the Calculated Value and the relevant Salary and Contribution Details columns.
Continue this process until all fields have been completed.
Note:
Do not apply this to Pensionable Earnings, as this will display 0.00 in both columns.
Click SAVE.
At the bulk level, calculation can be done for one or more members at the same time. Refer to Salaries and Contributions.