In order to edit the content defined for an element, select an unauthorized element on the JU1FL Template Element List screen and click EDIT CONTENT. Different screens will be displayed depending on the element type for which they have been defined. The following examples show screens displayed per element type:
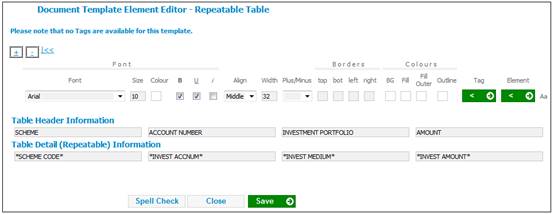
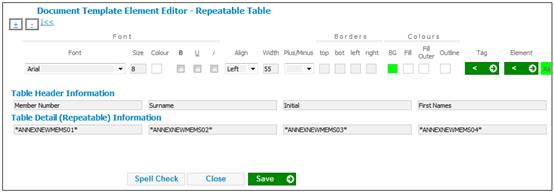
Example of table element type
Example 1
Example 2
Tables and Paragraphs
Capture selections and settings as follows:
FONT
|
Font |
Select a text font from the drop-down list, e.g. Arial, Courier, Times-Roman, etc. |
|
Size |
Enter the size of the text to be displayed. |
|
Colour |
Click on the Colour box to define the colour of the text. The Colour pallet will be displayed.
Select a colour from the pallet. |
|
B (Bold) U (Underline) i (Italics) |
Tick any or all of the Bold, Underline and Italic boxes to set the font as bold, underlined or italic. |
ALIGN, WIDTH, PLUS / MINUS (Only applies to Tables)
|
Align |
Select a value from the drop-down list. Values may be left, middle or right. |
||||||||||||
|
Width |
Enter the width of the text to be displayed. |
||||||||||||
|
Plus/Minus |
Select Plus or Less from the drop-down list.
The Plus/Minus selection will only be displayed when the Table Header Orientation field on the JU1FL Maintain Template Element screen has a value of DOWN.
This field must be applied to each tag defined in order to indicate whether the amount that each tag represents in a table must be added or subtracted. These amounts are then summed in the table and a total is produced.
|
BORDERS (Only applies to Tables)
|
Borders
(Top Bottom Left Right) |
These fields define the display of borders around paragraphs or tables.
Capture the width required for the border being defined in each of the following fields: - Top - Bottom - Left - Right These fields will only be displayed if the SHOW BORDER field on the JU1FL Maintain Template Element screen was ticked. |
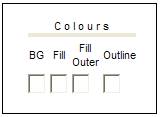
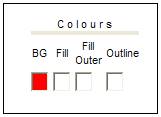
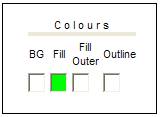
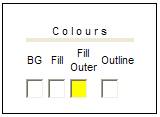
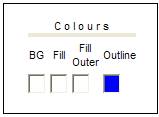
COLOURS (Only applies to Tables)
|
Colours |
Click on each box to display the Colour Pallet and select a colour for the cell that contains the element. The following selections can be made: - BG (Background) - Fill - Fill Outer - Outline
Refer to the element cell samples in Colour below. |
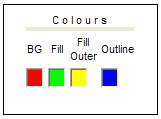
Colours
The following table illustrates the effect of the various selections under the Colour section on the element cell:
|
COLOURS SELECTIONS |
ELEMENT PREVIEW |
|
|
|
|
|
|
|
|
|
|
|
|
|
|
|
|
|
|
TAGS and ELEMENTS
|
Tag |
A tag is a bookmark, and is used when a paragraph is defined. It is used to specify where application variables need to be embedded into paragraph text.
The Tag must be captured on a separate line and whether it appears on its own or within a line of text will depend on whether a carriage return is selected for the previous line and for the tag line.
Click
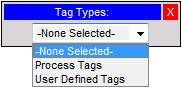
Note: Process Tags are defined by Developers on the system and cannot be changed by the User. User Defined Tags can be defined and maintained by the User.
Click Process Tags or User Defined Tags to display and select a value from the drop-down list.
Click
Refer to Example of Tag / Carriage Return below.
UK Schemes The order in which the tags are selected on the Document Template Element Editor – Table screen is the order in which they will appear in the extract.
When the Tag List option is selected, the system will display all of the Tags associated to the Process Type of BEN STATEMENT and will display the Text Description together with the Text Value.
For the purposes of the UK benefit statement, set up a Template Element with a Template Element Type of TABLE, a Process Type of BEN STATEMENT, Number of Cells equal to 2.and a Table Header Orientation of ACROSS. The name of the column in the extract must be captured in the first column and the applicable Tag selected in the second column.
For more information on benefit statements for UK schemes, refer to Special note for UK schemes in Benefit Statement Formats under Product Launch Requirements Additional Menu Options Income
For a list of Tags used for Benefit Statements, refer to Supplements Tags Benefit Statements |
|
Element |
Click
Click
|
|
CR (Carriage Return) |
Tick the box to indicate whether or not the text must start on a new line.
Note: Only displayed for a Paragraph.
Refer to Example of Tag / Carriage Return below. |
TEXT AND SPELL CHECK
|
Text |
Capture the text that must be displayed for the line selected. |
|
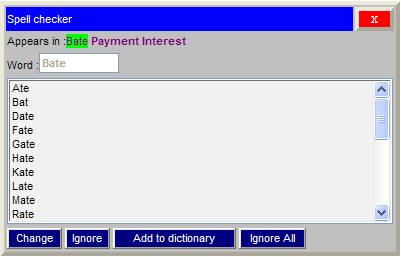
Spell Check |
Click SPELL CHECK to check the spelling of text that appears in the text cells.
The Spell checker screen will be displayed.
Select the correct word from the list and click CHANGE.
Click |
Images
Capture selections and data as follows:
|
Image Alignment |
Click on the drop-down to select the position of the image.
|
|
Image Business Name |
Capture the business name of the image. |
|
Upload File |
Tick the box in order to enable the upload of a new image |
|
Upload / Submit |
Click SUBMIT to capture the image settings.
If the UPLOAD FILE box has been ticked, then BROWSE will be enabled. Click BROWSE to select a new file to upload, and click SUBMIT. |
For additional information, refer to
Supplements
Processes
Setting up Template Elements for Benefit Statements
Annexures
The Document Template Element Editor – Annexure screen is displayed.
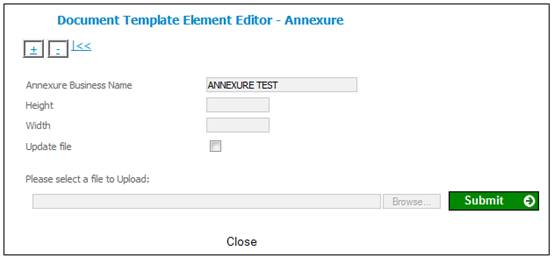
Capture selections and data as follows:
|
Annexure Business Name |
Capture the business name of the annexure. |
|
Please select a file to Upload: |
Capture the address of the image or click BROWSE and select from the list displayed.
Note: The file to be uploaded as an annexure must be a PDF file.
The sequencing of the annexures will be determined by the order number on the Template / Element Association.
Click SUBMIT to capture the annexure business name. |
Click PREVIEW to view the data captured, in its end state. The paragraph element content is displayed.
Example 3
Example 4

Example 5

Example 6

Once all necessary data has been captured, click SAVE. A message on the PDF Table Editor screen will confirm that the page has been saved successfully.
Click CLOSE to return to the JU1FL Template Element List screen.
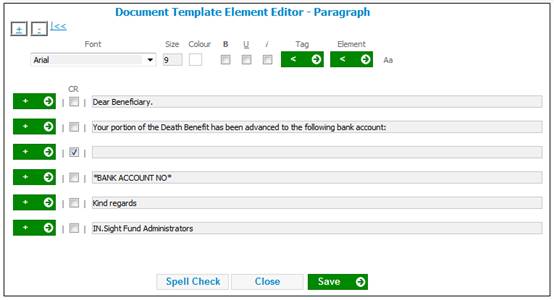
Example of paragraph element type
Refer to Edit content above for details on how to use this screen.
Example of Tag / Carriage Return
If the line of text in the template is
Dear <<MemTitle>> <<MemSurname>>
when the report is generated, it would appear as

In order to correctly define this, the tag must be captured on a separate line and whether is appears on its own or within a line of text will depend on whether a carriage return is selected for the previous line and for the tag line.
In the example below, the text all appears in one line as no carriage returns have been selected.
Click PREVIEW to view the data captured, in its end state. The paragraph element content is displayed.
Once all necessary data has been captured, click SAVE. A message on the Document Template Element Editor – Paragraph screen will confirm that the page has been saved successfully.
Click CLOSE to return to the JU1FL Template Element List screen.
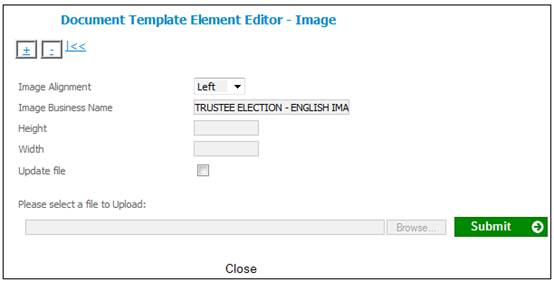
Example of image element type
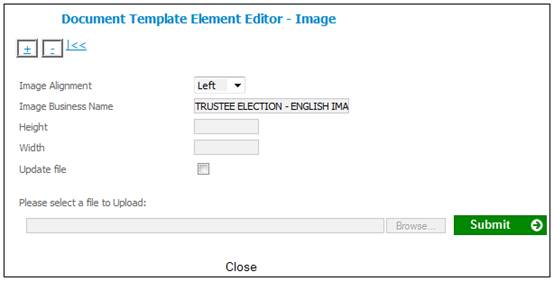
Capture data as follows:
|
Image Alignment |
Select a value from the drop-down list to define the positioning of the image, i.e. Left, Middle, Right. |
|
Image Business Name |
Capture text as a name for the image. |
|
Update file |
If the file to be uploaded must be selected using the browse button, place a tick in the UPDATE FILE box. |
|
Please select a file to Upload: |
Capture the address of the image or click BROWSE and select from the list displayed. The browse button will only be enabled if the UPDATE FILE box is ticked.
Click SUBMIT. |
Click PREVIEW to view the data captured, in its end state. The image element content is displayed.

Once all necessary data has been captured, click SUBMIT. A message on the Document Template Element Editor - Image screen will confirm that the page has been saved successfully.
If an attempt is made to load an image file with an extension that is not one of the following, an error messages will be displayed.
- .bmp
- .gif
- .jpg
- .png
- .tiff
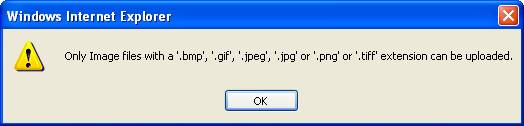
Click OK to remove the message, then load an image file with the correct extension.
Click CLOSE to return to the JU1FL Template Element List screen.