If the month-end run has been processed incorrectly and the income has already been authorised, the payroll cycle must be deleted and the income reversed using a bulk journal.
Navigation: Processes > Contributions
Select Payroll from the top menu.
![]()
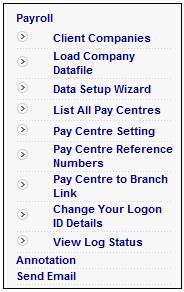
Select Client Administration from the top menu.
![]()
Select List All Pay Centres from the sub-menu on the left.
The List All Pay Centres screen will be displayed.
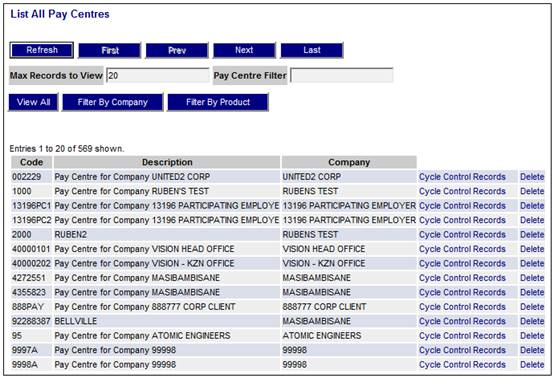
Select a Pay Centre and click the hyperlinked Cycle Control Records on the right.
The Cycle Control Record Administration screen will be displayed. Check the Version No of the OPEN cycle. (In the example below, it is a 2).
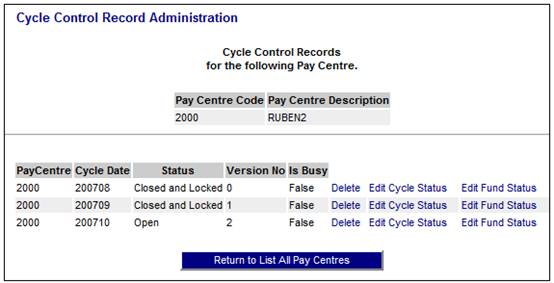
Delete the OPEN cycle and any other CLOSED cycles that need to be deleted.
OPEN the cycle that needs to be reprocessed.
Click on the hyperlinked Edit Cycle Status next to the month that needs to be opened.

The Edit Cycle Control Record screen will be displayed.
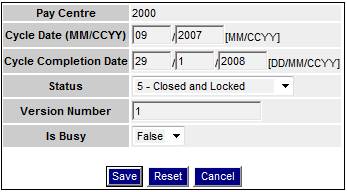
Capture the input values as follows:
|
Field |
Instruction |
|
Cycle Completion Date |
Remove the date |
|
Status |
Select 0 – Open from the drop-down list. |
|
Version No |
Set the version number to the number of the original OPEN cycle – in this example you will set it to 2 |
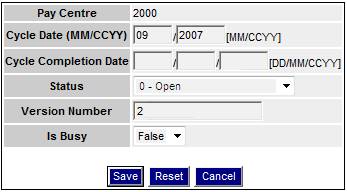
Click SAVE.
Click on the hyperlinked Edit Fund Status.
The List Funds for Pay Centre screen will be displayed.
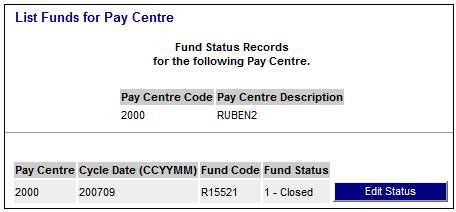
Click EDIT STATUS.
The Edit PayCentre Plan Control Record screen will be displayed.
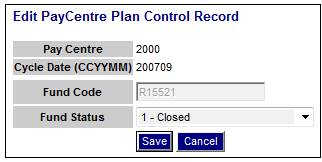
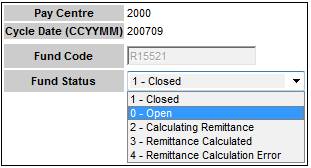
Change the Fund Status to 0 – Open
The Pay Centre is now open.
For more information, refer to Load Status under
Auxiliary Activities
Adding a new Pay Centre
Adding a new Pay Centre (Payroll)
The authorized records that need to be reversed must be extracted.
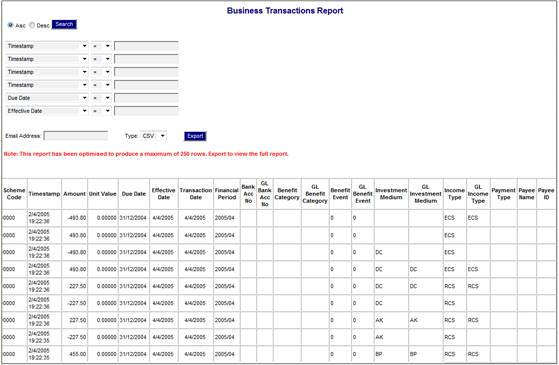
Navigation: Reports > Financial > Business Transactions
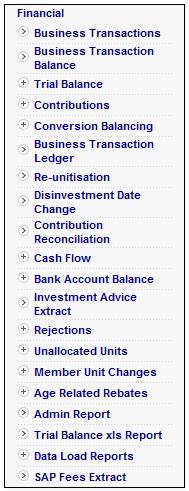
The Business Transaction Report screen will be displayed.
Select the following criteria from the drop-down lists:
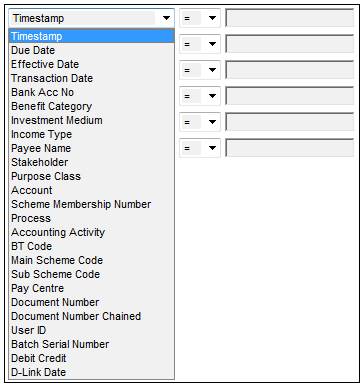
|
Due Date |
The cycle month that needs to be reversed. E.g. 30/11/2012 |
|
Process |
INCOME |
|
Debit Credit |
D = display the debit entries. C = display the credit entries. |
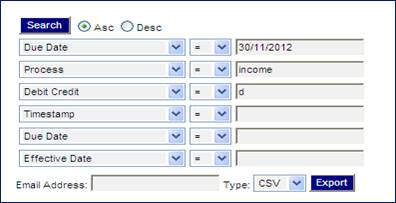
Click SEARCH.
Once the data is returned, you can export the details to your email address.
![]()
Repeat these steps for any other months that need to be reversed.
For more information, refer to
Reports
Financial
Business Transactions
Report
The bulk journal file must be prepared to load the reversal entries.
For more information refer to
Processes
File Transfer
File Layouts
Upload Bulk Journal File
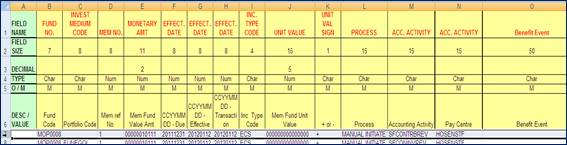
The entries that were exported must be reversed.
The following table shows the reversal entry:
|
Process |
Accounting Activity |
|
Reversal Process |
Reversal Accounting Activity |
|
INCOME |
SFCONTRB |
Member Contribution |
Manual Intiate |
SFCONTRBREV |
|
INCOME |
SFCONINV |
Member Investment |
Manual Intiate |
SFCONINVREV |
|
INCOME |
SFNOEFTP |
Fund Contribution |
Manual Intiate |
SFNOEFTPREV |
|
INCOME |
SFNOINVI |
Fund Investment |
Manual Intiate |
SFNOINVIREV |
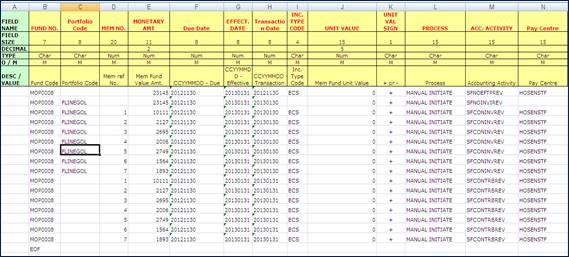
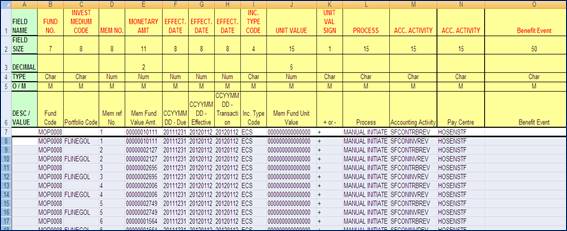
The bulk journal file consists of 3 worksheets (Input, Format and Text.)
Input Worksheet
Copy the data from the Exported BT extract into the INPUT worksheet, using the reversal accounting activities.
Note:
All fields can be taken from the Exported BT, except for the Accounting Activity.
The last row must always be EOF (End of File).
Delete any redundant data after the EOF row.
|
Fund Code |
From the Exported BT extract |
|
Portfolio Code |
From the Exported BT extract – for investment accounting entries. E.g. SFCONINV and SFNOINVI |
|
Member Reference No. |
From the Exported BT extract |
|
Value |
1234.56 must be inserted as 123456 |
|
Due Date |
YYYYMMDD |
|
Effective Date |
YYYYMMDD |
|
Transaction Date |
YYYYMMDD |
|
Income Type |
From the Exported BT extract |
|
Process |
Manual Initiate |
|
Accounting Activity |
See the reversal table above |
|
Pay Centre |
From the Exported BT extract |
Format Worksheet
Click on the FORMAT worksheet.
Highlight row 7 and copy it. It contains the formulae which converts the data from the Input Worksheet.
Highlight the estimated number of rows that make up your file.
(For example, if you have 10 rows of data – highlight 10 rows from Row 8).
Click Paste. (Make sure you have EOF in your last row).
Text Worksheet
Click on the TEXT worksheet.
Highlight row 1 and copy it. It contains the formulae which converts the data from the FORMAT worksheet.

Highlight the estimated number of rows that make up your file.
(For example, if you have 10 rows of data – highlight 10 rows from Row 8).
Click Paste. (Make sure you have EOF in your last row).
Delete any redundant data after the EOF row.
Save the workbook.
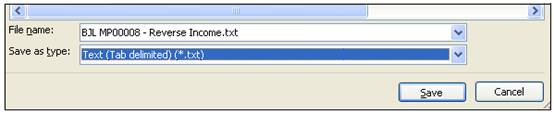
Now that the workbook has been saved, the worksheet must be saved as a Text file.
For more information refer to
Processes
File Transfer
File Layouts
Upload Bulk Journal File
Make sure you are on the TEXT worksheet.
Click ![]() .
.
Save as Type: TEXT (Tab delimited)
Open the Text File (.txt).
Remove any redundant data after the EOF (as shown in the example below).
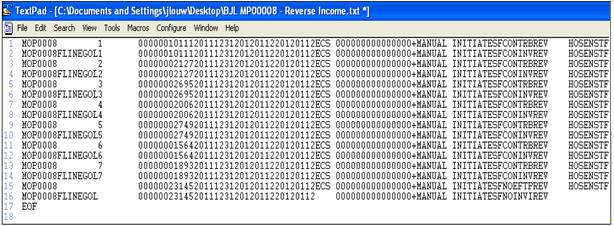
The file is now ready for uploading.