This section describes the process to be followed in order to load existing pensioner annuity details onto the system. This process describes the loading of the following data:
- Membership Details
- Membership Updates
- Beneficiary Details
- Annuity Payment Details
- Bank Account Details
- Address Details
The adhoc conversion process should be followed when loading the annuity details.
For additional process information, refer to
Supplements
Processes
Adding New Members or Beneficiaries to an Annuity Fund
This should only be used when loading initial member data for annuity only funds, as the payroll load facility should be used for all other funds.
To view the input file layout, refer to
Processes
File Transfer
File Layouts
Membership Details
For information on the order of loading, refer to
Processes
Regular Payments
New Business
Loading Data for Annuitants
The process is as follows:
Select the member menu option
Log in to the system from the Logon page.
Click clients.
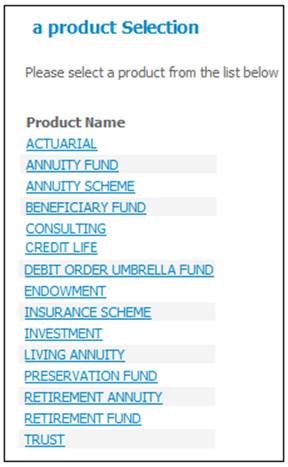
Select product ANNUITY FUND
From the main menu on top, click Products.
The Product Selection screen will be displayed.
Click ANNUITY FUND.
Select a product
The Selection screen will be displayed.
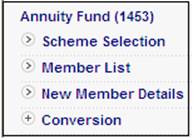
Select the required product by clicking the hyperlinked code.
Select Upload File
A sub-menu will be displayed on the left.
From the menu, click ![]() alongside Conversion on the sub-menu on the left. Additional options will be displayed.
alongside Conversion on the sub-menu on the left. Additional options will be displayed.
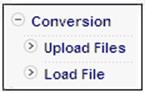
Click Upload Files below Conversion.
Browse, select file and submit file
A screen for the file upload will be displayed.
Click BROWSE. This will allow you to search the available drives (user network or local) for the file to be loaded.
Highlight the required file, then click OPEN.
The file name will appear in the box. Click SUBMIT FILE. The file will be moved to the application server.
Load File
Click Load File below Conversion. The Annuity Batch Selection screen will be displayed, and a message will confirm that the batch run has started.
The file will be read into the conversion tables. The progress of the batch job can be monitored on the log.
Once BJU3EA has completed successfully, start MEMBER.BAT. This will add all members with a membership status of LIVE.
This will only load the beneficiary's person details and create the relationship to the principle member. The beneficiary's details can also be loaded via the annuity payment details load.
To view the input file layout, refer to
Processes
File Transfer
File Layouts
Beneficiaries
The process is as follows:
Select Process > File Transfer
Log in to the system from the Logon page.
Click processes, then click file transfer.
Select a scheme
The Scheme Selection screen will be displayed.
Select the required scheme by clicking the hyperlinked scheme code.
Select File Transfer option
From the main menu on the top, click File Transfer. A list of sub-menu options will be displayed on the left.

Select File Upload
Select File Upload from the sub-menu. The File Upload screen will be displayed.
Browse, select file and submit File
Click BROWSE. This will allow you to search the available drives (user network or local) for the file to be loaded.
Highlight the required file, then click OPEN.
The file name will appear in the box. Click SUBMIT FILE.
A message will confirm that the file has been successfully uploaded.
You will now be able to use the conversion monitor to track the progress of the file.
Adhoc Upload
Select Adhoc Upload from the sub-menu on the left.
The Adhoc Upload screen will be displayed.
Click BROWSE. This will allow you to search the available drives (user network or local) for the file to be loaded.
Highlight the required file, then click OPEN.
The file name will appear in the box. Click SUBMIT.
A message will confirm that the file has been successfully uploaded.
You will now be able to use the conversion monitor to track the progress of the file.
Select Conversion Monitor
From the main menu on the top, click Conversion Monitor. The Conversion Monitor screen will be displayed.
A list of sub-menu options will be displayed on the left.
To process the results, select Beneficiaries from the sub-menu on the left.
The lower section of the screen will display the selected mask.
Click ![]() , then select the required status from the drop-down box. Click SEARCH.
, then select the required status from the drop-down box. Click SEARCH.
In order to ensure that new files loaded are processed timeously, click ACTIVATE PROCESSING.
Adhoc File Processing
Select Adhoc File Processing from the sub-menu on the left. The Adhoc Upload screen will be displayed.
Click ACTIVATE PROCESSING.
The status of the job can be monitored in the error log by viewing the details for program BJU5AA.
Refer to
Reports
General
Error Log Report
The following facilities can be used to load all payment types, including year to date figures, for both principle members as well as beneficiaries.
The YTD figures can be loaded in two ways, either as an annuity payment record on its own, or as part of an annuity payment record.
Option 1: Annuity Payment
Field 10 (PAYMENT TYPE) must contain a YTD payment type and the YTD amount must be stored in field 14 (AMOUNT OF REGULAR PAYMENT). In this scenario two records are required one for the annuity payment and one for the YTD amount.
Option 2: Part of an Annuity Payment.
Fields 10 and 14 contain the annuity payment type and amount, the YTD amount for that annuity is stored in filed 42 (YEAR TO DATE AMOUNT).
Note:
ANN TAX YTD must be loaded using option 1.
When loading payment details for principle members, the membership as well as the personal details must already exist.
When loading payment details for beneficiaries, only the principle member details need to already exist on the system. If the beneficiary details have not been loaded, this process will load these details.
To view the Input file layout, refer to
Processes
File Transfer
File Layouts
Annuity Payment
The process is as follows:
Select Process File Transfer
Log in to the system from the Logon page.
Click processes, then click file transfer.
Select a scheme
The Scheme Selection screen will be displayed.
Select the required scheme by clicking the hyperlinked scheme code.
Select File Transfer option
From the main menu on the top, click File Transfer. A list of sub-menu options will be displayed on the left.

Select File Upload
Select File Upload from the sub-menu. The File Upload screen will be displayed.
Browse, select and submit file
Click BROWSE. This will allow you to search the available drives (user network or local) for the file to be loaded.
Highlight the required file, then click OPEN.
The file name will appear in the box. Click SUBMIT FILE.
A message will confirm that the file has been successfully uploaded.
You will now be able to use the conversion monitor to track the progress of the file.
Adhoc Upload
Select Adhoc Upload from the sub-menu on the left.
The Adhoc Upload screen will be displayed.
Click BROWSE. This will allow you to search the available drives (user network or local) for the file to be loaded.
Highlight the required file, then click OPEN.
The file name will appear in the box. Click SUBMIT.
A message will confirm that the file has been successfully uploaded.
You will now be able to use the conversion monitor to track the progress of the file.
Select Conversion Monitor
From the main menu on the top, click Conversion Monitor. The Conversion Monitor screen will be displayed.
A list of sub-menu options will be displayed on the left.

To process the results, select Annuity Payment from the sub-menu on the left.
The lower section of the screen will display the selected mask.
Click ![]() , then select the required status from the drop-down box. Click SEARCH.
, then select the required status from the drop-down box. Click SEARCH.
In order to ensure that new files loaded are processed timeously, click ACTIVATE PROCESSING.
Adhoc File Processing
Select Adhoc File Processing from the sub-menu on the left. The Adhoc Upload screen will be displayed.
Click ACTIVATE PROCESSING.
The status of the job can be monitored in the error log by viewing the details for program BJU5AA.
Refer to
Reports
General
Error Log Report
The following facilities can used to load bank account details for both principle members as well as beneficiaries.
To view the Input file layout, refer to
Processes
File Transfer
File Layouts
Bank Accounts
The process is as follows:
Select Process File Transfer
Log in to the system from the Logon page.
Click processes, then click file transfer.
Select a Scheme
The Scheme Selection screen will be displayed.
Select the required scheme by clicking the hyperlinked scheme code.
Select File Transfer option
From the main menu on the top, click File Transfer. A list of sub-menu options will be displayed on the left.
Select File Upload
Select File Upload from the sub-menu. The File Upload screen will be displayed.
Browse, select and submit file
Click BROWSE. This will allow you to search the available drives (user network or local) for the file to be loaded.
Highlight the required file, then click OPEN.
The file name will appear in the box. Click SUBMIT FILE.
A message will confirm that the file has been successfully uploaded.
You will now be able to use the conversion monitor to track the progress of the file.
Adhoc Upload
Select Adhoc Upload from the sub-menu on the left.
The Adhoc Upload screen will be displayed.
Click BROWSE. This will allow you to search the available drives (user network or local) for the file to be loaded.
Highlight the required file, then click OPEN.
The file name will appear in the box. Click SUBMIT.
A message will confirm that the file has been successfully uploaded.
You will now be able to use the conversion monitor to track the progress of the file.
Select Conversion Monitor
From the main menu on the top, click Conversion Monitor. The Conversion Monitor screen will be displayed.
A list of sub-menu options will be displayed on the left.
To process the results, select Bank Accounts from the sub-menu on the left.
The lower section of the screen will display the selected mask.
Click ![]() , then select the required status from the drop-down box. Click SEARCH.
, then select the required status from the drop-down box. Click SEARCH.
In order to ensure that new files loaded are processed timeously, click ACTIVATE PROCESSING.
Adhoc File Processing
Select Adhoc File Processing from the sub-menu on the left. The Adhoc Upload screen will be displayed.
Click ACTIVATE PROCESSING.
The status of the job can be monitored in the error log by viewing the details for program BJU5AA.
Refer to
Reports
General
Error Log Report
The following facilities can used to load address details for both principle members as well as beneficiaries.
To view the Input file layout, refer to
Processes
File Transfer
File Layouts
Addresses
The process is as follows:
Select Process File Transfer
Log in to the system from the Logon page.
Click processes, then click file transfer.
Select a Scheme
The Scheme Selection screen will be displayed.
Select the required scheme by clicking the hyperlinked scheme code.
Select File Transfer option
From the main menu on the top, click File Transfer. A list of sub-menu options will be displayed on the left.

Select File Upload
Select File Upload from the sub-menu. The File Upload screen will be displayed.
Browse, select and Submit File
Click BROWSE. This will allow you to search the available drives (user network or local) for the file to be loaded.
Highlight the required file, then click OPEN.
The file name will appear in the box. Click SUBMIT FILE.
A message will confirm that the file has been successfully uploaded.
You will now be able to use the conversion monitor to track the progress of the file.
Adhoc Upload
Select Adhoc Upload from the sub-menu on the left.
The Adhoc Upload screen will be displayed.
Click BROWSE. This will allow you to search the available drives (user network or local) for the file to be loaded.
Highlight the required file, then click OPEN.
The file name will appear in the box. Click SUBMIT.
A message will confirm that the file has been successfully uploaded.
You will now be able to use the conversion monitor to track the progress of the file.
Select Conversion Monitor
From the main menu on the top, click Conversion Monitor. The Conversion Monitor screen will be displayed.
A list of sub-menu options will be displayed on the left.

To process the results, select Addresses from the sub-menu on the left.
The lower section of the screen will display the selected mask.
Click ![]() , then select the required status from the drop-down box. Click SEARCH.
, then select the required status from the drop-down box. Click SEARCH.
In order to ensure that new files loaded are processed timeously, click ACTIVATE PROCESSING.
Adhoc File Processing
Select Adhoc File Processing from the sub-menu on the left. The Adhoc Upload screen will be displayed.
Click ACTIVATE PROCESSING.
The status of the job can be monitored in the error log by viewing the details for program BJU5AA.
Refer to
Reports
General
Error Log Report