This activity enables you to maintain records of the Administrators Corporate Clients (External Organisation Units).
These clients may be Companies or other bodies (e.g. Trade Unions) which act in various roles with regard to SCHEMES administered by the Administrator. These roles include those of Sponsor / Principal Employer and Participating Employer.
This activity may also be used to record details of other service providers such as other Life Assurers, Intermediaries, Reassurers, Investment Managers, etc.
From the System Entities menu on the top, select Corporate Client from the sub-menu on the left.
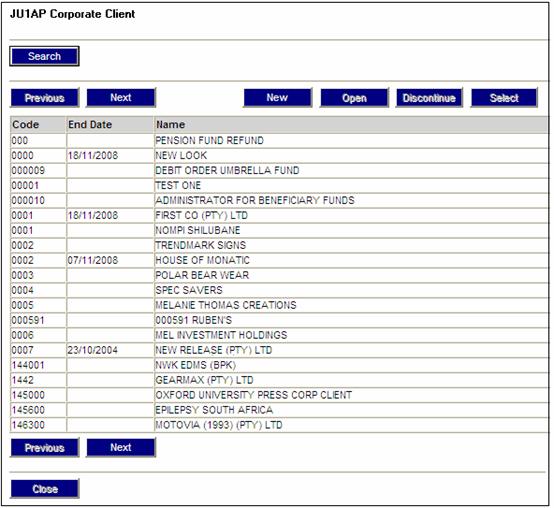
The JU1AP Corporate Client screen will be displayed.
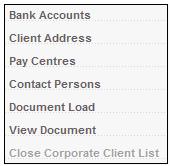
The following options are available:
|
|
Allows the user to select an occurrence from the listbox when the function is enabled (function disabled in the Infrastructure environment). |
|
|
Flows to the New Corporate Client dialog box to capture a new client. |
|
|
Flows to the Corporate Client Detail dialog box to update an existing client record. |
|
|
Flows to the Discontinue Corporate Client dialog box to remove a client record. |
|
|
Flows to the Corporate Clients Bank Account List screen to manage the client's Bank account(s). |
|
|
Flows to the Address Maintain screen to record or update the clients address details. (see Address.doc) |
|
|
Flows to the Corporate Client Pay Centre List screen to manage the client's pay centre details. |
|
|
Flows to the Contact Person screen to manage the client's "contact person" details. |
To add a new corporate client, click![]() . The JU1AP Corporate Client Detail
screen will be displayed.
. The JU1AP Corporate Client Detail
screen will be displayed.
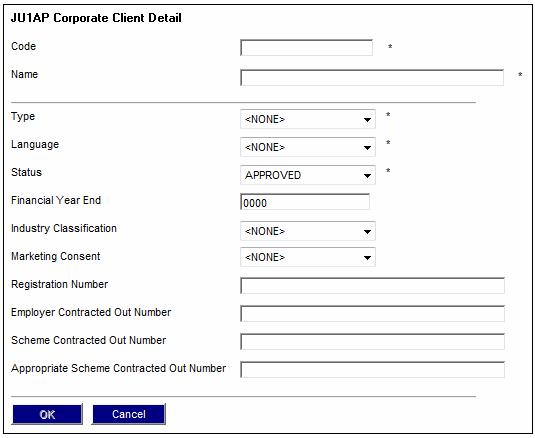
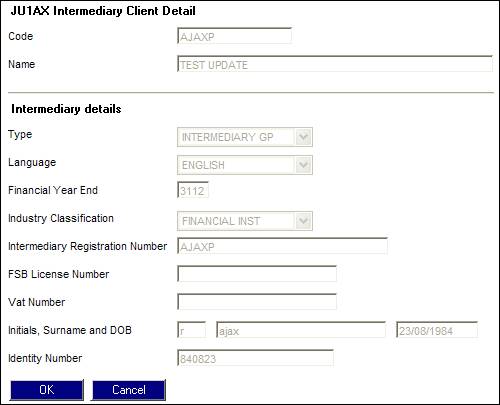
Descriptions of the input fields on this screen appear below.
|
Client Details |
|
|
Code |
External organisation unit code supplied by the client |
|
Name |
Client's legal name |
|
Type |
Client operations description (select from the drop down box). |
|
Language |
The language in which the Client operates. |
|
Status |
Indicates if the Organization Unit is approved or if it has been blacklisted. Select one of the following values from the drop-down list: APPROVED BLACKLISTED |
|
Financial Year End |
The financial year end for this Client. |
|
Industry Classification |
The industry in which this Client operates. Select from the drop down box |
|
Marketing Consent |
Indicates whether a client has opted in or out for marketing information to be forwarded to them.
Select Yes or No from the drop-down list. |
|
Registration Number |
Client company legal registration number |
|
Employer Contracted Out Number |
The Employer Contracted Out Number for the termination of a contracted out scheme. |
|
Scheme Contracted out Number |
The Scheme Contracted Out Number for the termination of a contracted out scheme. |
|
Appropriate Scheme Contracted out Number |
The Appropriate Scheme Contracted Out Number for the termination of a contracted out scheme. |
Once the above information has been
captured, click ![]() . The new client will appear on the JU1AP Corporate Client screen.
. The new client will appear on the JU1AP Corporate Client screen.
Validation
The system will validate the Type and Code, and if a Corporate Client already exists with the same Type and Code, the following message will be displayed:
A Corporate Client exists with the Code keyed in. Please change the Code and resubmit.

Click ![]() to remove the message.
to remove the message.
The JU1AP Corporate Client Detail screen will be displayed with the Code field highlighted.
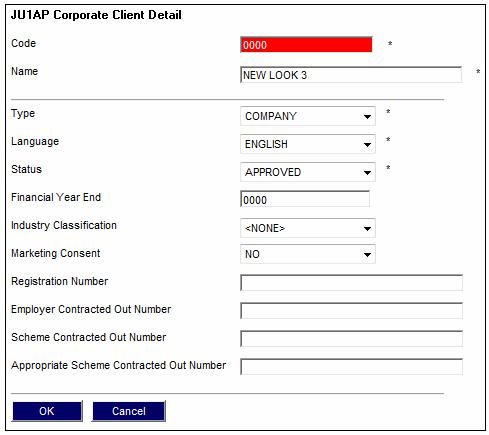
Change the Code and resubmit the new Corporate Client.
To view the corporate client details,
highlight a corporate client and click![]() . The JU1AP Corporate Client Detail screen will be displayed.
. The JU1AP Corporate Client Detail screen will be displayed.
The following fields can be updated:
- Language
- Status
- Financial Year End
- Industry Classification
- Marketing Consent
- Registration Number
- Employer Contracted Out Number
- Scheme Contracted out Number
- Appropriate Scheme Contracted out Number
On the JU1AP
Corporate Client List screen, click![]() .
.
The JU1AP Corporate Client screen will be displayed showing the client details.
To discontinue use, click ![]() . You will then be
asked for confirmation.
. You will then be
asked for confirmation.
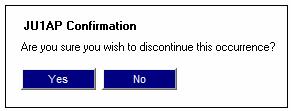
When use of a corporate client is discontinued, an end date will be displayed in the End Date column on the JU1AP Corporate Client screen.
You can list all the bank accounts for a client. There are facilities to capture and update account details and to set the account limits.
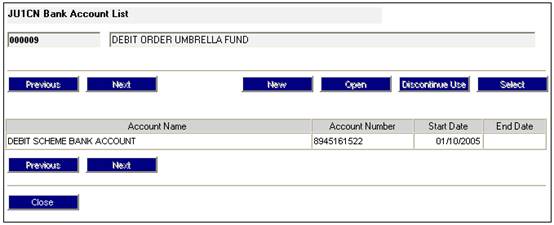
From the JU1AP Corporate Client screen, highlight a corporate client and select Bank Accounts from the sub-menu on the left.
The JU1CN Bank Account List screen will be displayed.

Descriptions of the fields on this screen appear below.
|
Corporate Client Details |
External organisation unit code (supplied by the client) and the client's legal name |
|
Account Name |
Name of registered account holder |
|
Account Number |
Bank account number |
|
Start Date |
Effective date from which account can be used |
|
End Date |
Date of termination of use of the account |
The following options are available:
|
|
Flows to the New Corporate Client Bank Account dialog box to record new account details. |
|
|
Flows to the Corporate Client Bank Account Details dialog box to update account details. |
|
|
Flows to the Delete Corporate Client Bank Account dialog box to discontinue the use of an account. Records 'today’s' date as the end date. |
|
|
Flows to the Corporate Clients Bank Account Limit List screen to manage the relevant transaction limits for the selected account. |
From the JU1CN Bank Account List screen, click ![]() . The JU1CN
Bank Account Details screen will be displayed.
. The JU1CN
Bank Account Details screen will be displayed.
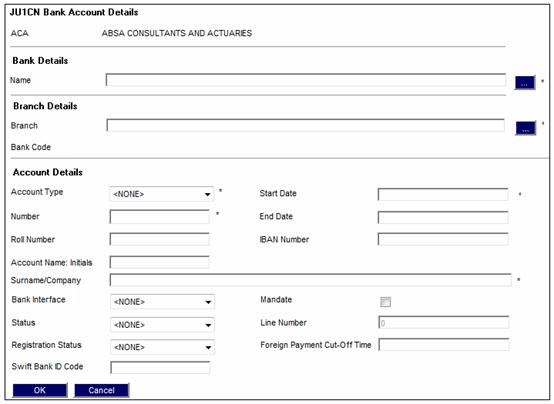
Descriptions of the input fields on this screen appear below.
|
Bank Details |
|
|
Name |
Call Bank List (i.e. List of Banking Institutes) to select from (See Bank Structure section) Links: With reference to the section Bank Details, the Bank List and Bank Branch Info must be set up in SYSTEM DATA>BANK STRUCTURE |
|
Branch Details |
|
|
Branch |
Call Bank Branch Info List (i.e. List of Branch(es) linked to Bank) to select from (see Bank Structure section) |
|
Bank Code |
Populated as a result of the call made for the branch in Branch details. |
|
Account Details |
|
|
Account Type |
Type of operating account, e.g. Current Account or Savings Account. |
|
Number |
Bank account number Do not capture spaces between the numbers into the Bank account number field or capture the member account Name in the numerical field. Note: The Account Type and Account number must be checked to be correct as allocated by the bank. This data is used in "downstream" processes making or receiving payments and should it fail validation against the bank then the payment will NOT take place. |
|
Roll Number |
The Building Society Roll Number.
Note: If the Account Type selected is BUILDING SOCIETY, then Roll Number will be enabled for capture. This field will accept special characters.
This field has a sort code of 6 digits and an account number of 8 digits, and in addition a roll number of 15 characters, 5 digits followed by a forward slash and then 10 digits e.g. 0505/1111111111. The forward slash can be captured anywhere in the number. |
|
IBAN Number |
International Bank Account Number. |
|
Start Date |
Effective date from which account can be used |
|
End Date |
Date of termination of the use of the account |
|
Account Name: Initials |
The initials of a person who is the account holder. |
|
Surname/Company |
The surname of a person who is the account holder, or the name of the Company who is the account holder. |
|
Bank Interface |
The bank interface service that must be used for this bank account. The drop down box displays a list of the different types of services available, i.e. Cashfocus, Nedinform, ACB, LDC, CPY, FNB Online, BIB, etc. |
|
Mandate |
A tick in this box indicates that a Mandate agreement is in place with this client, allowing the client to collect funds from this Bank Account. Note: This field is only enabled if the Bank Interface selected is Nedinform. |
|
Line Number |
In cases where a Mandate exists, the Line Number is used by the Bank to identify the bank account to be used when processing EFT’s (Electronic fund transfers) between banks. This is a form of authorisation that the Client uses to approve the movement of funds from their Client. This number must be checked to be correct as allocated by the bank. The number is used in downstream processes making or receiving payments, and should it fail validation against the bank, payment will NOT take place. Note: In the case of regular payments to a foreign bank, e.g. annuity payments, this field will be used for the number used by the bank for the set up of the member’s banking details. In the case of Barclays this is known as the Line Sheet Number. |
|
Status |
The status of the account holder validation, e.g. NOT VALIDATE, VALIDATED, REJECTED, USER VALIDATED, etc.
When any of the fields on the bank account record are updated, the status field will be updated to NOT VALIDATED.
Only needed if BANK INTERFACE is LDC.
Note: The account holder validation (AHV) via LDC only validates account numbers for ABSA, First National Bank (FNB) and Standard Bank (SBSA). Where the account is held at any other bank, the status will be able to be updated to MANUAL VALIDATE and the user ID of the person who updated the status will be displayed. The authorizer can take this into account when checking the status of the account. |
|
Registration Status |
The FICA registration status of the bank account. |
|
SWIFT Bank ID Code |
Society for Worldwide Interbank Financial Telecommunication Bank Identifier Code.
Note: This field is 15 characters long and can be alphabetical or numerical. |
|
Foreign Payment Cut-Off Time |
The cut-off time for foreign currency payments. |
Note:
When a new Bank Account is added for a Corporate Client who is linked to a scheme that is a Main Umbrella scheme, the Bank Account will automatically be added to all of the sub-schemes.
You can list all the limits for the selected bank accounts for a client. There is a facility to capture and update account limit details.
From the JU1CN Bank Account List screen select Account Limit List from the sub-menu on the left
![]()
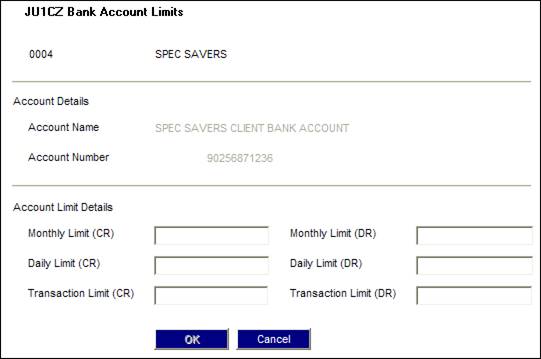
The JU1CZ Bank Account Limits screen will be displayed.
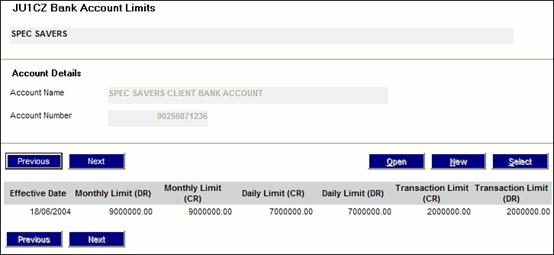
The following options are available:
|
|
Allows the user to select an occurrence from the listbox when function enabled. Returns to the relevant calling procedure (function disabled here). |
|
|
Flows to the New Corporate Client Bank Account Limit dialog box to capture the new account limit detail. |
|
|
Flows to the Corporate Client Bank Account Limit Details dialog box to update existing account limit details. |
From the Corporate Clients Bank Account Limit List screen, click![]() . The JU1CZ Bank Account Limits screen will be displayed.
. The JU1CZ Bank Account Limits screen will be displayed.
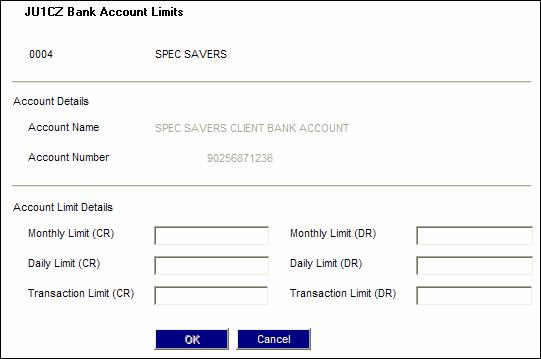
Descriptions of the input fields on this screen appear below.
|
Corporate Client |
External Organisation Unit Code supplied by the client and the client's legal name |
|
Account Details |
Account Holder and Account Number |
|
Effective Date |
The date on which the limits take effect |
|
Account Limit Details |
|
|
Monthly limit (CR) |
Account Limit Credit value |
|
Monthly limit (DR) |
Account Limit Debit value |
|
Daily Limit (CR) |
Account Limit Credit value |
|
Daily Limit (DR) |
Account Limit Debit value |
|
Transaction limit (CR) |
Account Limit Credit value |
|
Transaction limit (DR) |
Account Limit Debit value |
You can specify the client’s address/es and contact details. There are facilities to capture and update client address and contact details.
From the JU1AP Corporate Client screen, select Client Address from the sub-menu on the left.
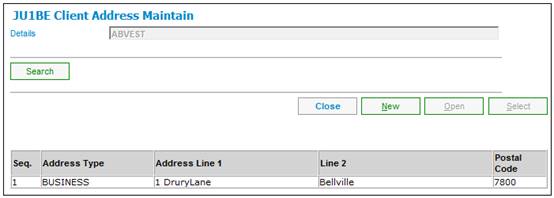
The JU1BE Client Address Maintain screen will be displayed.
Descriptions of the input fields on this screen appear below.
|
Client Details |
The client’s name |
|
Sequence |
The sequence number of the client’s address i.e. second of three. |
|
Address Type |
An indication of the type of address (e.g. member, foreign bank, etc.) |
|
Address Line 1 |
The first line of the address |
|
Address Line 2 |
The second line of the address |
|
Postal Code |
The postal code for the Client’s address |
The following options are available:
|
|
Flows to the New Client Address Detail dialog box to record details of the client addresses. |
|
|
Flows to the New Client Address Detail Update dialog box to update client address details. |
From the JU1BE Address Maintain screen, click![]() . The Client Address Detail screen will be displayed.
. The Client Address Detail screen will be displayed.
Descriptions of the input fields on this screen appear below.
|
Address Type |
Select a value from the drop-down list, e.g. Business, Postal or Residential.
If each address type is different, a new Client Address Detail screen must be opened for each address type that is different. |
|
Last Updates Timestamp |
Once details have been captured, the system will store the timestamp of the date created or last updated. |
|
Address Lines 1 to 5 |
Lines of address detail |
|
Country |
To select a country, click |
|
Postal Code |
Postal code |
|
Address Status |
If applicable, select a value from the drop-down list. Current values are: - Mail Returned - Other Location |
|
Telephone Lines: |
|
|
Country code |
The international country code for the client’s telephone, fax, cellphone or pager numbers |
|
Area code |
The local area code for the client’s telephone, fax, cellphone or pager number |
|
Number |
The clients telephone, fax, cellphone or pager number |
|
E-mail Addresses: |
|
|
Identifier |
The identifier (email address) for 3 electronic addresses |
|
Description |
The description for the identifier (e.g. home email) |
|
Effective Date |
The date from which the client address record is effective. |
|
Discontinue Use |
Tick the box to indicate that the use of this set of client address details has been discontinued. |
|
Preferred Communication |
Select which of the addresses is the preferred address to which all communication should be addressed from the drop-down list. E.g. Business Address, Private Address. |
You can record pay centre details where the client is a participating employer in a scheme, and where this is required.
From the JU1AP Corporate Client screen, select Pay Centres from the sub-menu on the left.
The JU1CF Corporate Client Pay Centre List screen will be displayed.
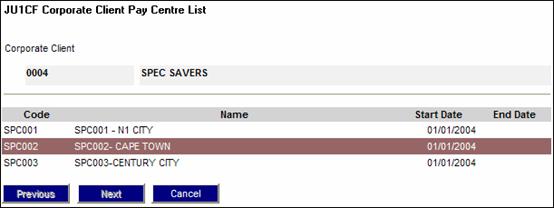
The following options are available:
|
|
Allows the user to select an occurrence from the list box when function enabled. Returns to the relevant calling procedure (function disabled here). |
|
|
Flows to the JU1CF New Corporate Client Pay Centre List dialog box to create a new pay centre. |
|
|
Flows to the JU1CF Corporate Client Pay Centre Details dialog box to update Pay Centre Details. |
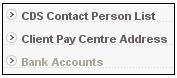
|
(CDS = Client Data Site) |
Flows to the Contact Person screen to record details of the contact person. |
|
|
Flows to the Address Maintain screen |
|
|
Flows to the JU1CN Pay Centre Bank Account screen. |
On the JU1CF
Corporate Client Pay Centre List screen, click ![]() . The JU1CF New Corporate Client Pay Centre
screen will be displayed.
. The JU1CF New Corporate Client Pay Centre
screen will be displayed.
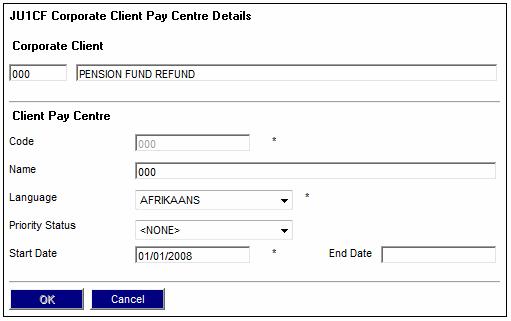
Descriptions of the input fields on this screen appear below.
|
Corporate Client |
External organisation unit code supplied by the client and the client's legal name |
|
Code (Client Pay Centre) |
Pay Centre Code |
|
Name (Client Pay Centre) |
Pay Centre legal name |
|
Language (Client Pay Centre) |
The language in which this pay centre operates. |
|
Priority Status |
Select a value from the drop-down list.
Current Values are: High, Normal. |
|
Start Date (Client Pay Centre) |
Date Pay Centre became effective |
|
End Date (Client Pay Centre) |
Date Pay Centre was discontinued from use |
From the JU1CF Corporate Client Pay Centre List screen select CDS Contact Person List from the sub-menu on the left.
The JU1CP Contact Person screen will be displayed.
The following options are available:
|
|
Allows the user to select an occurrence from the listbox when function enabled. Returns to the relevant calling procedure (function disabled here). |
|
|
Flows to the Contact Person Details dialog box to create a new contact person for the selected pay centre. |
|
|
Flows to the Contact Person Details dialog box to update role details. |
From the JU1CP Contact Person screen, click![]() . The JU1CP Contact Person Details screen will be displayed.
. The JU1CP Contact Person Details screen will be displayed.

Descriptions of the input fields on this screen appear below.
|
Person Details |
|
|
Surname |
Surname of the contact person - use List button to flow to the Client List screen |
|
First Name |
First name of the contact person. |
|
DOB |
Date of birth of the contact person. |
|
Initials |
Initial of the contact person. |
|
Title |
Title of the contact person. |
|
Language |
The language of the contact person for communication purposes. |
|
Role Details |
|
|
Contact Person Role |
The particular role and responsibility of the contact person |
|
Start Date |
The start date for the details of the contact person. |
|
End Date |
The end date for the details of the contact person. |
You can record corporate client details where the corporate client is a contact person in a scheme, and where this is required.
From the JU1AP Corporate Client screen, select Contact Persons from the sub-menu on the left.
The JU1CP Contact Person screen will be displayed.
The following options are available:
|
|
Allows the user to select an occurrence from the listbox when function enabled. Returns to the relevant calling procedure (function disabled here). |
|
|
Flows to the Contact Person Details dialog box to create a new contact person. |
|
|
Flows to the Contact Person Details dialog box to update contact person details. |
See previous section on contact person for the process.
To electronically upload a document, select Document Load from the sub-menu on the left.
The Document Upload screen will be displayed.
Click ![]() alongside File Type, then select the
required type of file to be uploaded from the drop-down list.
alongside File Type, then select the
required type of file to be uploaded from the drop-down list.
Note:
This may be documents linked to a Participating Employer level under either Products or Scheme List.
Capture any free form text about the document being uploaded in the Comment field.
Use ![]() to find the document to be uploaded, then
click
to find the document to be uploaded, then
click ![]() . A message will confirm that the file has been
successfully uploaded.
. A message will confirm that the file has been
successfully uploaded.
To view a document that has been electronically upload, select View Document from the sub-menu on the left.
The Documents Uploaded screen will be displayed.
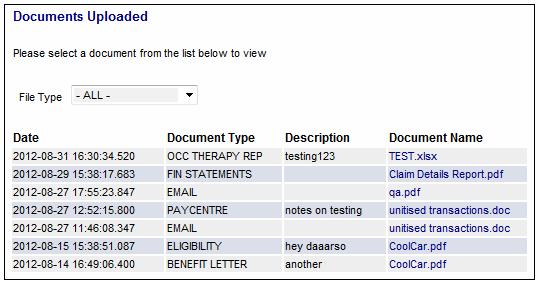
This screen displays any documents already uploaded.
Click ![]() alongside File Type, then select the
required type of file to be viewed from the drop-down list. A list of documents
previously uploaded will be displayed for the File Type selected.
alongside File Type, then select the
required type of file to be viewed from the drop-down list. A list of documents
previously uploaded will be displayed for the File Type selected.
Click the hyperlinked document name to view the document.