Benefit statements are produced per member, and display the values of the members' benefits. The batch run generates member benefit statements for each member of the selected scheme.
If the Report is for the Main Umbrella Scheme, the data will be extracted per Sub Umbrella Scheme linked to the Main Umbrella Scheme, and displayed in one report.
Reports can be printed in bulk (i.e. for multiple members), or individually.
Note:
Where there are more than a pre-determined number of benefit statements (e.g. 200), you have the option of viewing them via the browser, or creating them on the application server, from where they can be viewed and printed. Large benefit statement files that are created on the application server will be split into smaller files (e.g. 5000 benefit statements per file).
The benefit statements are generated by a batch run. The process involves four distinct steps:
- schedule the batch run
- submit the batch run job
- monitor the progress of the batch run
- view the report
These steps are described elsewhere in the manual. For details, refer to Batch Runs under
IN.pensions User Manual
Help
Scheme Reports
Overview
Note:
When calculating the fund values for benefit statements:
- if the pricing method defined for the investment medium is “Same Day”, then the system will calculate the market value of the number of units using the unit price with an Effective Date equal to the Benefit Statement Date.
- if the pricing method defined for the investment medium is “Forward”, then the system will calculate the market value of the number of units using the unit price with an Effective Date equal to the next working day immediately after the Benefit Statement Date.
- if the pricing method defined for the investment medium is “Historic”, then the system will calculate the market value of the number of units using the unit price with an Effective Date equal to the first working day prior to the Benefit Statement Date.
This includes the calculation for Fund Value and the Fund Value Summary.
For information on scheduling and submission of the batch run for this report, refer to
IN.pensions User Manual
Help
Infrastructure
Batch
Create a new batch run, or change the parameters of an existing batch run.
For information on scheduling a batch run, refer to Schedule a batch run under
IN.pensions User Manual
Help
Infrastructure
Batch
From the JAJU Batch Structure screen, select the batch group named STATEMENTS.
Specify either the FROM EFFECTIVE DATE or TO EFFECTIVE DATE values.
Specify the Report Criteria that must be used for this report.
Refer to Submit a batch run job and Monitor progress of the batch run under
IN.pensions User Manual
Help
Infrastructure
Batch
The following is the batch job to be submitted.
|
BATCHJOB10 |
Extract for Benefit Statements |
JU3AX_BenSta\Bju3axo0.bat |
Once the batch run has taken place, the report will become available.
Refer to Accessing the Reports under
IN.pensions User Manual
Help
Scheme Reports
Overview
From the Member menu, click ![]() alongside Benefit Statements on the sub-menu on the left.
Additional options will be displayed.
alongside Benefit Statements on the sub-menu on the left.
Additional options will be displayed.

This facility enables you to view benefit statements that were created prior to the release of IN.pensions Release 4.2.
Click Old below Benefit Statements.
The Benefit Statement screen will be displayed.
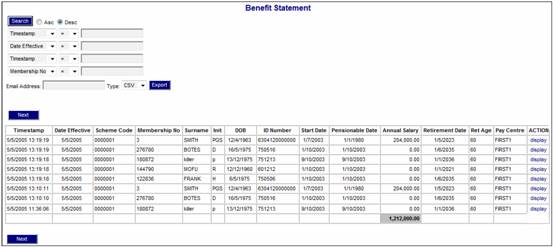
The following columns are displayed:
- Timestamp
- Date Effective
- Scheme Code
- Membership No
- Surname
- Init
- DOB
- ID Number
- Start Date
- Pensionable Date
- Annual Salary
- Retirement Date
- Ret Age
- Pay Centre
- Action
The following fields are available as search criteria:
- Timestamp
- Date Effective
- Membership No
- Surname
- Pay Centre
Refer to ![]() Searching for Records for an explanation
of the search process.
Searching for Records for an explanation
of the search process.
To view the benefit statement, click display at the end of the required line.
The Member Benefit Statement will be displayed.
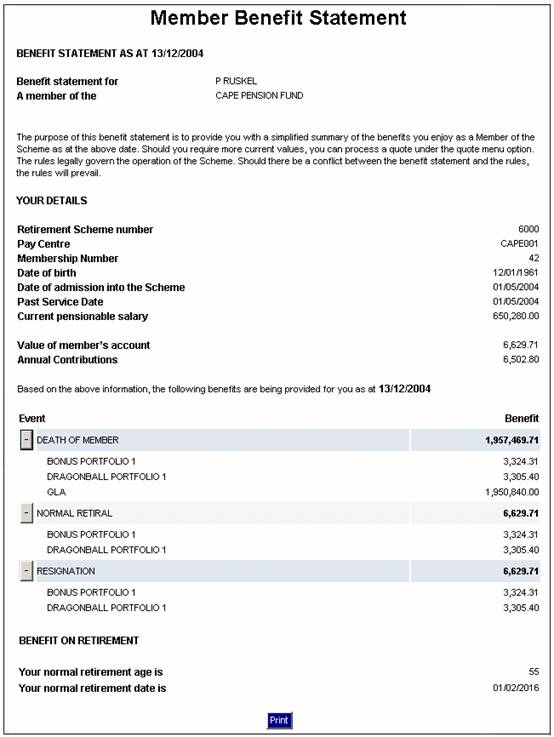
Main Umbrella Schemes
If the Report is for a Main Umbrella Scheme, the data will be extracted per Sub Umbrella Scheme linked to the Main Umbrella Scheme, and a separate extract for each sub Umbrella scheme will be displayed.
This facility enables you to view benefit statements that were created after the release of IN.pensions Release 4.2.
Click View below Benefit Statements.
The Benefit Statements screen will be displayed.
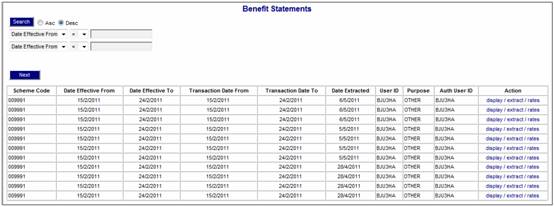
The following columns are displayed:
- Scheme Code
- Date Effective From
- Date Effective To
- Transaction Date From
- Transaction Date To
- Date Extracted
- User ID
- Purpose
- Auth User ID
- Action
The following fields are available as search criteria:
- Date Effective From
- Date Effective To
- Date Extracted
Refer to ![]() Searching for Records for an explanation
of the search process.
Searching for Records for an explanation
of the search process.
Main Umbrella Schemes
If the Report is for a Main Umbrella Scheme, the data will be extracted per Sub Umbrella Scheme linked to the Main Umbrella Scheme, and a separate extract for each sub Umbrella scheme will be displayed.
To display the benefit statement batch, click display at the end of the required line.
The Benefit Statements screen will be displayed.
The following functions can be performed from this screen:
- Create Bulk PDF files.
- Select from a list of Bulk PDF files that can be printed or saved to a file.
- Create and print benefit statements in PDF format for specific members.
The following columns are displayed on this screen:
- Timestamp
- Date Effective
- Scheme Code
- Membership Group
- Branch
- Membership No
- Company Reference Number
- Surname
- Init
- DOB
- ID Number
- Start Date
- Retirement Date
- Ret Age
- Pay Centre
- Pensionable Date
- Annual Salary
- Action
The following fields are available as search criteria:
- Membership Group
- Branch
- Membership No
- Company Reference No
- Surname
For the purpose of bulk printing, up to three of the following fields can be used as sorting criteria:
- Membership Group
- Branch
- Membership No
- Company Reference No
- Surname
Main Umbrella Schemes
If the Report is for a Main Umbrella Scheme, the data will be extracted per Sub Umbrella Scheme linked to the Main Umbrella Scheme, and a separate extract for each sub Umbrella scheme will be displayed.
To create Bulk PDF files, click ![]() .
.
Note:
When extracting large numbers of benefit
statements, you can use the search criteria and printing order features to make
the output more manageable. Refer to ![]() Searching for Records.
Searching for Records.
A confirmation message will be displayed.
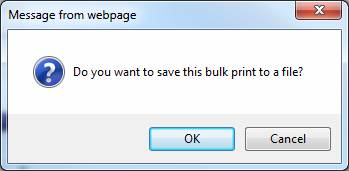
Click ![]() .
.
The Benefit Statements screen will be re-displayed, and a message will confirm that the job has been submitted successfully.
Job submitted successfully.
![]()
The file will be displayed in a list of bulk PDF files available for selection on the right side of the screen. Any PDF files already created at an earlier date will also be displayed.

The following columns are displayed for each file:
- File Name
- Date Created
- File Size
When ![]() is selected, the system will create both a zip
file and one or more PDF files.
is selected, the system will create both a zip
file and one or more PDF files.
The zip file will contain all members for all Pay Centres and all Branches.
Each PDF file will contain all members for a Pay Centre and Branch combination. If the scheme has more than one Pay Centre and / or Branch, then a separate PDF file will be produced for each Pay Centre and Branch combination.
Note:
When a hyperlinked file name is selected from the File Name column, then if the PDF file has a size greater than2.5 meg, the system will convert the data to a zip file, due to its size.
To view the contents of a PDF file, click on the hyperlinked name in the File Name column. The benefit statements for all of the Members in the same Pay Centre and Branch will be displayed.
To view the contents of a zip file, click on the hyperlinked name in the File Name column.
A list of files will be displayed for selection.
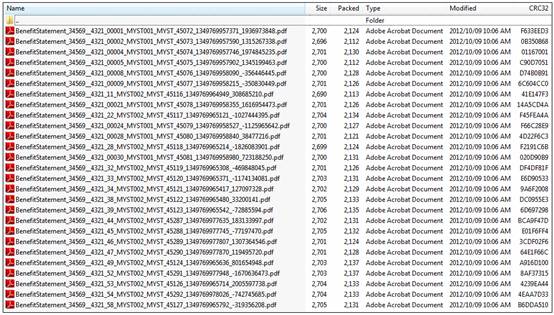
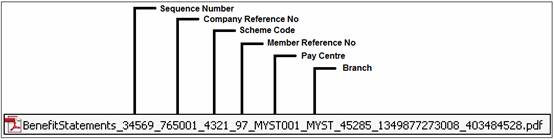
Each separate PDF file is for one member.
The following details can be identified from the file name.
The benefit statement can be printed or saved to a file from the PDF file.

To create and print benefit statements in
PDF format for specific members, click ![]() in the Action
column alongside the appropriate member.
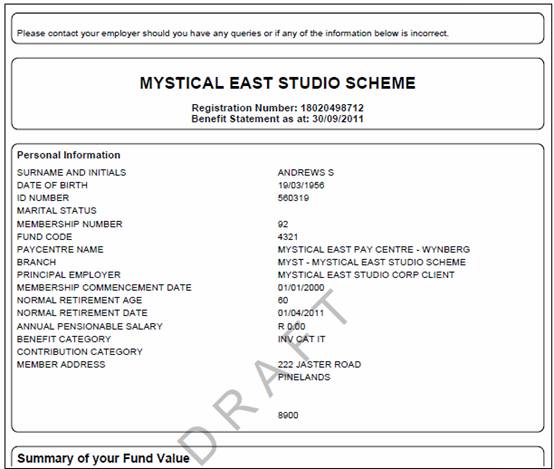
The benefit statement will be displayed (in PDF format).
in the Action
column alongside the appropriate member.
The benefit statement will be displayed (in PDF format).
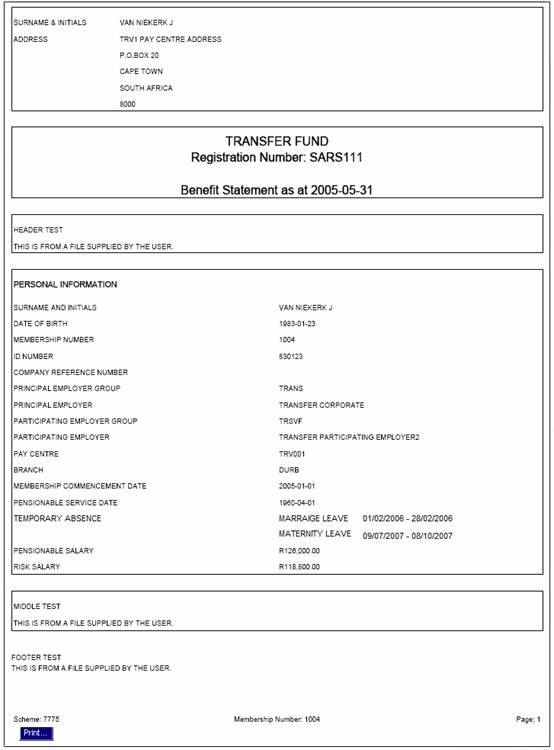
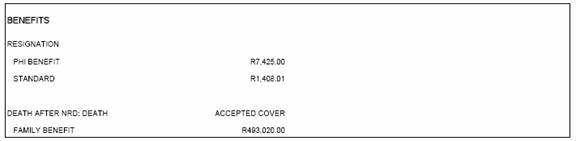
The following sections (as applicable to the individual member) will be displayed after the block of text (if any) following the Personal Information block:
Benefits
Fund Value

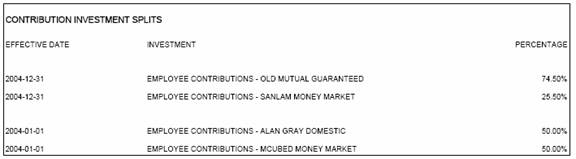
Contributions

Contribution Investment Splits
Investments

To print the statements, click ![]() . The standard Windows print options will be
displayed for selection.
. The standard Windows print options will be
displayed for selection.
Extract benefit statements to Excel
To extract the benefit statement batch, click extract at the end of the required line.
The Benefit Statements screen will be displayed.

Enter an e-mail address to which the Excel
extract should be sent, then click ![]() . A message will confirm that the extract has
been sent.
. A message will confirm that the extract has
been sent.
A separate Excel spreadsheet will be created for each of the following:
- Member details
- Contributions
- Investment transactions
- Investment splits
- Fund value investments
- Benefits
If any of the data extracts is too large for one file, multiple files will be created.
View benefit statement rates
If the Benefit Statement has bonus rates in it, a rates hyperlink will be displayed. To view the benefit statement rates used, click rates at the end of the required line.
The Benefit Statements Rates screen will be displayed.

The following columns are displayed:
- Type
- Date
- Unit Price
- Bonus Rate
- Portfolio
Enter the e-mail address to which the
report should be sent, then click ![]() . The report will be e-mailed as a CSV file.
. The report will be e-mailed as a CSV file.
This facility allows you to download the benefit statement is a CSV file.
Click File Download below Benefit Statements.
The File Download screen will be displayed.
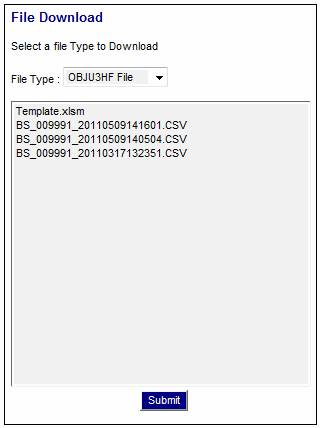
This screen displays Benefit Statements in CSV format that have been created by the batch run.
To view a Benefit Statement, select the batch run name from the File Type drop-down list.
Benefit Statements in CSV and XLS format will be displayed for selection.
Select a Benefit Statement and click ![]() to open the CSV file.
to open the CSV file.
You are able to set the font for the various sections of the benefit statement.
Click Text Font below Benefit Statements.
The Text Font Settings screen will be displayed.

Use the FONT drop-down list to select the required font, and enter the font size in the SIZE box alongside. This is done for each section of the benefit statement, as required.
Place a tick in any or all of the Bold, Underline and Italic boxes to set the font as bold underlined or italic.
Use the CASE drop-down list to select the required case.
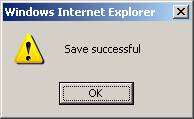
Click ![]() to save the settings. A confirmation box will be displayed.
to save the settings. A confirmation box will be displayed.
Click ![]() to revert to the last saved settings.
to revert to the last saved settings.
Note:
In the column headed PDF font, the following section of the benefit statement is Heading.

In the column headed PDF font, the following section of the benefit statement shows Detail Heading ("Benefits"), Detail Sub Heading ("Retrenchment") and Detail ("Standard – Equitable Share")..

The benefit statement text editor enables you to create and edit the text that appears at the top, middle and bottom of the benefit statements. It also enables you to add text to the various sections of the benefit statement.
This option can be used in conjunction with the facility to add free-form text to benefit statements. Refer to
![]() Auxiliary Activities
Auxiliary Activities
![]() Document Customization
Document Customization
![]() Customization
Customization
This facility enables you to set standard formatting options, e.g. font, font size, bold, underline, italics, etc.
The first time you access the editor, a blank text field will be presented. This field is used to input the text that must appear on the benefit statement. A preview facility is available for you to see the layout of the text.
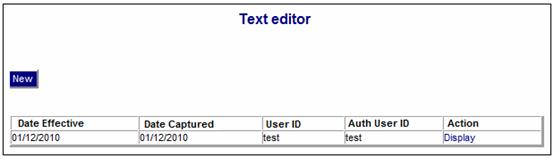
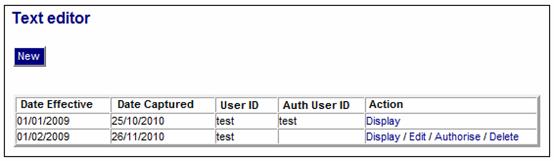
Click Text Editor below Benefit Statements.
The Text editor screen will be displayed.
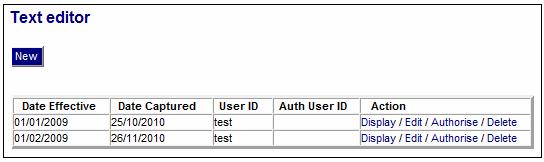
A summary of previous text created (if any) will be displayed.
The following columns are displayed:
- Date effective
- Date captured
- User ID
- Auth User ID
- Action
Add new text
To add new text, click ![]() . Date input boxes will be displayed.
. Date input boxes will be displayed.
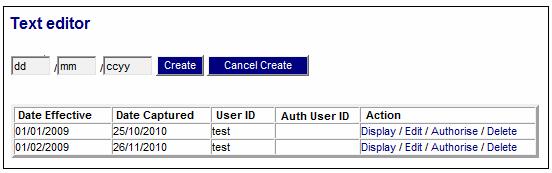
Enter the effective date of the benefit
statement, then click ![]() . The Text
Editor screen will be displayed, providing text input boxes.
. The Text
Editor screen will be displayed, providing text input boxes.
Note:
If text is being created for the first time, the text input box will be blank.
If previous text exists, the text input box will display the text that exists for the effective date immediately prior to the effective date now being created.
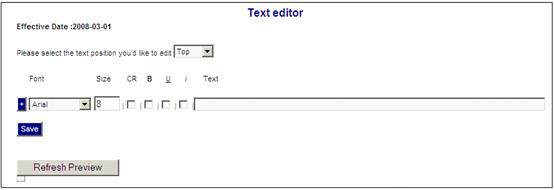
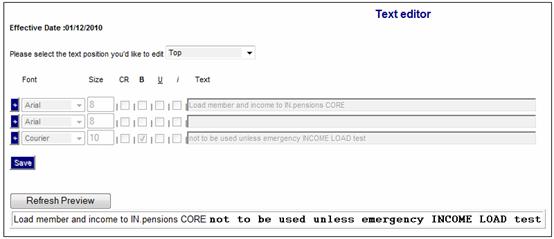
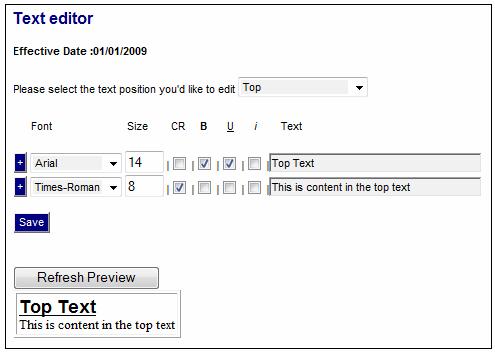
Text controls
Use the drop-down list at the top to select the section of the benefit statement for which the text is being created or edited.
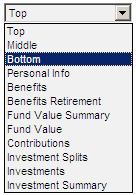
Whether or not the options available appear on the benefit statement are determined by the configuration of the benefit statement format. Refer to
![]() Schemes
Schemes
![]() Additional
Menu Options
Additional
Menu Options
![]() Formats
Formats
The layout and format of the text is controlled by the options to the left of the text field.
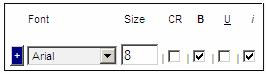
Use the FONT drop-down list to select the required font, and enter the font size in the SIZE box alongside.
Place a tick in the CR box if you want the text to start on a new line.
Place a tick in any or all of the B, U and i boxes to set the font as bold (B), underlined (U) or italic (i).
Click ![]() to open another text field.
to open another text field.
Text input
Type the
first line of text, then click ![]() . The text, with all formatting options
applied, will be displayed in a window below.
. The text, with all formatting options
applied, will be displayed in a window below.
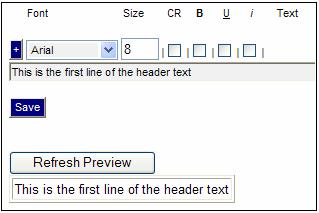
All formatting within the text field must be the same, but different formatting can be applied to each line.
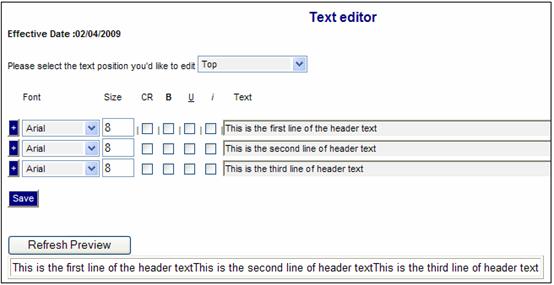
To save the text, click ![]() .
.
Text deletion
To delete
lines of text, highlight the text, then press the DELETE button on the
keyboard. Click ![]() . Text fields that are completely blank will be
removed from the screen. One blank text
field will always remain on the screen.
. Text fields that are completely blank will be
removed from the screen. One blank text
field will always remain on the screen.
Actions
Existing text can be displayed, edited and deleted. There is a facility to authorize text, and once authorized, it cannot be edited or deleted.
These actions are all initiated from the Text editor screen.
Display
To display text previously added, click Display in the Action column for the required effective date. The Text editor screen will be displayed.
This is for viewing only, and no updating can be done on this screen.
Edit
To edit text previously added, click Edit in the Action column for the required effective date. The Text editor screen will be displayed.
For details on editing this screen, refer to the Add new text section above.
Authorise
To authorise text previously added, click Authorise in the Action column for the required effective date. The following message will be displayed:
You are about to authorise the text for effective date (dd/mm/ccyy). Once authorised, no further editing will be allowed to this text. Click OK to confirm.
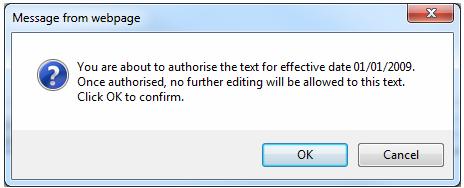
Click ![]() to remove the message and confirm the
authorisation.
to remove the message and confirm the
authorisation.
The User ID of the Authorisor will be displayed in the Auth User ID column and the Edit, Authorise and Delete hyperlinks will be removed for selection.
Delete
To delete text previously added, click delete in the Action column for the required effective date. The following message will be displayed:
You are about to delete the text for effective date (dd/mm/ccyy). Once deleted, the previously created text will be used within PDF documents if any. Click OK to confirm.
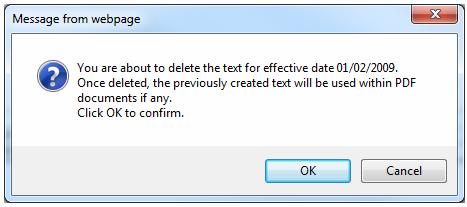
Click ![]() to remove the message and confirm the
deletion.
to remove the message and confirm the
deletion.
The text will be removed from the screen.